Table of Contents
Advertisement
Advertisement
Table of Contents

Related Manuals for Roland R-07


Summary of Contents for Roland R-07
- Page 1 Reference Guide...
-
Page 2: Table Of Contents
Contents Panel Descriptions Controlling the R-07 from a Mobile Device Main Screen Installing the App “R-07 Remote” Making Settings on the R-07 Getting Ready Making Settings on the Mobile Device Installing the Batteries Starting the R-07 Remote Supplying Power from the USB Port... -
Page 3: Panel Descriptions
Bluetooth speaker or headphones between two points (the A–B region) of a file (p. 23). When you assign an (p. 10). It is lit if the R-07 is connected to a Bluetooth speaker “A” marker and “B” marker in the file, or headphones, or when the remote playback will repeat between the “A”... - Page 4 This allows files recorded (p. 10). switch to the right to enable the HOLD on the R-07 to be transferred to your function. computer, or WAV and MP3 files from your computer to be copied to the R-07 If you leave HOLD on, operation is for playback.
-
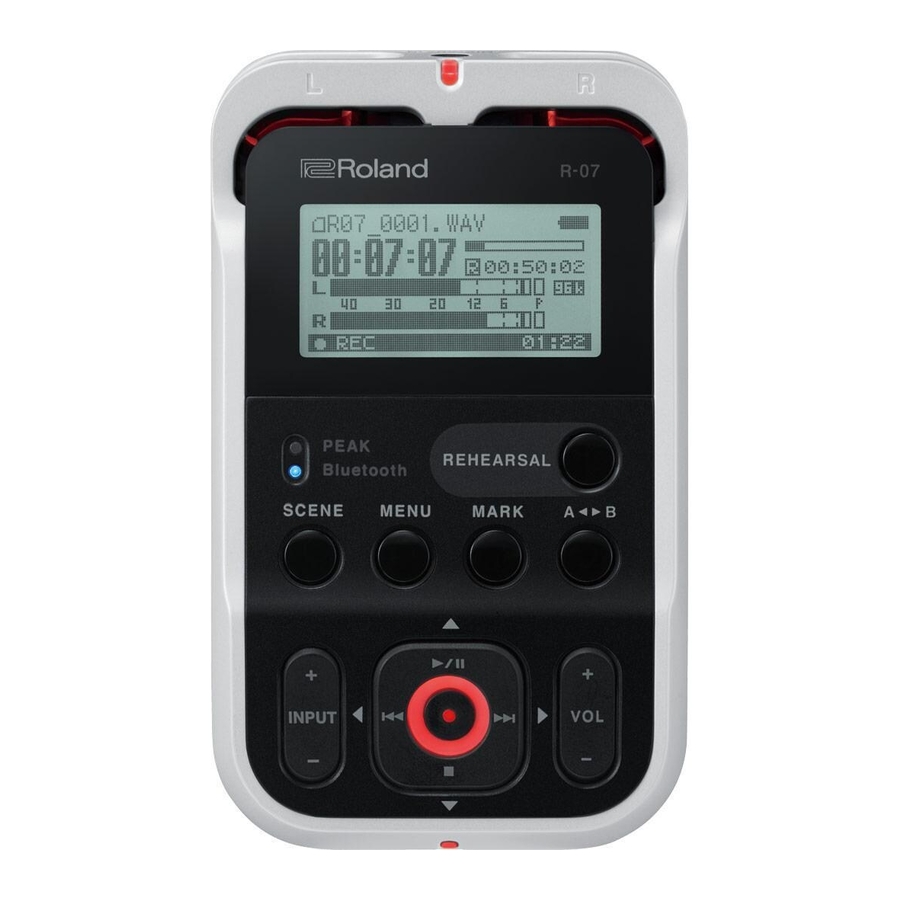
Page 5: Main Screen
Panel Descriptions Main Screen Here we’ll explain the principal icons and information shown in the main screen. Playing / Stopped Song name Power supply status (USB /batteries Elapsed playback time Song length Sampling rate of the song being played Output level Peak Current time Play/stop status (PLAY/STOP) -
Page 6: Getting Ready
5 Do not mix fresh batteries with used batteries, and do not mix – batteries of different types. 5 If you won’t be using the R-07 for an extended period of time, we recommend that you remove the batteries to prevent them Close the cover of the battery compartment. -
Page 7: Specifying The Battery Type
Continuous recording NOTE approximately 15 hours 5 The internal clock is powered by batteries. If the R-07 is left * The above battery lifespans are approximate. Battery life will for several minutes with batteries removed, the internal vary depending on environmental conditions and the method clock will return to its default state. -
Page 8: Preparing A Microsd Card
5 The R-07 supports microSD/microSDHC cards. 5 Some microSD card types or memory cards from some manufacturers may not record or play back properly on the R-07. 5 Never insert or remove an microSD card while this unit’s power is on. Doing so may corrupt the unit’s data or the data on the microSD card. -
Page 9: Formatting A Microsd Card
R-07. NOTE 5 You must format the microSD card on the R-07 itself. A microSD card formatted on a device other than the R-07 might not work correctly in the R-07. -
Page 10: Using Headphones Or Speakers
You’ll need to use speakers that have a built-in amplifier. Use [ ]/[ ] to select “Connect Audio” and then Use an audio cable to connect the R-07’s PHONES jack to the line press [ ]. input jacks of your speaker system. - Page 11 Getting Ready Disconnecting a Bluetooth device Use this procedure when you want to switch to a different Bluetooth device. Press [MENU] to access the “Menu” screen, use ]/[ ] to select “Bluetooth,” and then press [ ]. Use [ ]/[ ] to select “Disconnect Audio” and then press [ ].
-
Page 12: Recording
“File Name” (p. 39). Press [ ] to play back the recorded file. Switch on the R-07’s power (p. 6). For details, refer to “Basic Playback Operation” (p. 22). Recall the settings that are most appropriate for your specific recording situation (p. 13). -
Page 13: Recalling Settings For Specific Purposes
Recording Recalling Settings for Specific Purposes The R-07 provides settings that are suitable for various recording situations. These settings are called “scenes. ” Press [SCENE] to access the “Scene” screen, and use [ ] to change the Scene setting. Scene... -
Page 14: Specifying The Recording Quality
5 If you are recording audio material that you’ll be editing into a video production, we recommend that you use the 48.0 kHz sampling rate. 5 The R-07 is not able to convert the sampling rate of a Use [ ]/[ ] to move the cursor to Rec Mode recorded file. -
Page 15: Approximate Recording Times
Recording Approximate Recording Times The following table shows the approximate recording times that a microSD card will allow. Recordable time (approximate) Units: minutes microSD card capacity Rec Mode 2 GB 4 GB 8 GB 16 GB 32 GB WAV (24 bit/96 kHz) WAV (24 bit/88.2 kHz) WAV (24 bit/48 kHz) 1800... -
Page 16: Using Limiter Or Agc
Recording Using Limiter or AGC Cutting the Low-Frequency Range The limiter setting gives you three choices: “ON” to use the limiter, If low cut is set to anything other than “OFF, ” the low-frequency “AGC” to use Auto Gain Control, or “OFF” to use neither. Normally range below the specified frequency is cut. -
Page 17: Adjusting The Input Level
MEMO The R-07 is designed to let you record a wide range of sounds. By adjusting the input level (volume) appropriately for the source If the recording mode is set to 2xWAV- (dual-level recording), you’re recording, you’ll be able to record with optimal quality. -
Page 18: Using The Rehearsal Function
Using the Pre-Rec Function You can use the rehearsal function to automatically set the The R-07 provides a Pre-Rec function that lets you capture the appropriate recording level based on the audio that is input two seconds of sound that preceded the moment you press [ ]. -
Page 19: Recording Instruments Or Vocals
The built-in mics are stereo. devices, always turn down the volume, and turn off the The mic on the right side of the R-07 will record the right (R) power on all devices before making any connections. channel, and the mic on the left side will record the left (L) channel. -
Page 20: Recording From A Cassette Or Cd
In addition to recording instrumental performances or voice plug-in power supply. memos via a mic, the R-07 lets you use the MIC/AUX IN jack to record sound from a cassette or CD. Press [MENU] to access the “Menu” screen, use ]/[ ] to select “Input,”... -
Page 21: Assigning A Marker During Recording
5 With some microSD cards, there are rare cases in which the marker. recording is interrupted. 5 When carrying out playback on the R-07, it is not possible to Splitting the File During Recording play back without an interruption between the preceding and following files;... -
Page 22: Playback
(play in order) If the display indicates “No Song, ” the current folder contains SHUFFLE (shuffle play) no files that the R-07 can play back. If the display indicates “No Card, ” no microSD card has been Use [ ]/[ ] to move the cursor to Repeat setting, inserted. -
Page 23: Assigning Markers In A File
Playback Assigning Markers in a File Repeatedly Playing a Portion of a File You can assign markers to the desired locations in a WAV file, and The AB Repeat function lets you repeatedly play a specified then jump easily to those locations. portion of a file. -
Page 24: Changing The Playback Speed
Not available for 88 2 kHz or 96 0 kHz sample rates You can make the playback faster or slower without changing the You can apply reverb when playing back a file on the R-07. The pitch. reverb effect simulates the reverberation that is characteristic of a performance in a large hall or other space. -
Page 25: Changing The Reverb Depth
Changing the Reverb Depth Types of Files that Can be Played Specifies the depth of reverb. The R-07 can play back the following types of files. Press [MENU] to access the “Menu” screen, use Sampling rate (kHz) Sample size (bits) ]/[ ] to select “Player,”... -
Page 26: Controlling The R-07 From A Mobile Device
From the web browser of your mobile device, Start the R-07 Remote. access the following URL. If you are starting the R-07 Remote for the first time, or if you have http://roland cm/r-07 initialized the R-07’s settings, tap the R-07 that appears. - Page 27 Controlling the R-07 from a Mobile Device Synchronizing the time with the mobile device When the “R-07 Remote” app is connected to the R-07, you can automatically synchronize the R-07’s time with the mobile device’s time. Don’t synchronize the time Date &...
-
Page 28: Using The Metronome
Using the Metronome Using the Metronome by Itself Sounding the Metronome During Recording You can listen to the metronome via the preview monitor or through headphones while you practice your instrument. You can listen to the metronome through headphones when in Press [MENU] to access the “Menu”... -
Page 29: Using The Tuner
Using the Tuner Two types of tuners, each having a different type of display, are Tuner provided: a tuner that’s convenient for tuning an instrument, and a graphic tuner that’s useful for vocal or brass instrument practice. Both tuners let you choose either Auto, which automatically This tuner provides a convenient way to tune your instrument. -
Page 30: Graphic Tuner
Using the Tuner Graphic Tuner This tuner graphically shows the pitch change in real time. It is a convenient way for you to practice singing or playing a wind instrument with a stable pitch. Press [MENU] to access the “Menu” screen, use ]/[ ] to select “Graphic Tuner,”... -
Page 31: Connecting To Your Computer
Connecting to Your Computer By using a USB cable to connect the R-07 to your computer, you display will show the “Now connecting” screen. can transfer files from the R-07’s microSD card into your computer and use them in your music software. You can also transfer files from your computer to the R-07 and play them back on the R-07. -
Page 32: Handling Files And Folders
Handling Files and Folders The R-07 stores audio files on the microSD card. Basic Operation The “Finder” screen provides various functions for listing, deleting, or copying these files. You can also create folders and move files between folders to manage your data. -
Page 33: Opening A File Or Folder
Converts a WAV file into MP3. p. 36 Repairs the file. Repair p. 37 * This menu item is shown only if the R-07 has detected a damaged file. Select Selects the folder and moves to the main screen. p. 33 Information Shows information about the folder. -
Page 34: Deleting A File Or Folder
5 If you select “Root, ” the file will be moved to the top level If you decide to cancel, press [MENU] before you press [ ]. (the root folder) of the R-07’s card. If you select a folder, the Press [MENU] twice to return to the main screen. -
Page 35: Dividing A File
Handling Files and Folders Dividing a File Combining Files In the “Finder” screen, select a file. In the “Finder” screen, select a file. Choose “Divide.” Choose “Combine.” Use [ ]/[ ] and [ ] to play, fast-forward, Select the file that will be combined with the and rewind through the file to find the point at currently selected file. -
Page 36: Deleting Unwanted Portions Of A File (Trim)
Handling Files and Folders Deleting Unwanted Portions of a File Creating an MP3 File (Trim) Not available for 88 2 kHz or 96 0 kHz sample rates In the “Finder” screen, select the WAV file that you In the “Finder” screen, select a file. want to convert to MP3. -
Page 37: Repairing A File
]/[ ] to select Root, and press [ ]. In the “Finder” screen, select a file. Choose “Repair.” This menu item is shown only if the R-07 detects a damaged file. When the confirmation message appears, press [ ]. To create a folder within a folder... -
Page 38: Settings For The
Settings for the R-07 Press [MENU] to access the “Menu” screen, use In the “Menu” screen you can make various settings for the R-07 itself, such as settings for recording and playback, and the date ]/[ ] to choose the desired settings category, and time. - Page 39 Connects paired Bluetooth headphones or speakers with the R-07 Connect Audio – (p. 10). Disconnect Audio Disconnects connected Bluetooth headphones or speakers. – Makes preparations for using the “R-07 Remote” app to control the Remote Control – R-07 (p. 26). Category: Display Menu item Effect...
- Page 40 Use this to check pitch changes during vocal or brass instrument practice (p. 30). Category: Factory Reset Resets the R-07 to the factory-set condition. The state of connection with a Bluetooth device or mobile device is also reset. You’ll need to make the connection again.
-
Page 41: Error Messages
Over 2GB Writing to the microSD card could not be performed fast enough. Please use a microSD card that is known to work with the R-07. In some cases, repeated writing and deleting of files may cause SD Card Slow the files to become fragmented on the microSD card, impairing the processing capability. -
Page 42: Troubleshooting
17 too low. Set the recording level appropriately. The R-07 records in stereo. If you connect a mono mic, a stereo file with the same Recording with a mono mic creates a stereo sound on left and right (L, R) tracks will be created even if EXT Mic Type is set to p. -
Page 43: Problems With Bluetooth Functionality
Page Check whether the Bluetooth device is able to connect. If the Bluetooth device is too far away from the R-07, it might be unable to connect. Can’t connect with Bluetooth headphones or Place the Bluetooth device near the R-07. - Page 44 25 file MP3, or if the file is of a large size. This occurs because the R-07 needs to determine whether it is able to play the file. If you’re monitoring the recording through open-air type headphones, acoustic Feedback occurs when monitoring through feedback might occur if the R-07’s mics pick up the sound from your headphones.
-
Page 45: Main Specifications
Main Specifications High Resolution Audio Recorder: R-07 Data Type [For Recording] * Stereo only Recorder Part WAVE: Sampling Rate 44.1/48/88.2/96 kHz Tracks Bit Depth 16/24 bits 2 (stereo) MP3 (MPEG-1 Audio Layer 3): 4 (stereo x2) * WAVx2 recording mode only Sampling Rate 44.1/48 kHz... - Page 46 Bluetooth Binaural Microphones / Earphones: CS-10EM Stereo Microphone: CS-15S R-07 Remote: Bluetooth technology: Bluetooth Ver 4.0 * This document explains the specifications of the product at the Audio transmission: Bluetooth technology: Bluetooth Ver 3.0 time that the document was issued. For the latest information, Transmitting Power: Specification Power Class 2 (Line of sight refer to the Roland website.
Need help?
Do you have a question about the R-07 and is the answer not in the manual?
Questions and answers