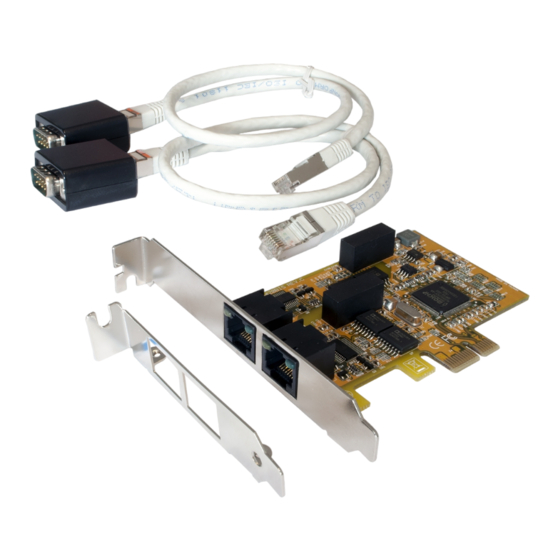
Advertisement
Available languages
Available languages
Quick Links
CONNECTORS
RJ45 Pin#
1
RJ45:
DB 9:
2
3
4
5
8
1
6
7
8
-
HARDWARE INSTALLATION
If you are ready with the jumper settings, please proceed with the following installation instructions.
Because there are large differences between PC's, we can give you only a general installation
guide.
Please
refer
to
your
computer's
reference
1.
Turn off the power to your computer and any other connected peripherals.
2.
Remove the mounting screws located at the rear and/ or sides panels of your Computer and
gently slide the cover off.
3.
Locate an available expansion slot and remove its covers from the rear panel of your comput-
er. Make sure it is the right expansion slot for the card (see card description)
4.
Align the card with the expansion slot, and then gently but firmly, insert the card. Make sure
the card is seated and oriented correctly. Never insert the card by force!
5.
Then connect the card with a screw to the rear panel of the computer case.
6.
Connect now the two Cat.6 Netware cable to the RJ45 connector. Then you connect the
RJ45 to 9 pin adapter.
7.
Gently replace your computer's cover and the mounting screws.
DRIVER INSTALLATION
Windows
After completing the hardware installation, the operating system will automatically the card and
install this! If the driver should not be installed automatically, insert the driver CD into you CD-
ROM drive (eg drive D:) and then open the folder „IO/MOSCHIP/MCS99xx". Please select the
folder with your operating system and install the driver (see Picture). Follow the hardware
assistant and finish the installation. Important! Restart your PC in any case after installing the
drivers.
5
DRIVER INSTALLATION
CHECK INSTALLED DRIVER
Signals
DB9M Pin#
Open the >Device manager<. Now you should see at „Ports (COM & LPT)" and at
DSR
6
„Multifunction Adapter" the following new entry's:
RTS
7
GND
5
TXD
3
RXD
2
DCD
1
CTS
8
DTR
4
If you see this or a similar information the device is installed correctly.
RI
9
CHANGE PORT NUMBER
If you like to change the port number for example COM3 to COM5, open the „Device Manager"
click at „COM3", „Settings" and then „Advance". There you can change between COM3 till
COM256.
Windows Server 20xx
manual
whenever
in
doubt.
After completing the hardware installation, the operating system will automatically the card and
install this! If the driver should not be installed automatically, insert the driver CD into you CD-
ROM drive (eg drive D:) and then open the folder „IO/MOSCHIP/MCS99xx". Please select the
folder with your operating system and install the driver (see Picture). Follow the hardware
assistant and finish the installation. Important! Restart your PC in any case after installing the
drivers.
Use the following driver for the following Windows Server Version.
Windows Server 2003
Windows Server 2008
Windows Server 2008R2 =
Windows Server 2012
Windows Server 2012R2 =
CHECK INSTALLED DRIVER
Open the >Device manager<. Now you should see at „Ports (COM & LPT)" and at
„Multifunction Adapter" the following new entry's:
If you see this or a similar information the device is installed correctly.
CHANGE PORT NUMBER
If you like to change the port number for example COM3 to COM5, open the „Device Manager"
click at „COM3", „Settings" and then „Advance". There you can change between COM3 till
COM256.
MS-DOS
Please read the manual on the driver CD. You will find the manual in the following folder
„IO/MOSCHIP/MCS99xx/DOS".
LINUX
The required Linux driver are located in the following directory
=
XP Driver
=
VISTA Driver
Windows 7 Driver
=
Windows 8.x Driver
Windows 10 Driver
„IO/MOSCHIP/MCS99xx/Linux".
6
EX-44352IS-4K
Anleitung
Vers. 1.0 / 21.12.16
AUFBAU
9 Pin Stecker
S2: 4KV Isolierter RJ45
Seriell Anschluss
S1: 4KV Isolierter RJ45
Seriell Anschluss
BESCHREIBUNG & TECHNISCHE DATEN
Die EX-44352IS-4KV ist eine PCI-Express serielle RS-232 Karte mit 2 seriellen FIFO 16C550
Ports, für den Anschluss von High-Speed seriellen RS-232 Peripherie Geräten (z.B. Terminal,
Modem, Plotter usw.). Die EX-44352IS-4KV unterstützt 15KV ESD Surge Protection auf allen
Leitungen und Optical Isolation von 4KV. Der serielle PCI-Express Bus unterstützt dabei optimal
die Leistung des schnellen 16C550 Chipset mit 256byte FIFO Cache. Die Karte gewährleistet
so eine sichere Datenübertragung und exzellente Performance von bis zu 115,2KBaud/s! Sie
unterstützt alle PCI-Express Slots von x1 bis x16. Es ist nicht möglich die I/O Adressen und
Interrupts manuell einzustellen, da die Einstellungen der Karte vom System (BIOS) und vom
Betriebssystem automatisch vorgenommen werden.
Kompatibilität:
PCI-Express x1 bis x16
Betriebssysteme:
Windows DOS/ 2000/ XP/ Vista/ 7/ 8.x/ 10/ Server 20xx/ Mac/ Linux
Anschlüsse:
2x RJ45 auf 9 Pin Seriell Anschluss
Lieferumfang:
EX-4352IS-4KV, 2x Cat.6 Netzwerk-Kabel,
2x Adapter RJ45 auf 9 Pin, Treiber CD, Anleitung
Zertifikate:
CE / FCC / RoHS / WEEE
DE97424562 / WHQL
LED & ANSCHLÜSSE
LED:
TXD LED
RXD LED
(Gelb)
(Grün)
1
Advertisement

Summary of Contents for Exsys EX-44352IS-4K
- Page 1 EX-44352IS-4K CONNECTORS DRIVER INSTALLATION CHECK INSTALLED DRIVER RJ45 Pin# Signals DB9M Pin# Anleitung Open the >Device manager<. Now you should see at „Ports (COM & LPT)“ and at RJ45: DB 9: „Multifunction Adapter“ the following new entry's: Vers. 1.0 / 21.12.16 AUFBAU If you see this or a similar information the device is installed correctly.
- Page 2 Steckplatz ein. Stellen Sie sicher das es sich um den richtigen Windows Server 2003 XP Treiber The EX-44352IS-4K is a plug & play high-speed serial RS-232 expansion card for the PCI- Steckplatz handelt! (siehe Kompatibilität unter technische Daten) Windows Server 2008 VISTA Treiber Express Bus.


Need help?
Do you have a question about the EX-44352IS-4K and is the answer not in the manual?
Questions and answers