Advertisement
Quick Links
QUICK USER GUIDE
!!! Please refer to our website: www.geemarc.com for an up to date user guide, as
there may be important updates and changes you need to be aware of !!!
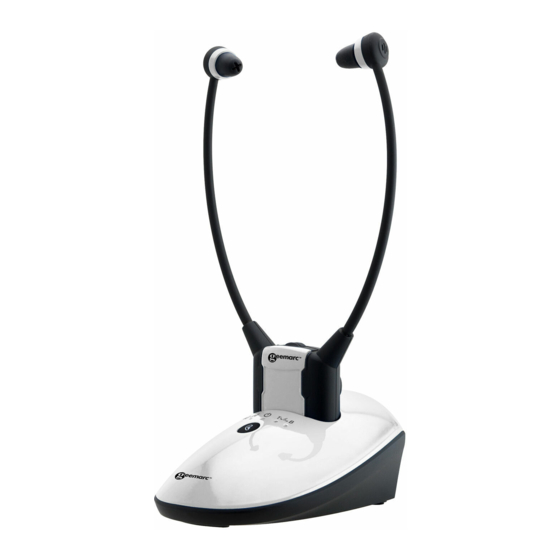
PACK COMPONENTS
Description
Headset Receiver
FRONT
REAR
Function Identification: Charging Cradle
REAR
INTRODUCTION
The Geemarc Wireless Audio Listener is an audio amplification system specifically
designed for people with hearing difficulties.
The Geemarc Audio Listener can be used with all kinds of audio systems for
interference - free listening enjoyment – TV set, Smartphone, DVD player, CD
player, Hi-Fi system, etc.
Audio output from a TV or audio device is transmitted by the Charging Cradle, the
wireless receiver receives the signal and amplifies the audio sound for the listener.
● The listener's comfort and long-term enjoyment has been built into every feature
of the Geemarc Wireless Audio Listener:
● Rich, adjustable audio quality:
o Broad audio bandwidth;
o Adjustable bass, treble and balance to compensate for hearing loss.
● Up to 25 meters transmit-receive range keeps you within hearing distance all over
the house and garden;
● Auto-tune button on your Receiver–tune in for the best sound exactly where you are;
(A1) TV Headset Receiver
(A2) Charging Cradle and
Transmitter
(A3) Power Supply
(A4) Optical Cable
(A5) Audio Cable (both ends
with 3.5mm stereo plug)
(optional)
(A6) RCA Adapter Cable
(optional)
(B1) Earbuds
(B2) Volume Control
(B3) Power/Signal LED
Indicator
(B4) Mute Button for Verbal
Communications
(B5) Microphone
(B6) Auto Tune Button for
Frequency Channel
(B7) Sound Balance Control
(B8) Power On/Off Switch
(B9) Battery Contact
(C1) Charging Pins
(C2) Tone Adjustment
(C3) LED Indicator: Battery
Charge (Red = charging,
Green = fully charged)
(C4) LED Indicator (Green):
Audio Signal
(C5) LED Indicator (Green):
Power
(C6) LED Indicator (Yellow):
Treble enhanced
(C7) LED Indicator (Blue):
FRONT
Bass enhanced
(C8) Audio In
(C9) Frequency Channel
Selector (CH1 or CH2)
(C10) Optical In Socket
(C11) Power ON/OFF
(C12) DC In Socket
1
● Listen and keep in touch with your surroundings:
o Multiple Receivers can be paired with one Charging Cradle;
o Single-touch Mute function switches the Audio Listener into a conversation assistant
enabling you to talk with and listen to the people around you with the receiver on,
taking advantage of its built-in audio amplifier to hear everything better.
● Up to 6 hours of rechargeable battery life per full charge – never lose the soundtrack
in mid-program;
● Only 3 hours to fully recharge the Receiver simply by replacing the Receiver in its
Charging Cradle.
INSTALLATION
Transmitter
(D1) Connect the Power Supply to the DC IN Socket located on the Charge Cradle
rear panel.
(D2) Connect the Power Supply to an electricity socket (100-240V~50/60Hz).
(D3) Connect one end of the Optical Cable to the rear panel of the Charge Cradle.
(D4) Connect the other end of the Optical Cable to your Audio Source (e.g. TV set,
Hi-Fi system) with Optical Output.
(D5) Accessories for items (D5) and (D6) in above drawing are not provided in the
pack components.
(D6) If your Audio Source does not have an optical socket, then use one of the following
Adapters (not provided in the pack components) that connects to the Audio In of
the Transmitter.
• 3.5mm to 3.5mm Audio Cable
• RCA Adapter Cable
(D7) On the rear panel of the Charging Cradle, switch the Power ON/OFF Switch to
ON. The green Power Indicator LED will glow immediately.
When the audio signal is detected from the Audio Source, the Green LED Signal
Indicator will glow constantly.
OPERATION
1. Switch on the Audio Source (TV set or audio device) that the Transmitter is connected
to. The Signal LED Indicator will glow continuously (see figure (4)).
2. Put the Ear Phone plug into the 3.5mm phone jack of TV Receiver. On the TV
Receiver, switch the ON the On/Off Switch (see figure (5)). The green signal LED
Indicator will glow continuously.
3. Adjust the Volume to the desired sound level (see figure (6)), then fit the earbuds
in your ears.
NOTE: Make sure the volume on your Audio Source (TV set or other audio device)
is turned up to at least half of its full volume to get good sound quality in your
Earbuds.
Optical Jack
3.5mm headphone
socket
6.3mm headphone
socket
RCA socket
• 3.5mm to 6.3mm Adapter Plug
• SCART Adapter
Initial Operation
1.Make sure the CL7350 is
plugged into the mains supply.
2.Switch ON the CL7350–on the
rear of the Charging Cradle
(see figure (1)).
3.Place the TV Receiver in the
Charging Cradle for at least
three hours to allow it to fully
charge.
• Make sure the TV Receiver is
switched OFF (see figure (2)).
• The LED Indicator glows red
during charging.
• It will glow green after the
battery is fully charged (see
figure (3)).
4.After three hours have passed
and the charging LED has
turned green, you can proceed
to use the device.
Routine Operation
2
SCART
socket
Advertisement

Related Manuals for Geemarc CL7350 OPTI


Summary of Contents for Geemarc CL7350 OPTI
- Page 1 QUICK USER GUIDE ● Only 3 hours to fully recharge the Receiver simply by replacing the Receiver in its !!! Please refer to our website: www.geemarc.com for an up to date user guide, as Charging Cradle. there may be important updates and changes you need to be aware of !!!
- Page 2 GUARANTEE With the Receiver on, rotate the Sound Balance button (see From the moment your Geemarc product is purchased, Geemarc guarantee it for the figure (10)) to adjust the sound – you will notice that the sound period of two years. During this time, all repairs or replacements (at our discretion) seems to “drift”...
Need help?
Do you have a question about the CL7350 OPTI and is the answer not in the manual?
Questions and answers