
Related Manuals for Belling Farmhouse 90DFT


Summary of Contents for Belling Farmhouse 90DFT
- Page 1 USER GUIDE A commitment to: Belling DF Range Part Number: 083594402 Date: 13/09/16...
- Page 2 NZ - New Zealand DE - Germany NL - Netherlands AU - Australia ES - Spain To contact Belling about your appliance, please call: Warranty Registration Customer Care Helpline 0344 815 3746 0800 952 1068 In case of difficulty within the UK...
- Page 3 INTRODUCTION Thank you for buying this British-built appliance from us. This user guide book is designed to help you through each step of owning your new product. Please read it carefully before you start using your appliance, as we have endeavored to answer as many questions as possible, and provide you with as much support as we can.
-
Page 4: Safety Warning
SAFETY WARNING • During use the appliance becomes hot. Care should be taken to avoid touching heating elements. • The appliance and its accessible parts become hot during use. Care should be taken to avoid touching heating elements. Children less than 8 years of age shall be kept away unless continuously supervised. - Page 5 should be kept away. CAUTION • This appliance must not be installed behind a decorative door in order to avoid overheating. • The cooking process has to be supervised. A short term cooking process has to be supervised continuously. • The use of a gas cooking appliance results in the production of heat, moisture and products of combustion in the room in which it is installed.
-
Page 6: Using Your Appliance
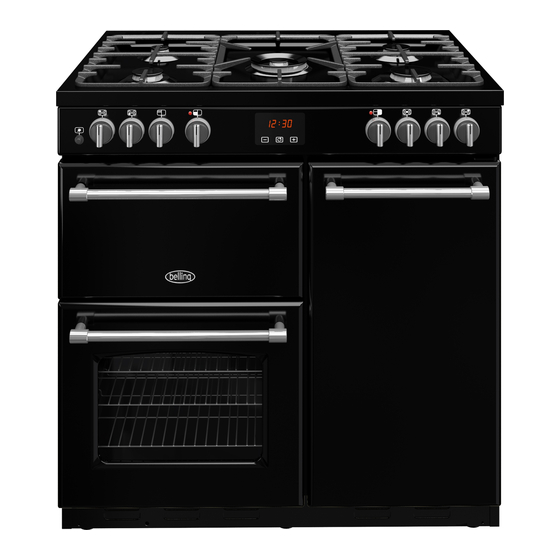
USING YOUR APPLIANCE Getting to know your product Note: Your appliance layout may differ depending on the model. Hob 90cm Small Medium Left hand rear Right hand rear Medium Large Left hand front Right hand front Hob 100/110cm Medium Small Medium Right hand rear Centre rear... -
Page 7: Control Panel
Control Panel Top oven / Grill or Grill Oven Thermostat indicator Cook zones (number (Top oven only) Cook zones depending on appliance width) Thermostat indicator Ignition Hob/Oven controls Hob/Oven controls Switch Clock/Programmer Oven Control Panel (90cm MF only) Thermostat indicator Main oven selector Top oven grill regulator Thermostat indicator... -
Page 8: Appliance Functions
Appliance functions Note: Your oven may not have all of the functions shown here. We recommend for best cooking results, please preheat your oven for 15 minutes and 3-5 minutes for grilling. Do not try to slow cook using any of the other oven functions. Intense Baking Defrost Base Heat with fan... - Page 9 Top oven/Grill Oven Oven/Grill Main ovens and Top oven/Grill Grill only When using the top oven or main oven, the red thermostat indicator will come on until the selected temperature is reached. When the top oven/grill or grill is switched on, the cooling fans comes on to keep the fascia and control knobs cool during cooking/grilling.
- Page 10 Grill THE DOOR MUST BE OPEN WHEN THE GRILL IS USED FOR CONVENTIONAL GRILLING. Grill pan, trivet and detachable grill pan handle The grill trivet, inside the grill pan, can be inverted to give a high or low position, or it may be removed. The speed of grilling can be controlled by selecting a higher or lower shelf position, or adjusting the grill setting.
-
Page 11: Pan Placement
Fitting burner caps and heads (Gas Hobs) angled burner cap parallel burner head burner cap not central Pan placement Always make sure that your pans are placed centrally on the burners and do not allow the flame to extend over the base of the pan. Pan sizes required Hob Cook Zones Minimum Pan Sizes (mm) -
Page 12: Using The Touch Controls
Please be aware that only the main oven is controlled by the programmer. Clock / Programmer Note: Your clock / programmer may not have all these functions Minus Menu Plus Minute minder Manual mode Volume level Cooking time / Duration 7-segment display End of cooking time Max. -
Page 13: Setting The Time Of Day
Setting the time of day By pressing menu, scroll through the functions until you reach ‘time of day’. Press the plus or minus buttons to set a time Setting the minute minder The maximum cooking time that can be set is 99 minutes. Press the plus or minus buttons to set a time Once set, the minute minder will start to countdown in steps of seconds. - Page 14 To modify or cancel the minute minder Return to the minute minder function and use either the plus or minus buttons to adjust the time. By setting the time to ‘0.00’, this will cancel the countdown. Setting the cooking time (the duration of time the oven will operate for) The maximum cooking time that can be set is 23 hours and 59 minutes.
- Page 15 Setting the end of cooking time (to set a time for the oven to turn off) The display shows the current ‘time of day’ plus the ‘end of cooking time’ symbol. The latest ‘end of cooking time’ is limited to the current ‘time of day’ plus the maximum time that can be set (23 hours and 59 minutes).
-
Page 16: Setting The Volume
Setting the volume Press the menu button until “LX” (X = 1, 2 or 3) flashes on the display. Use the plus or minus buttons to select a tone. Note: Default tone is L3 Activating / deactivating Key lock Press and hold the plus button for 3-5 seconds Once the Key lock is active, the buttons will be inactive. - Page 17 Removing Shelf Runners Telescopic positions Telescopic positions (if fitted) (if fitted) Standard shelves Slightly raise the shelf and insert in the chosen shelf position Ensure the shelf is fully pushed back towards the back of the oven, until the shelf stopper is reached.
-
Page 18: Changing The Light Bulb
Removing Telescopic shelves (if fitted) Grasp and lift shelf Lift shelf from the retaining tabs. Front of appliance Before removing the shelves completely, please make sure that the shelf is unclipped from the retaining tabs. Changing the light bulb Not all appliances have the same number and type of bulbs. Before you replace your bulb, check to see what type you have. - Page 19 If desired, the wok ring should be located on top of the pan supports. The locating cutouts on the bot- tom of the wok ring engage with the four fingers of the pan supports around the centre burner location. Ensure the wok ring is located correctly, is fully engaged with the pan support fingers and is not able to rotate or slide across the pan supports before use.
-
Page 20: Cleaning Your Appliance
CLEANING YOUR APPLIANCE Do’s Note: Always switch off your appliance and allow it to cool down before you clean any part of it. Note: Please take extra care when cleaning over the symbols on the control panel, as this can lead to them fading. - Page 21 Please keep this handbook for future reference, or for anyone else who may use the appliance.
- Page 22 Please keep this handbook for future reference, or for anyone else who may use the appliance.
- Page 23 Please keep this handbook for future reference, or for anyone else who may use the appliance.
-
Page 24: Technical Data
TECHNICAL DATA Gas - range Databadge Lower part of the front frame Appliance class Class 1 - freestanding cooker Electrical supply 220V - 240V ~ 50Hz Type of gas Please see data badge for your specified gas type. Can be convert- ed from natural gas to LPG.
Need help?
Do you have a question about the Farmhouse 90DFT and is the answer not in the manual?
Questions and answers
Re Belling Farmhouse 90 cm. Effective cleaning products for light fat on glass door? Additionally, how do you remove the glass to clean in between both glass panel to remove dust etc. ?
How to you get small fan assisted over to come on