Table of Contents
Advertisement
Quick Links
Quick Installation Guide
ASUS
ADSL Wireless Modem Router
Do not open the housing!
Use only the power supply provided with this device.
Use only the cables provided with this device and do
not perform any modification on them.
Rev 1.0
Nov, 23, 2004
P/N: 15-0680980F0
AAM6020VI ADSL Wireless Modem Router Quick Installation Guide
AAM6020VI
®
1
Page
Advertisement
Table of Contents

Related Manuals for Asus AAM6020VI


Summary of Contents for Asus AAM6020VI
- Page 1 AAM6020VI ADSL Wireless Modem Router Quick Installation Guide Quick Installation Guide ASUS AAM6020VI ® ADSL Wireless Modem Router Do not open the housing! Use only the power supply provided with this device. Use only the cables provided with this device and do not perform any modification on them.
-
Page 2: Before You Begin
AAM6020VI ADSL Wireless Modem Router Quick Installation Guide Before you begin Before installing your ADSL wireless modem router, please carefully check the following requirements with your computer. This ADSL wireless modem router is equipped with four 10/100Mbps RJ-45 Ethernet switch ports and 802.11g wireless Access Point. You can connect to the modem by Ethernet or wireless interface. -
Page 3: Getting Started
AAM6020VI ADSL Wireless Modem Router Quick Installation Guide Getting Started Hardware Installation Please follow the steps in the sequence outlined below. Fail to do so could result in damage of your ADSL wireless modem. Step 1: Connect a RJ-11 cable from wall phone jack to the connector “LINE” on the back of the modem. -
Page 4: Configuring Your Computers
1.1 Using Wired or Wireless Network Interface Card Before you start to access AAM6020VI via Ethernet or Wireless, please configure your PC’s TCP/IP address to be 192.168.1.x, where x could be any number between 2 to 254, subnet mask is 255.255.255.0, and Default gateway is 192.168.1.1 which is default IP address of ADSL modem. - Page 5 AAM6020VI ADSL Wireless Modem Router Quick Installation Guide 5. In the Internet Protocol (TCP/IP) Properties dialog box, click the radio button labeled Use the following IP address and type 192.168.1.x (192.168.1.20 is shown below as an example), 255.255.255.0 and 192.168.1.1 in the IP address field, Subnet Mask field and Default gateway, respectively.
- Page 6 AAM6020VI ADSL Wireless Modem Router Quick Installation Guide After restarting your PC, double-click the Network and Dial-up Connections icon in the Control Panel. In Network and Dial-up Connections window, right-click the Local Area Connection icon, and then select Properties. 10. In the Local Area Connection Properties dialog box, select Internet Protocol (TCP/IP), and then click 11.
- Page 7 AAM6020VI ADSL Wireless Modem Router Quick Installation Guide Double-click the Network icon. The Network dialog box displays with a list of currently installed network components. If the list includes TCP/IP, the protocol has already been enabled. Please skip to step 9 directly.
- Page 8 Most steps for accessing the modem are very similar to configure the wired NIC. Only difference with wired NIC is that your wireless card has built wireless connection with modem already. We will describe detailed linking and configuring steps, and take ASUS WL-100G 802.11G wireless card for example as below.
- Page 9 AAM6020VI ADSL Wireless Modem Router Quick Installation Guide 4. Click Status icon, then click IP Config to check IP address among 2~254 range. If it is true, then click Ping tab and run ping to do connection test between modem with your PC.
- Page 10 AAM6020VI ADSL Wireless Modem Router Quick Installation Guide After finishing above steps, you are ready to login and start to configure modem now. Page...
- Page 11 AAM6020VI ADSL Wireless Modem Router Quick Installation Guide 2. Configuring Wireless Modem Router 2.1 Internet connection with NAT function: Please enter the modem’s default IP address http://192.168.1.1 into your PC’s web browser and press Enter button on keyboard. The Login screen will show as below, following enter Admin for Username and Admin for Password then click on Log In button.
- Page 12 AAM6020VI ADSL Wireless Modem Router Quick Installation Guide 2.3 Click SETUP tab. 2.4 Click Firewall/NAT Services icon to select Enable Firewall and NAT Service, then click on Apply tab. Now re-login modem again. Page...
- Page 13 AAM6020VI ADSL Wireless Modem Router Quick Installation Guide 2.5 Click SETUP New Connection tab. 2.6 Input data Name column: It could be inputted anything you prefer. Type: There are listed five selections which you can choose from Type item PPPoE, PPPoA, Static, DHCP and Bridge.
- Page 14 AAM6020VI ADSL Wireless Modem Router Quick Installation Guide QoS: Keep the default setting. Auto PVC: You also use this function to get correct VPI/VCI instead of inputting manually. Please click on Apply icon. 2.7 Go to the Status tab, then click on Connection Status.
- Page 15 AAM6020VI ADSL Wireless Modem Router Quick Installation Guide 2.8 Click on Tools tab, then select System Commands. Please click on Save All, all of your changes on settings will be saved into this unit; if you don’t run Save All process, you will lose all changes you did once power off or restart modem.
-
Page 16: Performing A Factory Reset
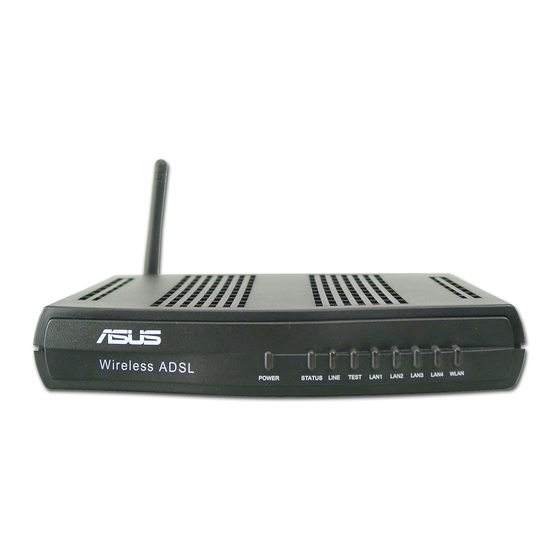
AAM6020VI ADSL Wireless Modem Router Quick Installation Guide 3. Performing a Factory Reset There are two methods to perform a factory default settings on this unit by software management or reset manually. 3.1 Software Management: Please first login into this unit using Username and Password, click on Tools System Commands. - Page 17 AAM6020VI ADSL Wireless Modem Router Quick Installation Guide Front panel system messages The following illustration shows the front panel of the ADSL Wireless Modem Router. LED Indicators The ADSL Wireless Modem Router is equipped with LEDs on the front panel as described in the table below.
- Page 18 AAM6020VI ADSL Wireless Modem Router Quick Installation Guide Rear panel system messages The following illustration shows the rear panel of the ADSL Wireless Modem Router. Outlet The ADSL Wireless Modem Router is equipped with outlets on the rear panel as described in the table below.
- Page 19 Appendix FCC Warning Statement This device complies with Part 15 of the FCC Rules. Operation is subject to the following two conditions: (1) this device may not cause harmful interference, and (2) this device must accept any interference received, including interference that may cause undesired operation.
- Page 20 Declaration of Conformity for R&TTE directive 1999/5/EC Essential requirements – Article 3 Protection requirements for health and safety – Article 3.1a Testing for electric safety according to EN 60950 has been conducted. These are considered relevant and sufficient. Protection requirements for electromagnetic compatibility –...
Need help?
Do you have a question about the AAM6020VI and is the answer not in the manual?
Questions and answers