
Related Manuals for Extech Instruments RTH10


Summary of Contents for Extech Instruments RTH10
- Page 1 USER GUIDE Humidity / Temperature Datalogger Model RHT10 1.800.561.8187 information@itm.com www. .com...
- Page 2 Introduction Congratulations on your purchase of the Relative Humidity and Temperature Datalogger. This datalogger measures and stores up to 16,000 relative humidity and 16,000 temperature readings over 0 to 100%RH and ‐40 to +70°C (‐40 to +158°F) measurement ranges. The user can easily configure ...
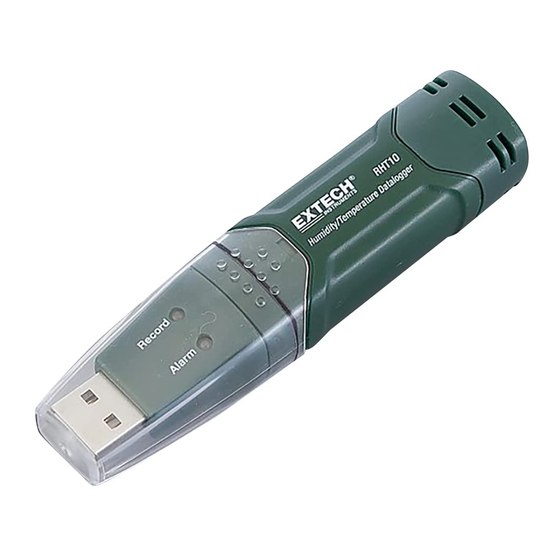
- Page 3 Description Protective cover USB connector to PC port Start button RH and Temperature sensors Alarm LED (red/yellow) Record LED (green) Mounting clip RHT10 HW_SW-en-US_V5.6.2 6/16 1.800.561.8187 information@itm.com www. .com...
-
Page 4: Operation
PC or Notebook with Pentium 90MHz or higher 32 MB RAM; At least 7 MB of hard disk space available to install Datalogger USB software. Recommended display resolution 1024X768 with High Color(16 bit). INSTALLING THE GRAPHING SOFTWARE and USB driver Install the supplied Windows PC Datalogger Software by placing the supplied program disk in the PC’s CD‐ROM drive or by downloading the program from the http://Extech.com/instruments/software.asp web page. If the installation program does not automatically open and provide on‐screen prompts, open and browse the CD‐ROM drive, then find and double‐click on the SETUP.EXE file included on the program disk. Follow the on‐screen prompts to complete the installation. Software Install Run SETUP.up.exe and follow the defaults to install he RTH10 software USB Driver Install 1. Open the root folder of the RHT10. 2. Open the folder Driver\DriverUSBXPRESS and double‐click on USBXpressInstaller.exe. 3. Follow the default choices to load this USBXpress driver. Note: When the RHT10 is connected to the USB port, the battery inside the device is discharged at a higher rate than normal. To conserve battery life, do not leave the RHT10 connected to the USB port for a prolonged period of time RHT10 HW_SW-en-US_V5.6.2 6/16 1.800.561.8187... - Page 5 RUNNING THE GRAPHING SOFTWARE With the RHT10 inserted in the PC’s USB port, double‐click the Datalogger Graph icon on your desktop to launch the program. The opening screen will appear as shown below. Click on “Connect” to open the main screen, Click on “About” to view the version number, Click on “View File” to open an existing file, Click on “Quit” to close the program. RHT10 HW_SW-en-US_V5.6.2 6/16 1.800.561.8187 information@itm.com www. .com...
-
Page 6: Menu Bar Description
MENU BAR DESCRIPTION The main menu for the software appears as follows: From left to right the MENU BAR icons represent DATA DOWNLOAD, LOGGER SETUP, FILE OPEN, FILE SAVE‐AS, FILE PRINT, VIEW ALL, and ZOOM. In addition, the FILE, VIEW, LINK, and HELP pull‐down menus are available here. All of these functions are described in the following paragraphs. LOGGER SETUP ... - Page 7 The LED Flash Cycle can be set by the user: longer cycle times help to extend the battery life. The ALARM SETTINGS area of the SETUP window allows the user to set high and low temperature and humidity limits and to disable the flashing of the RHT10’s LEDs, thereby conserving battery energy. Once the changes have been made, click on the SETUP button to save them. Press the DEFAULT button to set the RHT10 back to factory default conditions. Press the CANCEL button to abort the setup. Note: Any stored data will be permanently erased when the user clicks on Setup. To save the data before creating a new setup, click Cancel and then download the data. Note: The battery may run out before the RHT10 has finished collecting a specified number of sample points. Always ensure that the remaining charge in the battery is sufficient to last the complete duration of your logging exercise. When in doubt, we recommend that you always install a fresh battery before logging critical data. If INSTANT was selected in the SETUP window, the RHT10 begins logging at the instant the SETUP button is pressed. If MANUAL was selected, the RHT10 must be manually started by pressing and holding the device’s yellow button for approx. 3 seconds, or until the two LEDs on the RHT10 flash ...
-
Page 8: Data Download
DATA DOWNLOAD To transfer the readings stored in the RHT10 to the PC: Connect the RHT10 to the same USB port used when the RHT10 was initialized. Open the graphing software program if it is not still running. Click the Download icon (1 on the left) or select Data Download from the LINK pull‐down menu The Window shown below will appear. Press DOWNLOAD to begin transferring readings If the readings are successfully transferred, the VIEW screen and the SAVE screen (both shown below) will appear. In the SAVE screen, name the file and save it to a convenient location. The data ... - Page 9 When VIEW is pressed, the Data Graph window appears, The Data Graph window presents the transferred data in an x‐y graph format with Date/Time represented on the horizontal axis and Temperature / Relative Humidity / Dew Point / Grains per pound GPP (with optional RHT10‐SW only) / Alarm Limits represented on the vertical axis: To zoom in and out of data regions, there are several approaches: Use the mouse to click and drag a box around any data area to magnify the selected area. Click on the zoom magnifier icon tool on the menu bar Select VIEW ALL or ZOOM OUT from the VIEW pull‐down menu. In the example graph above, the Temperature is represented by the solid red line (the lines are known ...
-
Page 10: File Print
To customize the graph window select SHOW TRACES, BACKGROUND, GRID LINES, and MASK POINTS from the VIEW pull‐down menu. These options provide the following features: SHOW TRACES: Allows the user to select which data to view as a trace (Temperature & Alarms). BACKGROUND: Select background color scheme. GRID LINES: Add or remove grid lines from x and y axes. MASK POINTS: Places dots on the traces for the actual data points, breaking up the continuous nature of the trace. FILE OPEN, FILE SAVE‐AS To save the transferred data in a format other than the proprietary .rec format, click the SAVE AS icon from the menu bar (4 from right) or select SAVE AS from the FILE pull‐down menu. The data can be saved in the following formats: TEXT FILE (.txt) EXCEL FILE (.xls) BITMAP FILE (.bmp) To open an existing data file for viewing on the data graph window, click on the FILE OPEN icon on the menu bar (3 from left), or select FILE OPEN from the FILE pull‐down menu. When prompted, select a .rec file saved earlier. ... - Page 11 GRAINS PER POUND (GPP) (RHT10‐SW) GPP values are obtained only by purchasing and loading the optional RHT10‐SW software. The optional software can be purchased through an Extech distributor using the part number RHT10‐SW. Note that the standard RHT10 software must be un‐installed before the optional RHT10‐SW software can be installed. To view GPP data, click on the VIEW menu heading and scroll down to the SHOW TRACES tab. Ensure that the GPP line is checked. If checked, the graph will display GPP data. If unchecked, the graph will not show GPP data. RHT10 HW_SW-en-US_V5.6.2 6/16 1.800.561.8187 information@itm.com www. .com...
- Page 12 RHT10 LED STATUS GUIDE LEDs Meaning Action No LEDs flashing Record Alarm Fit battery in place ‐No logging in process Or Replace the battery and ‐No battery found download the data Or ‐Battery completely discharged Green single flash every 10 sec. * Record Alarm To start, Hold the start button ‐Logging, no alarm** until Green and Yellow LED flash Green double flash every 10 sec. * ‐Delayed start Red single flash every 10 sec. * Record Alarm ‐Logging, low alarm for RH Logging, if enabled, will stop Red double flash every 10 sec. ‡ ...
-
Page 13: Specifications
Specifications Relative Humidity Overall Range 0 to 100% Accuracy (0 to 20 and 80 to 100%) ±5.0% Accuracy (20 to 40 and 60 to 80%) ±3.5% Accuracy (40 to 60%) ±3.0% Temperature Overall Range ‐40 to 158 F (‐40 to 70 C) Accuracy (‐40 to ‐10 and +40 to ±2 C C) Accuracy (‐10 to +40 C) ±1 C Accuracy (‐40 to +14 and 104 to ±3.6 F F) Accuracy (+14 to 104 F) ±1.8 F Dew Point Temperature Overall Range ‐40 to 158 F (‐40 to 70 C) Accuracy (25 C, 40 to 100%RH) ±4.0 F (±2 C) ... -
Page 14: Battery Replacement
Battery Replacement It is highly recommended that the battery be replaced every 12 months, or prior to logging critical data. The RHT10 does not lose its stored readings when the battery weakens or when the battery is replaced; the data logging process will however be stopped and cannot be re‐started until the battery has been replaced and the logged data has been downloaded to PC. ... -
Page 15: Warranty
Warranty FLIR Systems, Inc. warrants this Extech Instruments brand device to be free of defects in parts and workmanship for one year from date of shipment (a six month limited warranty applies to sensors and cables). If it should become necessary to return the instrument for service during or beyond the warranty period, contact the Customer Service Department for authorization. Visit the website www.extech.com for contact information. A Return Authorization (RA) number must be issued before any product is returned. The sender is responsible for shipping charges, freight, insurance and proper packaging to prevent damage in transit. This warranty does not apply to defects resulting from action of the user such as misuse, improper wiring, operation outside of specification, improper maintenance or repair, or unauthorized modification. FLIR Systems, Inc. specifically disclaims any implied warranties or merchantability or fitness for a specific purpose and will not be liable for any direct, indirect, incidental or consequential damages. FLIR’s total liability is limited to repair or replacement of the product. The warranty set forth above is inclusive and no other warranty, whether written or oral, is expressed or implied. Calibration, Repair, and Customer Care Services FLIR Systems, Inc. offers repair and calibration services for the Extech Instruments products we sell. We offer NIST traceable calibration for most of our products. Contact our Customer Service Department for information on calibration service availability. Annual calibrations should be performed to verify meter performance and accuracy. Technical support and general customer service is also provided, refer to the contact information provided below. Copyright © 2014‐2016 FLIR Systems, Inc. All rights reserved including the right of reproduction in whole or in part in any form RHT10 HW_SW-en-US_V5.6.2 6/16 1.800.561.8187 information@itm.com www. .com...
Need help?
Do you have a question about the RTH10 and is the answer not in the manual?
Questions and answers