Table of Contents
Advertisement
Quick Links
Advertisement
Table of Contents

Related Manuals for TP-Link TD-W8950N


Summary of Contents for TP-Link TD-W8950N
- Page 1 TD-W8950N 150Mbps Wireless N ADSL2+ Modem Router REV: 2.0.1 1910011611...
- Page 2 Specifications are subject to change without notice. is a registered trademark of TP-LINK TECHNOLOGIES CO., LTD. Other brands and product names are trademarks or registered trademarks of their respective holders. No part of the specifications may be reproduced in any form or by any means or used to make any derivative such as translation, transformation, or adaptation without permission from TP-LINK TECHNOLOGIES CO., LTD.
- Page 3 FCC STATEMENT This equipment has been tested and found to comply with the limits for a Class B digital device, pursuant to part 15 of the FCC Rules. These limits are designed to provide reasonable protection against harmful interference in a residential installation. This equipment generates, uses and can radiate radio frequency energy and, if not installed and used in accordance with the instructions, may cause harmful interference to radio communications.
- Page 4 RF Exposure Information This device meets the EU requirements (1999/5/EC Article 3.1a) on the limitation of exposure of the general public to electromagnetic fields by way of health protection. Canadian Compliance Statement This device complies with Industry Canada license-exempt RSSs. Operation is subject to the following two conditions: (1) This device may not cause interference, and (2) This device must accept any interference, including interference that may cause undesired...
- Page 5 BSMI Notice 安全諮詢及注意事項 ●請使用原裝電源供應器或只能按照本產品注明的電源類型使用本產品。 ●清潔本產品之前請先拔掉電源線。請勿使用液體、噴霧清潔劑或濕布進行清潔。 ●注意防潮,請勿將水或其他液體潑灑到本產品上。 ●插槽與開口供通風使用, 以確保本產品的操作可靠並防止過熱, 請勿堵塞或覆蓋開口。 ●請勿將本產品置放於靠近熱源的地方。 除非有正常的通風, 否則不可放在密閉位置中。 ●請不要私自打開機殼, 不要嘗試自行維修本產品, 請由授權的專業人士進行此項工作。 Продукт сертифіковано згідно с правилами системи УкрСЕПРО на відповідність вимогам нормативних документів та вимогам, що передбачені чинними законодавчими актами України. Safety Information When product has power button, the power button is one of the way to shut off the product; when there is no power button, the only way to completely shut off power is to disconnect the product or the power adapter from the power source.
- Page 6 TP-LINK TECHNOLOGIES CO., LTD DECLARATION OF CONFORMITY For the following equipment: Product Description: 150Mbps Wireless N ADSL2+ Modem Router Model No.: TD-W8950N Trademark: TP-LINK We declare under our own responsibility that the above products satisfy all the technical regulations applicable to the product within the scope of Council Directives:...
-
Page 7: Table Of Contents
CONTENTS Package Contents ........................ 1 Chapter 1. Product Overview .................... 2 1.1 Overview of the Modem Router ..................2 1.2 Main Features ........................3 1.3 Panel Layout ........................4 1.3.1 The Front Panel ......................4 1.3.2 The Back Panel ......................5 Chapter 2. Connecting the Modem Router ..............6 2.1 System Requirements......................6 2.2 Installation Environment Requirements................6 2.3 Connecting the Modem Router...................7... - Page 8 4.4.13 Interface Grouping ..................... 49 4.4.14 IP Tunnel........................50 4.4.15 Multicast........................52 4.5 IPTV ..........................53 4.6 Wireless..........................53 4.6.1 Basic......................... 53 4.6.2 Security ........................54 4.6.3 Wireless Schedule ..................... 68 4.6.4 MAC Filter ......................... 69 4.6.5 Wireless Bridge......................70 4.6.6 Advanced ........................71 4.6.7 Station info ........................
-
Page 9: Package Contents
One RJ45 cable Two RJ11 cables One ADSL splitter One Resource CD for TD-W8950N 150Mbps Wireless N ADSL2+ Modem Router, including: • This User Guide • Other Helpful Information Note: Make sure that the package contains the above items. If any of the listed items are damaged or... -
Page 10: Chapter 1. Product Overview
150Mbps Wireless N ADSL2+ Modem Router User Guide Chapter 1. Product Overview Thank you for choosing the TD-W8950N 150Mbps Wireless N ADSL2+ Modem Router. 1.1 Overview of the Modem Router The TD-W8950N 150Mbps Wireless N ADSL2+ Modem Router integrates 4-port Switch, Firewall, NAT-router and Wireless AP. -
Page 11: Main Features
TD-W8950N 150Mbps Wireless N ADSL2+ Modem Router User Guide 1.2 Main Features Complies with IEEE 802.11n to provide a wireless data rate of up to 150Mbps One RJ11 LINE port, four 10/100M Auto-Negotiation RJ45 LAN ports, supporting Auto MDI/MDIX ... -
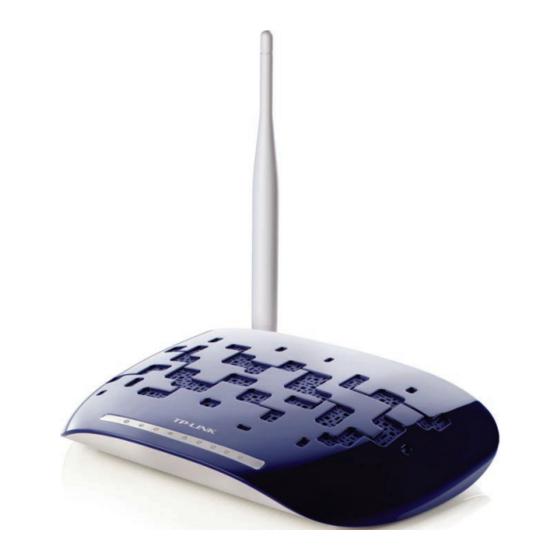
Page 12: Panel Layout
TD-W8950N 150Mbps Wireless N ADSL2+ Modem Router User Guide 1.3 Panel Layout 1.3.1 The Front Panel The router’s LEDs are located on the front panel (View from left to right). Figure 1-1 LED Explanation: Name Status Indication The modem router is powered on. -
Page 13: The Back Panel
TD-W8950N 150Mbps Wireless N ADSL2+ Modem Router User Guide Note: 1) If the ADSL LED is off, please check your Internet connection first. Refer to 2.3 Connecting the Modem Router for more information about how to make Internet connection correctly. If... -
Page 14: Chapter 2. Connecting The Modem Router
Keep away from the strong electromagnetic radiation and the device of electromagnetic sensitive. Generally, TD-W8950N is placed on a horizontal surface. The device also can be mounted on the wall as shown in Figure 2-1. Figure 2-1 Wall-mount Install ... -
Page 15: Connecting The Modem Router
Plug one end of the twisted-pair ADSL cable into the ADSL port on the rear panel of TD-W8950N. Connect the other end to the MODEM port of the external splitter. Step 2: Connect the Ethernet cable. Attach one end of a network cable to your computer’s Ethernet port or a regular hub/switch port, and the other end to the LAN port on the modem router TD-W8950N. -
Page 16: Chapter 3. Quick Installation Guide
150Mbps Wireless N ADSL2+ Modem Router User Guide Chapter 3. Quick Installation Guide This chapter will show you how to configure the basic functions of your TD-W8950N 150Mbps Wireless N ADSL2+ Modem Router using Quick Setup Wizard within minutes. 3.1 TCP/IP Configuration The default IP address of the TD-W8950N 150Mbps Wireless N ADSL2+ Modem Router is 192.168.1.1. -
Page 17: Quick Installation Guide
192.168.1.2 - 192.168.1.254. 3.2 Quick Installation Guide With a Web-based utility, it is easy to configure and manage the TD-W8950N 150Mbps Wireless N ADSL2+ Modem Router. The Web-based utility can be used on any Windows, Macintosh or UNIX OS with a Web browser, such as Microsoft Internet Explorer, Mozilla Firefox or Apple Safari. - Page 18 TD-W8950N 150Mbps Wireless N ADSL2+ Modem Router User Guide Figure 3-5 Choose the WAN Type for Internet access, and then click Next. Figure 3-6...
- Page 19 TD-W8950N 150Mbps Wireless N ADSL2+ Modem Router User Guide Note: 1) The Quick Setup Wizard will guide you to configure the WAN Service over ATM interface. 2) If you are unwilling to configure WAN Service now, you can click the Skip WAN button. Then you can configure WAN service referring to 4.4.1 Layer2...
- Page 20 TD-W8950N 150Mbps Wireless N ADSL2+ Modem Router User Guide Figure 3-8 The WLAN function is enabled by default. You can rename your wireless network name and create your own password in this page. The default wireless name is TP-LINK_XXXXXX, and the default wireless password, the same as the PIN code, is printed on the bottom label.
-
Page 21: Chapter 4. Configuring The Modem Router
Software and Hardware. The second table displays the current status of the TD-W8950N connection. This information will vary depending on the settings of the router configured on the Advanced Setup screen. -
Page 22: Quick Setup
TD-W8950N 150Mbps Wireless N ADSL2+ Modem Router User Guide Figure 4-1 Note: Click the other submenus under the main menu Device Info, and you will be able to view the corresponding information about WAN, Statistics, Route, ARP and DHCP. -
Page 23: Layer2 Interface
TD-W8950N 150Mbps Wireless N ADSL2+ Modem Router User Guide This Advanced Setup section mainly introduces how to configure the router for adequate use. The detailed explanations for each subsection are provided below. Note: To completely configure the WAN Interface, you need to first select the Layer2 Interface (4.4.1... - Page 24 TD-W8950N 150Mbps Wireless N ADSL2+ Modem Router User Guide Figure 4-2 Remove: Select the check box in the table on the screen above and then click the Remove button, the corresponding interface will be deleted in the table. ...
-
Page 25: Wan Service
TD-W8950N 150Mbps Wireless N ADSL2+ Modem Router User Guide Note: The detailed configuration about Scheduler for Queues of Equal Precedence will be described Quality of Service. 4.4.1.2 ETH Interface Choose “Advanced Setup”“Layer2 InterfaceETH Interface”, you can configure ETH WAN interfaces on the screen below. - Page 26 TD-W8950N 150Mbps Wireless N ADSL2+ Modem Router User Guide below to complete the further configuration of WAN Interface. There are five different configurations for the connection types, which are PPPoE, IPoE, Bridge, PPPoA, and IPoA. You can select the corresponding types according to your needs.
- Page 27 TD-W8950N 150Mbps Wireless N ADSL2+ Modem Router User Guide Figure 4-9 Enter the following parameters and then click Next. Figure 4-10 PPP Username/Password: Enter the Username and Password provided by your ISP. These fields are case-sensitive. PPPoE Service Name: Enter the Service Name if it was provided by your ISP. You can leave it blank, if the ISP doesn’t provide it.
- Page 28 TD-W8950N 150Mbps Wireless N ADSL2+ Modem Router User Guide re-establish the connection as soon as you attempt to access the Internet again. If your Internet is charged by time you may want to select this option in order to save money.
- Page 29 TD-W8950N 150Mbps Wireless N ADSL2+ Modem Router User Guide Figure 4-13 On the next screen you will see the WAN Port Information Table with the new configuration. Figure 4-14 Remove: Select the check box in the table above and then click Remove, the corresponding interface will be deleted.
- Page 30 TD-W8950N 150Mbps Wireless N ADSL2+ Modem Router User Guide Figure 4-15 Obtain an IP address automatically: Select this option, the router will be able to obtain IP network information dynamically from a DHCP server provided by your ISP. ...
- Page 31 TD-W8950N 150Mbps Wireless N ADSL2+ Modem Router User Guide • Option 125: The option 125 allows DHCP server to be pre-configured with policy for handling classes of devices in a certain way without requiring DHCP server to be able to parse the unique format used in client-identifier option.
- Page 32 TD-W8950N 150Mbps Wireless N ADSL2+ Modem Router User Guide Select a preferred WAN interface as the system default gateway and click Next. Figure 4-17 Configure the DNS Server Addresses on the screen as follows. Figure 4-18 Note: If only single PVC with IPoA is configured, you must enter static DNS server IP addresses.
- Page 33 TD-W8950N 150Mbps Wireless N ADSL2+ Modem Router User Guide Figure 4-19 4.4.2.3 ATM-EoA-Bridging If you want to adopt the Bridge service and you need to use an ATM Interface, follow the steps below to add a WAN service over a selected ATM interface: Add a new ATM interface (see 4.4.1.1 ATM...
-
Page 34: Mac Clone
TD-W8950N 150Mbps Wireless N ADSL2+ Modem Router User Guide Static IP Address on the screen of Figure 4-15, and the Static IP Address for DNS Server on the screen of Figure 4-18. 4.4.2.6 ETH-PPPoE If your ISP provides a PPPoE connection and you need to use an ETH Interface, follow the steps... -
Page 35: Lan
TD-W8950N 150Mbps Wireless N ADSL2+ Modem Router User Guide Click Restore Default button to restore the WAN Interface’s default MAC Address. Note: Only the WAN Ports can use MAC Address Clone function. All the clone MAC addresses must not be the same with each other. - Page 36 TD-W8950N 150Mbps Wireless N ADSL2+ Modem Router User Guide DHCP client connected to it. Keep in mind that if you change the IP address of the router, you must change the range of IP addresses in the pool used for DHCP on the LAN.
- Page 37 TD-W8950N 150Mbps Wireless N ADSL2+ Modem Router User Guide Figure 4-23 Interface Address (prefix length is required): Here enter your interface address with its prefix length. IPv6 LAN Applications: Select a type to assign IPv6 addresses to the computers in your LAN.
-
Page 38: Nat
TD-W8950N 150Mbps Wireless N ADSL2+ Modem Router User Guide address. After the dynamic IPv6 address has expired, the user will be automatically assigned a new dynamic IPv6 address. The default is 24 hours. For RADVD: 1) If Randomly Generate is selected, it doesn’t need to be configured. - Page 39 TD-W8950N 150Mbps Wireless N ADSL2+ Modem Router User Guide 4.4.5.1 Virtual Servers Choose “Advanced Setup”“NAT”“Virtual Servers”, you can set up virtual servers on the screen below (shown in Figure 4-25). Virtual servers can be used for setting up public services on your LAN, such as DNS, Email and FTP.
- Page 40 TD-W8950N 150Mbps Wireless N ADSL2+ Modem Router User Guide To add a virtual server entry: Click the Add button on the preceding screen Figure 4-25, and then you will see the new Virtual Server in the next screen as shown in Figure 4-26.
- Page 41 TD-W8950N 150Mbps Wireless N ADSL2+ Modem Router User Guide application on the LAN initiates a TCP/UDP connection to a remote device using the triggering ports. The router allows the remote party from the WAN side to establish new connections back to the application on the LAN side using the open ports.
- Page 42 TD-W8950N 150Mbps Wireless N ADSL2+ Modem Router User Guide Select the application from the drop-down list. If the list does not have the application that you want, select the Custom application radio button, and type the name of the custom application in the text box.
-
Page 43: Security
TD-W8950N 150Mbps Wireless N ADSL2+ Modem Router User Guide Figure 4-30 Click the Save/Apply button to save your settings. 4.4.6 Security Choose “Advanced Setup”“Security”, and you will see the security screen including IP Filtering and MAC Filtering (only effective in Bridging mode) submenus. - Page 44 TD-W8950N 150Mbps Wireless N ADSL2+ Modem Router User Guide Set up an Outgoing IP Filtering rule: Click the Add button in Figure 4-31, and you will see the next screen as shown in Figure 4-32. Figure 4-32 Enter the Filter name for the rule, it is exclusive and must be filled.
- Page 45 TD-W8950N 150Mbps Wireless N ADSL2+ Modem Router User Guide Figure 4-33 Change Policy: There are two policies for the MAC filters: FORWARDED and BLOCKED. Select the Change checkbox and click the Change Policy button to change from one policy to another.
-
Page 46: Parental Control
TD-W8950N 150Mbps Wireless N ADSL2+ Modem Router User Guide Click Save/Apply to save this entry and then you will see your settings as shown in Figure 4-34. 4.4.7 Parental Control Choose “Advanced Setup”“Parental Control”. You can configure the Parental Control function on the screen as shown in Figure 4-35. - Page 47 TD-W8950N 150Mbps Wireless N ADSL2+ Modem Router User Guide Figure 4-37 Enter the User Name of the LAN device connected to the router. To restrict the device where the browser is running, select the Browser's MAC Address radio button. The MAC Address has been automatically displayed in the text box. To restrict other LAN devices, click Other MAC Address radio button and enter the MAC address of the other LAN device.
- Page 48 TD-W8950N 150Mbps Wireless N ADSL2+ Modem Router User Guide Figure 4-38 To set up the URL Filter: Check the Allow or Deny radio button. Here we take Deny for example. Focus on the Devices Under Control section. Choose the MAC Address of the computer you want to control and click the Add to Devices Under Control button.
-
Page 49: Quality Of Service
TD-W8950N 150Mbps Wireless N ADSL2+ Modem Router User Guide 4.4.8 Quality of Service Choose “Advanced Setup”“Quality of Service”, you can enable QoS (Quality of Service) on the screen shown in Figure 4-40. QoS helps to prioritize data as it enters your router. By attaching special identification marks or headers to incoming packets, QoS determines which queue the packets enter, based priority. - Page 50 TD-W8950N 150Mbps Wireless N ADSL2+ Modem Router User Guide Figure 4-41 Click the Add button in Figure 4-41, and you can configure the QoS queue entry on the next screen as shown in Figure 4-42. Figure 4-42 Name: Set a name for the entry.
- Page 51 TD-W8950N 150Mbps Wireless N ADSL2+ Modem Router User Guide After you specify the condition, click Save/Apply to save the entry and then you will see you settings as shown in Figure 4-41. Note: Lower integer values for precedence imply higher priority for this queue relative to others.
-
Page 52: Routing
TD-W8950N 150Mbps Wireless N ADSL2+ Modem Router User Guide 4.4.9 Routing Choose “Advanced Setup”“Routing”, it includes 2 menus: Default Gateway and Static Route. The detailed descriptions are provided below. 4.4.9.1 Default Gateway Choose “Advanced Setup”“Routing”“Default Gateway”, you can see the Default Gateway screen. -
Page 53: Dns
TD-W8950N 150Mbps Wireless N ADSL2+ Modem Router User Guide Figure 4-47 Enter the following data: IP Version: Select the version of IP. Destination IP Address/prefix length: The Destination IP Address is the address of the network or host that you want to assign to a static route. - Page 54 TD-W8950N 150Mbps Wireless N ADSL2+ Modem Router User Guide Figure 4-48 For PPPoA, PPPoE enabled PVC(s), please select the Select DNS Server Interface from available WAN interfaces checkbox, this modem router will accept automatically the first received DNS assignment from the selected configured WAN interface during the connection establishment.
-
Page 55: Dsl
TD-W8950N 150Mbps Wireless N ADSL2+ Modem Router User Guide To add a DDNS entry: Click the Add button (pop-up after Figure 4-49), and then you will set the DDNS in the next screen (shown in Figure 4-50). Figure 4-50 Select D-DNS provider in the drop-down list. -
Page 56: Upnp
TD-W8950N 150Mbps Wireless N ADSL2+ Modem Router User Guide Figure 4-51 You can select the modulation type, phone line pair and the capability of Bitswap or SRA. After you set them up, click Save/Apply to save the configurations. 4.4.12 UPnP Choose “Advanced Setup”“UPnP”, you can Enable or Disable the UPnP (Universal Plug and... -
Page 57: Interface Grouping
TD-W8950N 150Mbps Wireless N ADSL2+ Modem Router User Guide 4.4.13 Interface Grouping Choose “Advanced Setup”“Interface Grouping”, you can configure multiple ports to PVC and bridging groups to perform as an independent network. Figure 4-53 To support this feature, you must create mapping groups with appropriate LAN and WAN interfaces using the Add button. -
Page 58: Ip Tunnel
TD-W8950N 150Mbps Wireless N ADSL2+ Modem Router User Guide Figure 4-54 Enter a unique name for Group. Select the Interface which you want to use from the drop-down list. Note: If you like to automatically add LAN clients to a WAN Interface in the new group add the DHCP vendor ID string. - Page 59 TD-W8950N 150Mbps Wireless N ADSL2+ Modem Router User Guide IPv6 completely supplants IPv4. It is a temporary solution for networks that do not support native dual-stack, where both IPv6 and IPv4 run independently. Choose “Advanced Setup”“IP Tunnel”, it includes two menus: IPv6inIPV4 and IPv4inIPv6, The detailed descriptions are provided below.
- Page 60 TD-W8950N 150Mbps Wireless N ADSL2+ Modem Router User Guide Note: In this type, there should not have any IPv6 WAN connections. If there are IPv6 WAN connections, the page will prompt you to delete all the IPv6 WAN connections.
-
Page 61: Multicast
TD-W8950N 150Mbps Wireless N ADSL2+ Modem Router User Guide 4.4.15 Multicast Choose “Advanced Setup”“Multicast”, you can configure the IGMP protocol on the screen. Figure 4-59 Click Save/Apply to save your settings. 4.5 IPTV Figure 4-60 Enable IPTV: Check this box to enable IPTV. If you enable IPTV, please make sure the following settings are correct. -
Page 62: Wireless
TD-W8950N 150Mbps Wireless N ADSL2+ Modem Router User Guide 4.6 Wireless Choose “Wireless”, there are six submenus to configure Wireless LAN settings. Click any of them, and you will be able to configure the corresponding function. The detailed explanations for each submenu are provided below. -
Page 63: Security
TD-W8950N 150Mbps Wireless N ADSL2+ Modem Router User Guide SSID: SSID (Wireless network name) shared among all points in a wireless network. The SSID must be identical for all devices in the wireless network. It is case-sensitive and must not exceed 32 characters (use any of the characters on the keyboard). - Page 64 TD-W8950N 150Mbps Wireless N ADSL2+ Modem Router User Guide To build a successful connection by WPS, you should also do the corresponding configuration of the new device for WPS function meanwhile. I. By PBC If the wireless adapter supports WPS and the Push Button Configuration (PBC) method, you can add it to the network by PBC with the following two methods.
- Page 65 TD-W8950N 150Mbps Wireless N ADSL2+ Modem Router User Guide Step 2: Press and hold the WPS button of the adapter directly for 2 or 3 seconds. Step 3: Wait for a while until the next screen of adapter appears. Click OK to complete the WPS configuration.
- Page 66 TD-W8950N 150Mbps Wireless N ADSL2+ Modem Router User Guide Figure 4-65 Step 3: Wait for a while until the next screen appears. Click OK to complete the WPS configuration. Figure 4-66 II. By PIN If the new device supports Quick Security Setup and the PIN method, you can add it to the network by PIN with the following two methods.
- Page 67 TD-W8950N 150Mbps Wireless N ADSL2+ Modem Router User Guide Figure 4-67 Note: The PIN code of the adapter is always displayed on the WPS configuration screen. Step 2: For the configuration of the wireless adapter, please choose “Enter the PIN of this device into my access point or wireless router”...
- Page 68 TD-W8950N 150Mbps Wireless N ADSL2+ Modem Router User Guide Method Two: Enter the PIN of my router into the wireless adapter. Step 1: Select Use AP PIN and get the Device PIN generated by the router as shown below. You can click Gen New PIN to get a new PIN code for router.
- Page 69 TD-W8950N 150Mbps Wireless N ADSL2+ Modem Router User Guide Figure 4-71 Select SSID: Select a wireless network to configure. Network Authentication: Select an authentication type from the drop-down list. Options available are: Open, Shared, WPA, WPA-PSK, WPA2, WPA2-PSK, Mixed WPA2/WPA, and Mixed WPA2/WPA-PSK.
- Page 70 TD-W8950N 150Mbps Wireless N ADSL2+ Modem Router User Guide Figure 4-72 Figure 4-73 Encryption strength: Select the appropriate level of encryption, 64-bit or 128-bit. Current Network Key: To indicate which WEP key to use, select a transmission key number.
- Page 71 TD-W8950N 150Mbps Wireless N ADSL2+ Modem Router User Guide Figure 4-74 Note: We use Network Authentication Shared, Encryption Strength 64-bit, Current Network Key “1” and enter 10 hexadecimal digits”1234567890” in the Network Key 1 for example, as shown in...
- Page 72 TD-W8950N 150Mbps Wireless N ADSL2+ Modem Router User Guide WPA security for wireless communication has been developed to overcome some of the shortcomings of WEP. WPA combines the key generation with the authentication services of a RADIUS server. Figure 4-75 ...
- Page 73 TD-W8950N 150Mbps Wireless N ADSL2+ Modem Router User Guide Figure 4-76 WPA-PSK WPA-PSK requires a shared key and does not use a separate server for authentication. PSK keys can be ASCII or Hex type. Figure 4-77 WPA/WAPI passphrase: WPA/WAPI passphrase is also called Wireless Network Key. In this field, enter the key shared by the router and your other network devices.
- Page 74 TD-W8950N 150Mbps Wireless N ADSL2+ Modem Router User Guide Figure 4-78 Note: If you click the option “Click here to display”, the Figure 4-79 will pop-up, and it shows the password you have set. In addition, it won't show the blank characters in both ends of the password phrase.
- Page 75 TD-W8950N 150Mbps Wireless N ADSL2+ Modem Router User Guide WPA2 Preauthentication: Select Enable from the drop-down list, Stations will authenticate with the AP during the scanning process, and once association is required, the station has been already authenticated. Network Re-auth Interval: Enter a value in seconds as the frequency interval to enable periodic Network Re-authentication function, while leave it blank or enter “0”...
-
Page 76: Wireless Schedule
TD-W8950N 150Mbps Wireless N ADSL2+ Modem Router User Guide Figure 4-83 4.6.3 Wireless Schedule Choose menu “Wireless”“Wireless Schedule”, you can configure the Task Schedule as shown below. Figure 4-84 Note: The time you set is the period you need the wireless off. -
Page 77: Mac Filter
TD-W8950N 150Mbps Wireless N ADSL2+ Modem Router User Guide Add: Click this button to add your selected time to the below table. Click the Clear Schedule button to clear your settings in the table. Click Save to complete the settings. -
Page 78: Wireless Bridge
TD-W8950N 150Mbps Wireless N ADSL2+ Modem Router User Guide 4.6.5 Wireless Bridge Choose “Wireless””Wireless Bridge”, you will see the screen of Wireless--Bridge settings shown as below. You can configure wireless bridge features of the wireless LAN interface and click Save/Apply button to save the current configuration. -
Page 79: Advanced
TD-W8950N 150Mbps Wireless N ADSL2+ Modem Router User Guide Figure 4-89 Note: Only Open or Shared authentication method support wireless bridge, you should choose “Wireless”“Security” to change authentication method to “open” or ”shared” mode first. 4.6.6 Advanced Choose “Wireless””Advanced”, you will see the screen of Wireless--Advanced settings shown as below. -
Page 80: Station Info
TD-W8950N 150Mbps Wireless N ADSL2+ Modem Router User Guide Fragmentation Threshold: This value specifies the maximum size for a packet before data is fragmented into multiple packets. If you experience a high packet error rate, you may slightly increase the Fragmentation Threshold. Setting the Fragmentation Threshold too low may result in poor network performance. -
Page 81: Guest Network
TD-W8950N 150Mbps Wireless N ADSL2+ Modem Router User Guide MAC: Displays the connected wireless station's MAC address. Associated: Displays whether the wireless station has associated with the access point. Authorized: Displays the information of Authentication. SSID: Displays the connected wireless station's SSID. -
Page 82: Station List
TD-W8950N 150Mbps Wireless N ADSL2+ Modem Router User Guide Encryption: You can select either AES, or AES+TKIP. Wireless Password: Enter the wireless password for the Guest Network as you like. You also can click Click here to display to see the wireless password. -
Page 83: Management
TD-W8950N 150Mbps Wireless N ADSL2+ Modem Router User Guide Figure 4-94 4.9 Management Choose “Management”, there are eight submenus under the main menu. They are Settings, System Log, SNMP Agent, TR-069 Client, Internet Time, Access Control, Update Firmware and Reboot. Click any of them, and you will be able to configure the corresponding function. - Page 84 TD-W8950N 150Mbps Wireless N ADSL2+ Modem Router User Guide 4.9.1.1 Export Choose “Management”“Settings”“Export”, you can see the Export screen, this screen (shown in Figure 4-96) allows you to save the current configuration of the router as a backup file. Figure 4-96 To back up the router’s current settings:...
- Page 85 TD-W8950N 150Mbps Wireless N ADSL2+ Modem Router User Guide Figure 4-98 4.9.1.2 Import Choose “Management”“Settings”“Import”, you can see the Import screen, this screen (shown in Figure 4-99) allows you to update the router’s settings. Figure 4-99 To update the router’s settings: Click the Choose File button to locate the update file for the device, and you can also enter the exact path to the Setting file in the text box.
-
Page 86: System Log
TD-W8950N 150Mbps Wireless N ADSL2+ Modem Router User Guide 4.9.1.3 Restore Default Choose “Management”“Settings”“Restore Default”, you can see the Restore Default screen, this screen (shown in Figure 4-100) allows you to restore the router’s configuration to the factory defaults on the screen. -
Page 87: Snmp Agent
TD-W8950N 150Mbps Wireless N ADSL2+ Modem Router User Guide Figure 4-102 Refresh: Click the button, the information in the table will be updated. Back: Click the button, the screen will back to the previous page. To Configure the System Log Settings: Click the Configure System Log button (shown in Figure 4-101), you will see the screen below (shown in Figure 4-103). - Page 88 TD-W8950N 150Mbps Wireless N ADSL2+ Modem Router User Guide SNMP (Simple Network Management Protocol) has been widely applied in the computer networks currently, which is used for ensuring the transmission of the management information between any two nodes. In this way, network administrators can easily search and modify the information on any node on the network.
-
Page 89: Client
TD-W8950N 150Mbps Wireless N ADSL2+ Modem Router User Guide System Contact: The location of the person that is identified as the system contact. Trap Manager IP: Enter the IP address of the SNMP Manager,where the SNMP Agent forwards trap notifications. -
Page 90: Internet Time
TD-W8950N 150Mbps Wireless N ADSL2+ Modem Router User Guide Note: The Connection Request User Name and Connection Request Password are used for ACS log on the router and manage it. Select the desired values and click Save/Apply to configure the TR-069 client options. - Page 91 TD-W8950N 150Mbps Wireless N ADSL2+ Modem Router User Guide Figure 4-107 To change the password: Enter the Old Password in the text box. Enter the New Password and Confirm Password. The Confirm Password should be the same as the New Password.
-
Page 92: Firmware Upgrade
Upgrade Firmware: After you have selected the latest software, click the button. To upgrade the router's software: Download the latest software upgrade file from the TP-LINK website (http://www.tp-link.com). Click Choose File to view the folders and select the image file or enter the exact path to the image file location in the text box. -
Page 93: Reboot
TD-W8950N 150Mbps Wireless N ADSL2+ Modem Router User Guide 4.9.8 Reboot Choose “Management”“Reboot”, you can see the screen (shown in Figure 4-110) which allows you to reboot the router. Figure 4-110 Note: After you clicked the Reboot button, please wait for a while before reopening your web browser. -
Page 94: Appendix A: Specifications
TD-W8950N 150Mbps Wireless N ADSL2+ Modem Router User Guide Appendix A: Specifications General ANSI T1.413.I2, ITU G.992.1, ITU G.992.2, ITU G.992.3, IT U Standards G.992.5, IEEE 802.1p, IEEE 802.3, IEEE 802.3u, IEEE 802.11e, IEEE 802.11b , IEEE 802.11g , 802.11n, TR100, TR-067, TR-069... -
Page 95: Appendix B: Configuring The Pc
TD-W8950N 150Mbps Wireless N ADSL2+ Modem Router User Guide Appendix B: Configuring the PC In this section, we’ll introduce how to install and configure the TCP/IP correctly in Windows XP. First make sure your Ethernet Adapter is working, refer to the adapter’s manual if necessary. - Page 96 TD-W8950N 150Mbps Wireless N ADSL2+ Modem Router User Guide Figure B-0-2 The following TCP/IP Properties window will display and the IP Address tab is open on this window by default. Now you have two ways to configure the TCP/IP protocol below: ...
- Page 97 TD-W8950N 150Mbps Wireless N ADSL2+ Modem Router User Guide Figure B-0-3 Note: For Windows 98 OS or before, the PC and Router may need to be restarted. Setting IP address manually Select Use the following IP address radio button. And the following items available If the modem router's LAN IP address is 192.168.1.1, specify the IP address as 192.168.1.x...
- Page 98 TD-W8950N 150Mbps Wireless N ADSL2+ Modem Router User Guide Figure B-0-4 Now: Click OK to keep your settings.
-
Page 99: Appendix C: Troubleshooting
TD-W8950N 150Mbps Wireless N ADSL2+ Modem Router User Guide Appendix C: Troubleshooting T1. What can I do if I don’t know or forget my password? For default wireless password: Please refer to the “Wireless Password/PIN” labeled on the bottom of the modem router. - Page 100 TD-W8950N 150Mbps Wireless N ADSL2+ Modem Router User Guide Select Internet Protocol (TCP/IP), and then click Properties. Select Obtain an IP address automatically and Obtain DNS server address automatically. Then click OK. For Windows 8 Move your mouse to the lower right corner and you will see Search icon in the Popups.
- Page 101 TD-W8950N 150Mbps Wireless N ADSL2+ Modem Router User Guide Now, try to log on to the Web-based configuration page again after the above settings have been configured. If you still cannot access the configuration page, please restore your modem router’s factory default settings and reconfigure your modem router following the instructions in 3.2 Quick...
Need help?
Do you have a question about the TD-W8950N and is the answer not in the manual?
Questions and answers