Table of Contents
Advertisement
Quick Links
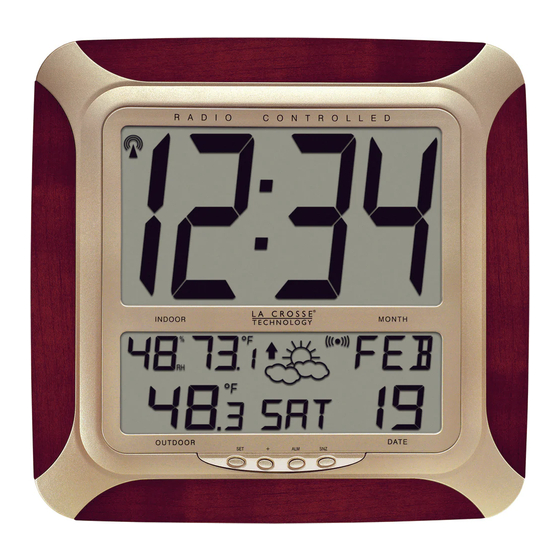
ATOMIC CLOCK WITH INDOOR TEMP/HUMIDITY AND OUTDOOR
FEATURES:
ATOMIC CLOCK:
LCD1
display
LCD2
display
Function keys
• WWVB Radio controlled time with manual time setting
• Time display: hour, minute, second
• Alarm setting with snooze function
• Complete calendar display
• Weekday display (3 languages to choose from: English, French and Spanish)
• Time zone setting
• Daylight savings time ON/OFF option (DST)
• Indoor temperature and humidity display
• Outdoor temperature display via 433MHz transmission
• Wall mount or freestanding
• Weather forecast with weather tendency indicator
WS-8249U
TEMPERATURE
Instruction Manual
1
Hanging holes
Battery cover
Foldable stands
Advertisement
Table of Contents

Related Manuals for La Crosse Technology WS-8249U-CH


Summary of Contents for La Crosse Technology WS-8249U-CH
- Page 1 WS-8249U ATOMIC CLOCK WITH INDOOR TEMP/HUMIDITY AND OUTDOOR TEMPERATURE Instruction Manual FEATURES: ATOMIC CLOCK: Hanging holes LCD1 display LCD2 Battery cover display Function keys Foldable stands • WWVB Radio controlled time with manual time setting • Time display: hour, minute, second •...
- Page 2 OUTDOOR TEMPERATURE TRANSMITTER: • Remote transmission of outdoor temperature to the atomic clock by 433 MHz signals Mounting Bracket • Wall mounting case TO INSTALL AND REPLACE BATTERIES IN THE TEMPERATURE TRANSMITTER The transmitter uses 2 x AA,1.5V batteries. To install and replace the batteries, please follow the steps below: Remove the cover.
-
Page 3: Function Keys
After 15 minutes both the Indoor and Outdoor areas on your clock should have a temperature showing. If not, remove both sets of batteries, wait 15 minutes and repeat step one. After the clock receives the outdoor temperature the WWVB time code reception will automatically start. -
Page 4: Manual Settings
ATOMIC CLOCK LCD SCREEN DESCRIPTIONS The atomic clock's LCD is divided into 2 sections and once the batteries are inserted, all the segments will light up briefly before displaying the information for time, date, indoor and outdoor temperatures and indoor humidity. Radio reception icon WWVB time Alarm icon... -
Page 5: Lcd Contrast Setting
Default (Factory) Setting • LCD contrast setting • Time zone setting -5 (Eastern Standard Time) • DST ON/OFF • Radio-controlled time ON/OFF • Language display setting ENG (English) • Manual time setting (Hour then Minute) 12 (hour), 00 (minute) • Year setting 2004 •... -
Page 6: Radio-Controlled Time Setting
Press and release the + key to select the desired time zone. Press and release the SET key to confirm the time zone setting and continue to the DST (Daylight Saving Time) setting. Note: The time zones from –4 to –10 hours will be displayed with 3 characters abbreviations: •... -
Page 7: Language Setting
Press and release the + key to select radio-controlled time ON or OFF. Press and release the SET key to confirm the radio-controlled time setting and continue to the Language setting. Note: Turn off the radio-controlled time feature only if you DO NOT want the clock to automatically update itself. -
Page 8: Year Setting
Note: The unit will still try to receive the signal every day despite it being manually set. When it does receive the signal, it will change the manually set time into the received time. During reception attempts the WWVB tower icon will flash. If reception has been unsuccessful, then the WWVB tower icon will not appear but reception will still be attempted the following hour. - Page 9 EXIT THE MANUAL SETTING MODES • To return to the normal display mode from anywhere in manual setting mode simply press the ALM key at anytime. • If no keys are pressed for at least 15 seconds in setting mode, the atomic clock will automatically switch back to normal display mode.
-
Page 10: Changing The Display Mode
The temperature is measured and transmitted to the atomic clock every 1 minute. The atomic clock will update the temperature display every 5 minutes. The range of the outdoor temperature transmitter may be affected by the temperature. At cold temperatures the transmitting distance may be decreased. Please bear this in mind when positioning the transmitter. -
Page 11: Wwvb Radio Controlled Time
To change the display: 1. Press and release the + key. The display should now show the seconds, indoor temperature and outdoor temperature. 2. Press and release the + key a second time. The display will now show the indoor humidity, seconds and outdoor temperature. -
Page 12: Weather Forecast
2,000 miles away through the internal antenna in the atomic clock. However, due to the nature of the Earth’s Ionosphere, reception is very limited during daylight hours. The atomic clock will search for a signal every night when reception is best. The WWVB radio station derives its signal from the NIST atomic clock in Boulder, Colorado. - Page 13 Weather Icons There are 3 possible weather icons that will be displayed in the LCD 2: Sunny—indicates that the weather is expected to improve (not that the weather will be sunny). Sun with Clouds—indicates that the weather is expected to be fair (not that the weather will be sunny with clouds).
-
Page 14: Wall Mounting
transmitter on a North-facing wall or in any well shaded area. The maximum transmitting range is 330 feet (100 meters). Obstacles such as walls, concrete, and large metal objects can reduce the range. Place both units in their desired location, and wait approximately 10 minutes before permanently mounting to ensure that there is proper reception. -
Page 15: Troubleshooting
POSITIONING THE OUTDOOR TEMPERATURE TRANSMITTER The outdoor temperature transmitter can be mounted in two ways: • with the use of screws • using the adhesive tape. MOUNTING WITH SCREWS Remove the mounting bracket from the outdoor temperature transmitter. Place the mounting bracket over the desired location. Through the three screw holes of the bracket, mark the mounting surface with a pencil. -
Page 16: Care And Maintenance
4) Remove batteries for five minutes, reinsert and leave the unit alone overnight without pressing any keys. Problem: Hour is incorrect (minute and date are correct). Solution: Be sure the correct time zone and daylight saving time are selected. "OFL“ appears in the indoor temperature section of the LCD Problem: Solution: 1) Move the atomic clock to an area with warmer or cooler surrounding... -
Page 17: Specifications
• Do not make any repairs to the units. Please return it to the original point of purchase. Opening and tampering with the units may invalidate the warranty. SPECIFICATIONS: Temperature measuring range Indoor: +14.1ºF to +99.8ºF with 0.2ºF resolution ("OFL" displayed if outside this range) Outdoor : -21.8ºF to +157.8ºF with 0.2ºF resolution ("OFL“... -
Page 18: Warranty Information
La Crosse Technology, Ltd or La Crosse Technology, Ltd’s authorized service center. La Crosse Technology, Ltd will repair or replace this product, at our option and at no charge as stipulated herein, with new or reconditioned parts or products if found to be defective during the limited warranty period specified above. - Page 19 LA CROSSE TECHNOLOGY, LTD WILL NOT ASSUME LIABILITY FOR INCIDENTAL, CONSEQUENTIAL, PUNITIVE, OR OTHER SIMILAR DAMAGES ASSOCIATED WITH THE OPERATION OR MALFUNCTION OF THIS PRODUCT.
- Page 20 All rights reserved. This handbook must not be reproduced in any form, even in excerpts, or duplicated or processed using electronic, mechanical or chemical procedures without written permission of the publisher. This handbook may contain mistakes and printing errors. The information in this handbook is regularly checked and corrections made in the next issue.
Need help?
Do you have a question about the WS-8249U-CH and is the answer not in the manual?
Questions and answers