Table of Contents
Advertisement
ATOMIC CLOCK WITH INDOOR TEMP/HUMIDITY AND OUTDOOR
FEATURES:
ATOMIC CLOCK:
LCD1
display
LCD2
display
• WWVB Radio controlled time with manual time setting
• Time display: hour, minute, second
• Alarm setting with snooze function
• Complete calendar display
• Weekday display (3 languages to choose from: English, French and Spanish)
• Time zone setting
• Daylight saving time ON/OFF option (DST)
• Indoor temperature and humidity display
• Outdoor temperature display via 433MHz transmission
• Wall mount or freestanding
• Weather forecast with weather tendency indicator
WS-8349U
TEMPERATURE
Instruction Manual
1
Hanging holes
Function
keys
Battery cover
Foldable stand
Advertisement
Table of Contents

Related Manuals for La Crosse Technology WS-8349U


Summary of Contents for La Crosse Technology WS-8349U
- Page 1 WS-8349U ATOMIC CLOCK WITH INDOOR TEMP/HUMIDITY AND OUTDOOR TEMPERATURE Instruction Manual FEATURES: Hanging holes ATOMIC CLOCK: LCD1 display Function keys Battery cover LCD2 display Foldable stand • WWVB Radio controlled time with manual time setting • Time display: hour, minute, second •...
- Page 2 OUTDOOR TEMPERATURE TRANSMITTER: • Remote transmission of outdoor temperature to the atomic clock by 433 MHz signals Mounting Bracket • Wall mounting case TO INSTALL AND REPLACE BATTERIES IN THE TEMPERATURE TRANSMITTER The transmitter uses 2 x AA,1.5V batteries. To install and replace the batteries, please follow the steps below: Remove the cover.
-
Page 3: Function Keys
After 15 minutes both the Indoor and Outdoor areas on your clock should have a temperature showing. If not, remove both sets of batteries, wait 15 minutes and repeat step one. After the clock receives the outdoor temperature the WWVB time code reception will automatically start. -
Page 4: Manual Settings
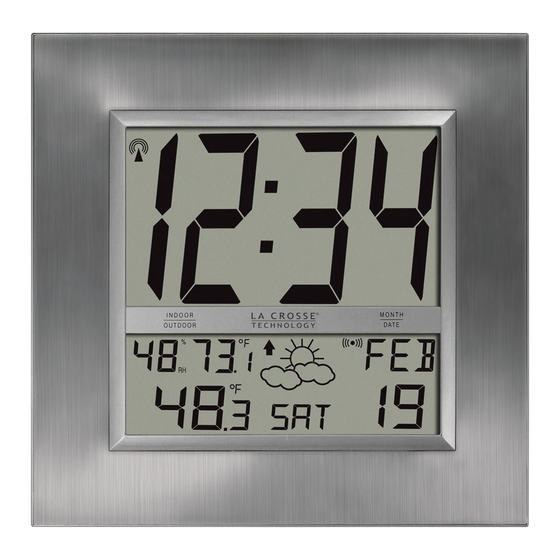
The atomic clock's LCD is divided into 2 sections and once the batteries are inserted, all the segments will light up briefly before displaying the information for time, date, indoor and outdoor temperatures and indoor humidity. Radio reception icon WWVB time Alarm icon Month Indoor humidity and... -
Page 5: Lcd Contrast Setting
Default (Factory) Setting • LCD contrast setting • Time zone setting -5 (Eastern Standard Time) • DST ON/OFF • Radio-controlled time ON/OFF • Language display setting ENG (English) • Manual time setting (Hour then Minute) 12 (hour), 00 (minute) • Year setting 2004 •... -
Page 6: Radio-Controlled Time Setting
Press and release the + key to select the desired time zone. Press and release the SET key to confirm the time zone setting and continue to the DST (Daylight Saving Time) setting. Note: The time zones from –4 to –10 hours will be displayed with 3 characters abbreviations: •... -
Page 7: Language Setting
Press and release the + key to select radio-controlled time ON or OFF. Press and release the SET key to confirm the radio-controlled time setting and continue to the Language setting. Note: Turn off the radio-controlled time feature only if you DO NOT want the clock to automatically update itself. -
Page 8: Year Setting
Select the desired minutes by pressing and releasing the + key. If the + key is held, the units will increase by 5. Press and release the SET key to confirm the Time setting and continue to the Year setting. Note: The unit will still try to receive the signal every day despite it being manually set. -
Page 9: Alarm Setting
Press and release the + key to select the desired date. Press and release the SET key to confirm the Date setting and exit the manual setting mode. Note: The date can only be set in conjunction with the selected month. For example, it is not possible to set the date 30 if the month of February is selected. -
Page 10: Snooze Setting
SNOOZE SETTING The snooze can only be activated during alarm time for a snooze duration of 10 minutes by pressing the SNZ key on the back of the clock. OUTDOOR TEMPERATURE TRANSMITTER: The temperature is measured and transmitted to the atomic clock every 1 minute. The atomic clock will update the temperature display every 5 minutes. -
Page 11: Changing The Display Mode
CHANGING THE DISPLAY MODE (SECONDS,TEMPERATURES AND HUMIDITY) There are four possible display modes to view the seconds, temperatures and humidity. The indoor humidity, indoor temperature and outdoor temperature display is the default (factory) setting. To change the display: 1. Press and release the + key. The display should now show the seconds, indoor temperature and outdoor temperature. -
Page 12: Wwvb Radio Controlled Time
WWVB RADIO CONTROLLED TIME The NIST radio station, WWVB, is located in Ft. Collins, Colorado and transmits the exact time signal continuously throughout the United States at 60 kHz. The signal can be received up to 2,000 miles away through the internal antenna in the atomic clock. However, due to the nature of the Earth’s Ionosphere, reception is very limited during daylight hours. - Page 13 The weather forecasting feature is estimated to be 75% accurate. The weather forecast is based solely upon the change of air pressure over time. The WS-8349U averages past air-pressure readings to provide an accurate forecast, creating a necessity to disregard all weather forecasting for 12-24 hours after the unit has been set-up, reset, or moved from one altitude to another (i.e.
- Page 14 POSITIONING Before permanently mounting ensure that the atomic clock is able to receive WWVB signals from the desired location. Also, extreme and sudden changes in temperature will decrease the accuracy of the atomic clock, and changes in elevation will result with inaccurate temperatures readings for the next 12 to 24 hours.
-
Page 15: Mounting With Screws
2) Install three mounting screws (not included) into a wall —leaving approximately 3/16 of an inch (5mm) extended from the wall. 3) Place the atomic clock onto the screws, using the hanging holes on the backside. Gently pull the atomic clock down to lock the screws into place. Note: Always ensure that the atomic clock locks onto the screws before releasing. -
Page 16: Troubleshooting
TROUBLESHOOTING Problem: The LCD is faint. 1) Replace the batteries. Solution: No reception of WWVB signal Problem: Solution: 1) It may help reception to face the front of the atomic clock in the general direction of Ft. Collins, Colorado. 2) Wait overnight for signal. 3) Be sure the atomic clock is at least 6 feet (2 meters) from any electrical devices, i.e. -
Page 17: Specifications
• Avoid areas where the units can be exposed to sudden changes in temperature, i.e. direct sunlight, extreme cold and wet/moist conditions as these will lead to rapid changes which reduce the accuracy of readings. • When cleaning the LCD and casing, use a soft damp cloth only. Do not use solvents or scouring agents. -
Page 18: Warranty Information
La Crosse Technology, Ltd or La Crosse Technology, Ltd’s authorized service center. La Crosse Technology, Ltd will repair or replace this product, at our option and at no charge as stipulated herein, with new or reconditioned parts or products if found to be defective during the limited warranty period specified above. - Page 19 Your La Crosse Technology, Ltd warranty covers all defects in material and workmanship with the following specified exceptions: (1) damage caused by accident, unreasonable use or neglect (including the lack of reasonable and necessary maintenance); (2) damage occurring during shipment (claims must be presented to the carrier); (3) damage to, or deterioration of, any accessory or decorative surface;...
- Page 20 web: www.lacrossetechnology.com Questions ? Instructions? Please visit: www.lacrossetechnology.info/8349 All rights reserved. This handbook must not be reproduced in any form, even in excerpts, or duplicated or processed using electronic, mechanical or chemical procedures without written permission of the publisher. This handbook may contain mistakes and printing errors. The information in this handbook is regularly checked and corrections made in the next issue.
Need help?
Do you have a question about the WS-8349U and is the answer not in the manual?
Questions and answers