Table of Contents
Advertisement
Quick Links
http://au.lge.com (Australia)
http://nz.lge.com (New Zealand)
Ceramic Glass Induction
Radiant HOB
Installation and Operating Instructions
To avoid the risk of accidents or damage to the HOB,
it is essential to read these operating instructions
before it is installed or used for the first time.
And please keep this manual for later reference.
KA65310S
KA65310A
KA65310F
KA65320S
P/No. :3828W5A8165
Advertisement
Table of Contents

Related Manuals for LG KA65310S


Summary of Contents for LG KA65310S
- Page 1 (Australia) http://nz.lge.com (New Zealand) Ceramic Glass Induction Radiant HOB Installation and Operating Instructions KA65310S KA65310A KA65310F KA65320S To avoid the risk of accidents or damage to the HOB, it is essential to read these operating instructions before it is installed or used for the first time.
- Page 2 Dear Customer Please read these operating instructions carefully. Above all, please observe the “safety” section on the first few pages. Please retain these operating instructions for later reference. Pass them on to any subsequent owners of the appliance. The following symbols are used in the text: Safety information -- Warning: Information concerning your personal safety.
-
Page 3: Table Of Contents
Contents Safety ..................4-7 Induction .................. 8-9 Suitable Kitchenware ............10-12 Description of the appliance ........... 13 Cooking zones and control ............13 The key features of your appliance .........14 Operating Instructions ............15-22 Before using for the first time ........... 15 Operating the hob .............. -
Page 4: Safety
Safety The safety aspects of this appliance comply with accepted technical standards and IEC Standards. However, as the manufacturer we also believe it is our responsibility to familiarize you with the following safety instructions. Electrical Safety • The installation and connection of the new appliance must only be carried out by qualified personnel. - Page 5 Child Safety This appliance is not intended for use by young children or infirm persons unless they have been adequately supervised by a responsible person to ensure that they can use the appliance safely. Young children should be supervised to ensure that they do not play with the appliance.
- Page 6 Safety Safety When Cleaning • Always switch off the appliance before cleaning. • For safety reasons do not clean the appliance with a steam jet or high pressure cleaner. • Clean the hob in accordance with the maintenance and cleaning instructions in this manual.
- Page 7 Disposal of old appliances Warning: Before disposing of old appliances please make them inoperable so that they cannot be the source of danger. To do this, have a qualified person disconnect the appliance from the house circuitry. To protect the environment, it is important that worn out appliances are disposed of in the correct manner.
-
Page 8: Induction
Induction Functionality of Cooking Zones An induction coil is beneath the ceramic glass cooking surface. This generates magnetic fields, which act directly on the base of the pots and pans compare as with other heating methods, first heating the ceramic glass. This means that the base of the pan is immediately heated up, which saves time and energy. - Page 9 Suitable Kitchenware for Induction Cooking Zones Pots and Pans • In principle all pots and pans with magnetic bases are suitable. These are steel, steel-enamel as well as cast-iron pots and pans. • High grade steel pans with a mixed metal base (sandwich base, e.g.
-
Page 10: Suitable Kitchenware
Suitable Kitchenware Pan Size Up to a certain limit the induction cooking zone adapts itself to the size of the pan base diameter. However, the pan base diameter must be of a minimum size, depending on the size of the cooking zone. - Page 11 Pots and pans The better the pot, the better the cooking results. • You can recognize good pots and pans by their bases. The base should be as thick and flat as possible. • When buying new pots and pans, pay particular attention to the diameter of the base.
- Page 12 Suitable Kitchenware Tips on saving energy You will save valuable energy by observing the following points: • Always position pots and pans before you switch on the cooking zone. • Dirty cooking zones and pot bases increase the power consumption. •...
-
Page 13: Description Of The Appliance
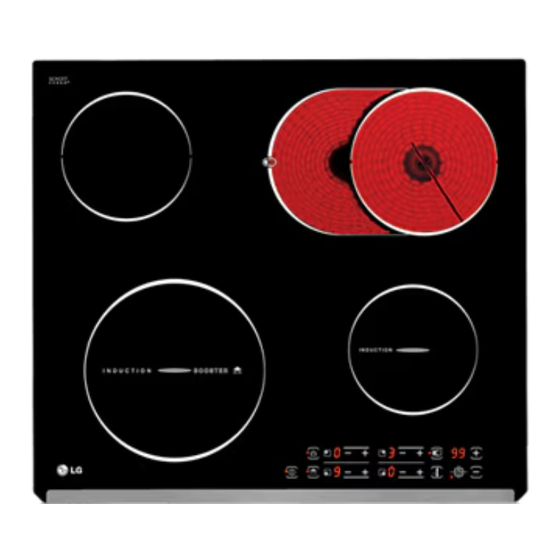
Description of the Appliance Cooking zones and control Radiant cooking zone Radiant cooking zone 1200W 15cm 2400W 26cm Touch-Control Induction cooking zone 21cm Induction cooking zone 2200W (Normal) 1400W 15cm 3300W (Boost) Oval Child Lock Selection Timer Up ON/OFF Boost Pause Timer Timer Down... -
Page 14: The Key Features Of Your Appliance
The Key Features of Your Appliance • Induction cooking zones: The appliance is fitted with ceramic glass and induction cooking zones. Induction heats the base of the pan immediately and does not heat the ceramic glass hob first. • Touch Control: Your appliance is operated using Touch-Control. •... -
Page 15: Operating Instructions
Operating Instructions Before using for the first time Initial Cleaning Wipe the ceramic glass surface with a damp cloth and ceramic cooktop glass cleaner. Important: Do not use any caustic, abrasive cleaners! The surface could be damaged. Operating the hob Touch Control Keys To operate a Touch Key, simply place your finger firmly on key. -
Page 16: Cooking Zone Selection
Operating Instructions When an individual cooking zone or the entire hob is switched off, any residual heat is shown with an in the display for the appropriate cooking zones. Cooking zone selection For setting and adjusting the power level ( ) for cooking, touch the relative cooking zone key. - Page 17 1. To set quickly when the power level “0” is displayed. Touch the key. The first time is pressed, the heat level is set to The first time is pressed, the heat level is set to If power level is on and it is desired to turn off burner, the key can be pressed one additional time, and the heating level will 2.
-
Page 18: Boost Function
Operating Instructions Boost Function Using the boost function you can increase the power on the left Induction Burner temporary. With this function you can, for example, bring a large quantity of water rapidly to boil or brown meat. Set the desired power level of the left front burner. To switch on the boost function, touch the key. -
Page 19: Child Lock
Child Lock With this key the control can be locked, as a safety precaution for children. Touch this key one more time, Child Lock will be released. about 3 secs. Oval Selection With this key the left position of the Right Rear Cooking Zone is switched on. -
Page 20: Timer
Operating Instructions Timer A cooking duration can be set with the integrated timer for all cooking zones. When the end of the cooking duration is reached, the cooking zone switches off automatically. 1. Using the cooking zone key, select the required cooking zone and set the required heat level. - Page 21 3. Using the key set or adjust the required period of time (eg. 30 minutes). After a few seconds the timer will start automatically and will show how much time remains before it will switch off. At the end of the set cooking time, the cooking zone will switch off automatically and a signal will sound.
-
Page 22: Pause
Operating Instructions Pause Selecting the Pause Key lowers each active burner to low setting. When pause is deactivated each burner returns to it’s original setting. -
Page 23: Uses, Tables And Tips
Uses, Tables and Tips Chart for Setting the Cooking Zones Heat setting suitable for 9 or Boost Heating Up Bringing liquid to a boil. Heavy Browning meat, heat oil for deep fat Browning frying or sauteing. Deep fat Maintaining fast boil for large frying amounts of liquids. -
Page 24: Automatic Time Limiter
Automatic time limiter If a element is in constant use for a long time without the setting being changed, the automatic time limiter is activated. Then, power level is set automatically. Touching will reset the burner. The following table shows the automatic limiter activation times. -
Page 25: Cleaning And Care
Cleaning and care The cleaning effort for induction ceramic glass cooking surfaces is considerably less than for cooking surfaces with radiant heating: - The induction cooking zone reacts faster to switching down and off. Boiling over and burning of dishes is avoided to a large degree. - Page 26 Cleaning and Care Light Soiling 1. Wipe the ceramic glass surface with a damp cloth and a little cooktop cleaner. 2. Then rub dry with a clean cloth. Remnants of cleaner must not be left on the surface. 3. Thoroughly clean the entire ceramic glass cooking surface once a week with a commercially available ceramic glass or stainless steel cleaner.
- Page 27 Problem Soils 1. Remove sugar, melted plastic, aluminium foil or other meltable materials with a glass scraper immediately and while still hot. Important: There is a risk of burning yourself when the glass scraper is used on a hot cooking zone! 2.
-
Page 28: Installation Instructions
Installation Instructions Technical Data Important! The new appliance may only be installed and connected by a registered specialist. Please observe these instructions, otherwise the warranty will not cover any damage that may occur. Appliance dimensions Width 575mm Depth 515mm Height 48mm Worktop cut-out dimensions Width... -
Page 29: Safety Instructions For The Installer
Safety Instructions for the Installer • A device must be provided in the electrical installation which allows the appliance to be disconnected from the mains at all poles with a contact opening width of at least 3 mm Suitable isolation devices include line protecting cut-outs, fuses (screw type fuses are to be removed from the holder), earth leakage trips and contactors. -
Page 30: Electrical Connection
Installation Instructions Electrical Connection Before connecting, check that the nominal voltage of the appliance, that is the voltage stated on the rating plate, corresponds to the available supply voltage. The rating plate is located on the lower casing of the hob. Shut off power to circuit before connecting hob wires to circuit. - Page 31 <Fig. 1> Warning: Pay attention (conformity) to phase and neutral allocation of house connection and appliance (connection scheme), otherwise components can be damaged. No guarantee cláims for disfunctional unit through improper installation. Will be accepted. The junction box should comply with the electrical spec and endurance temp for HOB.
-
Page 32: Assembly
Installation Instructions Assembly Bracing <Fig. 2> Remove the bracing from the Furniture furniture for hob airflow. min. 50 mm <Fig. 3> min. 50 mm min. 50 mm min. 5 mm Follow Fig.3 for minimum required surface clearances. - Page 33 <Fig. 4> Cabinet cutout and mounting clip locations.
- Page 34 Installation Instructions The board is to be installed underneath the hob. <Fig. 5> Hob into cutout as shown in Fig. 5. Caution: It is very important to keep 20 mm distance between hob case and combustible surface. <Fig. 6> Make sure hob is fully seated, with foam tape compressed against countertop.
- Page 35 <Fig. 7> To remove the hob, it must be pressed out from below. <Fig. 8> Junction box should be located 500mm below of the hob. Warning: The juction box may melt or burn if it is not located 500mm below of the hob.
-
Page 36: Troubleshooting
Troubleshooting Malfunctions often have simple explanations. Please read the following instructions before calling the after-sales service: Problem description Possible cause or Remedies Hob not work. • Check below. – Main Fuse (fuse box). (If the fuse blows several times, please call an approved electrician.) –... - Page 37 Problem description Possible cause or Remedies Indicator shows • Check that the household fuses for the appliance are OK. Check if there has been a power outage. The control panel is very dirty, food has spilt over or there is an object on the control panel.
- Page 38 Installation Instructions Problem description Possible cause or Remedies Indicator shows • display and numbers If an and numbers appear in the display panels, there is a fault with the electronics. Switch the Hob off and back on again using the household fuse or the circuit breaker in the fuse box.
-
Page 39: Service
Service Packaging and old appliances Your new appliance was protected by suitable packaging while it was on its way to you. All materials used for this purpose are environmentally friendly and can be recycled. Please make a contribution to protecting the environment by disposing of the packaging appropriately. - Page 40 Memo...
- Page 42 Memo...
- Page 44 FOR WARRANTY SERVICE PLEASE CONTACT LG Service on 1300 LG CARE (1300 54 2273) AUSTRALIA or 0800 LG CARE (0800 54 2273) NEW ZEALAND LG Electronics Australia 2 Wonderland Drive Eastern Creek NSW 2766 (ABN : 98 064 531 264)
Need help?
Do you have a question about the KA65310S and is the answer not in the manual?
Questions and answers