AEG BE2003021 User Manual
Hide thumbs
Also See for BE2003021:
- User manual (32 pages) ,
- User manual (24 pages) ,
- User manual (24 pages)
Table of Contents
Advertisement
Quick Links
Advertisement
Table of Contents

Related Manuals for AEG BE2003021


Summary of Contents for AEG BE2003021
- Page 1 EN OVEN BE2003021 USER MANUAL...
- Page 2 FOR PERFECT RESULTS Thank you for choosing this AEG product. We have created it to give you impeccable performance for many years, with innovative technologies that help make life simpler – features you might not find on ordinary appliances. Please spend a few minutes reading to get the very best from it.
-
Page 3: Table Of Contents
Contents CONTENTS 4 Safety information 5 Safety instructions 8 Product description 9 Before first use 10 Daily use 11 Clock functions 12 Using the accessories 13 Additional functions 13 Helpful hints and tips 20 Care and cleaning 23 What to do if… 24 Installation 27 Environment concerns 27 GREAT BRITAIN &... -
Page 4: Safety Information
Safety information SAFETY INFORMATION Before the installation and use of the appliance, carefully read the supplied instructions. The manufacturer is not responsible if an incor- rect installation and use causes injuries and damages. Always keep the instructions with the appliance for future reference. Children and vulnerable people safety WARNING! Risk of suffocation, injury or permanent disability. -
Page 5: Safety Instructions
Safety instructions SAFETY INSTRUCTIONS Installation WARNING! Only a qualified person must install this appliance. • Remove all the packaging. • Do not install or use a damaged appliance. • Obey the installation instruction supplied with the appliance. • Always be careful when you move the appliance because it is heavy. Always wear safety gloves. - Page 6 Safety instructions WARNING! Risk of injury, burns or electric shock or explosion. • Use this appliance in a household environment. • Do not change the specification of this appliance. • Make sure that the ventilation openings are not blocked. • Do not let the appliance stay unattended during operation. •...
- Page 7 Safety instructions • Before maintenance, deactivate the appliance and disconnect the mains plug from the mains socket. • Make sure the appliance is cold. There is the risk that the glass panels can break. • Replace immediately the door glass panels when they are damaged. Contact the Service. •...
-
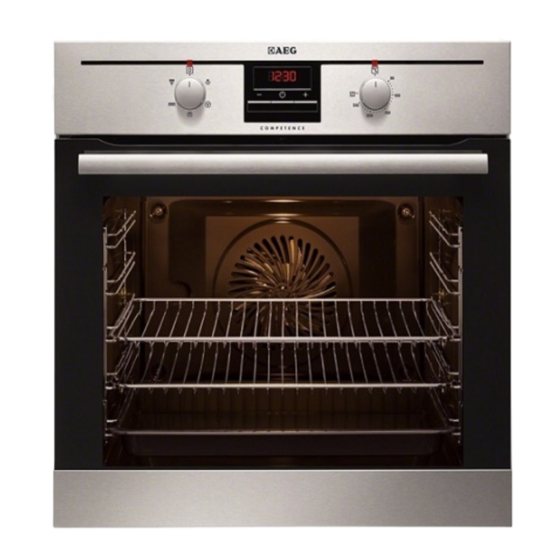
Page 8: Product Description
Product description PRODUCT DESCRIPTION General overview Control panel Control knob for oven functions Power lamp/symbol Electronic programmer Control knob for temperature Temperature lamp/symbol/indicator Heating element Oven lamp Rear wall heating element Bottom heat Shelf support, removable Shelf positions... -
Page 9: Before First Use
Before first use Accessories • Wire shelf For cookware, cake tins, roasts. • Grill / roasting pan To bake and roast or as pan to collect fat. • Trivet For roasting and grilling. Use the trivet only with the grill/roasting pan. BEFORE FIRST USE WARNING! Refer to "Safety information"... -
Page 10: Daily Use
Daily use When you connect the appliance to the electrical supply or in case of a power cut, the Time func- tion indicator flashes automatically. To set the current time use " + " or " - " button. After approximately 5 seconds, the flashing stops and the display shows the time of day set. -
Page 11: Clock Functions
Clock functions Electronic programmer Function indicators Function indicators Time display Button "+" Selection button Button "-" CLOCK FUNCTIONS Clock function Application Time of day Shows the time. To set, change or check the time. Minute minder To set a countdown time. A signal sounds, after the time period is completed. -
Page 12: Using The Accessories
Using the accessories Turn the oven functions control knob and the temperature control knob to off posi- tion. Cancelling the clock functions Push the Selection button again and again until necessary function indicator flashes. Push and hold button "- ". After some seconds the clock function goes out. -
Page 13: Additional Functions
Additional functions You can use the trivet to roast larger pieces of meat or poultry on one level: • Put the trivet inside the deep pan so that the supports of the oven shelf point up. • Put the deep pan in the oven at the necessa- ry level. - Page 14 Helpful hints and tips When you use frozen food, the trays in the oven can twist during baking. When the trays get cold again, the distortion will be gone. How to use the Baking Tables • We recommend to use the lower temperature the first time. •...
-
Page 15: Helpful Hints And Tips
Helpful hints and tips Type of baking Oven function Shelf position Temperature (°C) Time (min) Madeira cake / fruit True Fan Cooking 140 - 160 70 - 90 cakes Fatless sponge cake True Fan Cooking 140 - 150 35 - 50 Flan base - short pastry True Fan Cooking 10 - 25... - Page 16 Helpful hints and tips Bakes and gratins Dish Oven function Shelf position Temperature (°C) Time (min) Vegetables au Turbo Grilling or 160 - 170 15 - 30 True Fan Cooking gratin Baguettes topped Turbo Grilling or with melted 160 - 170 15 - 30 True Fan Cooking cheese...
- Page 17 Helpful hints and tips True Fan Cooking Temperature in Type of baking Shelf position Time in min. °C 2 levels 3 levels Small cakes / Small cakes (20 1 / 4 25 - 40 per tray) 1) Preheat the oven Roasting with Turbo Grilling Beef Oven func-...
- Page 18 Helpful hints and tips Type of meat Quantity Oven func- Shelf position Temperature Time min. tion °C Saddle of 1 - 1.5 kg Turbo Grilling 160 - 180 40 - 60 lamb Poultry Type of meat Quantity Oven func- Shelf position Temperature Time min.
- Page 19 Helpful hints and tips Time in min. Food to be gril- Shelf position Temperature 1st side 2nd side Whole Fish, 500 - 3 / 4 210 - 230 15 - 30 15 - 30 1000 g Fast Grilling Time in min. Food to be grilled Shelf position 1st side...
-
Page 20: Care And Cleaning
Care and cleaning Vegetables Shelf position Temperature in Time in hours Food to be dried °C (Guideline) 1 level 2 levels Beans 60 - 70 6 - 8 Peppers 60 - 70 5 - 6 Vegetables for 60 - 70 5 - 6 sour Mushrooms... - Page 21 Care and cleaning Removing the shelf support Pull the front of the shelf support away from the side wall. Pull the shelf support from the back of the side wall to remove it. To install the shelf support follow the proce- dure in reverse.
- Page 22 Care and cleaning Ceiling You can fold down the heating element on the ceiling to clean the ceiling easily. WARNING! Before you fold down the heating element, deactivate the appliance. Make sure that the appliance is cold. There is a risk of burns! Folding down the heating element Remove the shelf supports.
-
Page 23: What To Do If
What to do if… Removing and cleaning the door glass panels Remove the door. Hold the door trim (B) on the top edge of the door at the two sides and push inwards to release the clip seal. Pull the door trim to the front to re- move it. -
Page 24: Installation
Installation The necessary data for the service centre is on the rating plate. The rating plate is on the front frame of the appliance cavity. We recommend that you write the data here: Model (MOD.) ......... Product number (PNC) ......... Serial number (S.N.) ......... - Page 25 Installation min. 50 mm 560 min. 20 min. ! 530 min.
- Page 26 Installation 560 min. 530 min. 590 min. alternativ 100 max. R1200 mm H05VV-F H05RR-F min. 1600 mm 90 º...
-
Page 27: Environment Concerns
Environment concerns 2x3,5x25 ENVIRONMENT CONCERNS The symbol on the product or on its packaging indicates that this product may not be treated as household waste. Instead it should be taken to the appropriate collection point for the recycling of electrical and electronic equipment. By ensuring this product is disposed of correctly, you will help prevent potential negative consequences for the environment and human health, which could otherwise be caused by inappropriate waste handling of this product. -
Page 28: European Guarantee
Addington Way, Luton, Bedfordshire, LU4 9QQ or visit our website at www.electrolux.co.uk Customer Care Depart- Tel: (Calls may be recorded for training purposes) ment, Electrolux 08445 613 613 AEG-Electrolux 08445 611 611 Zanussi-Electrolux 08445 612 612 For Customer Service in The Republic of Ireland please contact us at the address below: Electrolux Group (Irl) Ltd, Long Mile Road, Dublin 12, Republic of Ireland Tel: +353 (0)1 4090751, Email: service.eid@electrolux.ie... - Page 29 www.electrolux.com • The appliance guarantee is for the same period and to the same extent for labour and parts as exists in your new country of residence for this particular model or range of ap- pliances. • The appliance guarantee is personal to the original purchaser of the appliance and can- not be transferred to another user.
- Page 30 Norge +47 81 5 30 222 Risløkkvn. 2 , 0508 Oslo Österreich 0810 955030 Herziggasse 9, 1230 Wien Polska +48 22 43 47 300 ul. Kolejowa 5/7, Warszawa Portugal +35 12 14 40 39 39 Quinta da Fonte - Edificio Gonçalves Zar- co - Q 35 -2774-518 Paço de Arcos Romania +40 21 451 20 30...
- Page 32 892949617-A-272012...
Need help?
Do you have a question about the BE2003021 and is the answer not in the manual?
Questions and answers