Advertisement
Available languages
Available languages
Quick Links
KI6111P
Het toestel-identificatieplaatje bevindt zich aan de onderkant van het toestel.
The appliance identification card is located on the bottom of the appliance.
Plak hier het toestel-identificatieplaatje.
Handleiding
Manual
Stick the appliance identification card here.
Houd, wanneer u contact opneemt met de serviceafdeling,
het complete typenummer bij de hand.
When contacting the service department,
have the complete type number to hand.
Adressen en telefoonnummers van de serviceorganisatie vindt u op de garantiekaart.
You will find the addresses and phone numbers of the service organisation on the guarantee card.
Advertisement

Subscribe to Our Youtube Channel
Related Manuals for Atag KI6111P


Summary of Contents for Atag KI6111P
- Page 1 KI6111P Het toestel-identificatieplaatje bevindt zich aan de onderkant van het toestel. The appliance identification card is located on the bottom of the appliance. Plak hier het toestel-identificatieplaatje. Handleiding Manual Stick the appliance identification card here. Houd, wanneer u contact opneemt met de serviceafdeling, het complete typenummer bij de hand.
- Page 2 Inhoud HANDLEIDING Uw inductiekookplaat Inleiding Bedieningspaneel Beschrijving Veiligheidsvoorschriften 7 - 9 Gebruik Even wennen 10 - 11 Pannen 12 - 13 Bediening Instellen 14 - 21 Koken 22 - 23 Onderhoud Reinigen Storingen Algemeen 25 - 26 Installatievoorschrift Algemeen Elektrische aansluiting Bijlage Afvoeren toestel en verpakking Technische gegevens...
- Page 3 Inleiding UW INDUCTIEKOOKPLAAT Deze inductiekookplaat is ontworpen voor de echte kookliefhebber. Koken op een inductiekookplaat heeft een aantal voordelen. Het is comfortabel, omdat de kookplaat snel reageert en ook op een zeer laag vermogen is in te stellen. Dankzij het hoge vermogen gaat het aan de kook brengen zeer snel.
- Page 4 Bedieningspaneel UW INDUCTIEKOOKPLAAT Tijd verlagen toets Tijd ophogen toets Boost met indicatielampje Vermogen verlagen zone linksvoor Kookzoneaanduiding Vermogen verhogen zone linksvoor Bediening overige kookzones (Kinder)slot met indicatielampje Aan-/uittoets met indicatielampje Pauze met indicatielampje Standen-indicatie zone rechtsvoor Standen-indicatie zone rechtsachter Standen-indicatie zone linksachter Standen-indicatie zone linksvoor Indicatie kookwekker zone rechtsvoor Indicatie kookwekker zone rechtsachter...
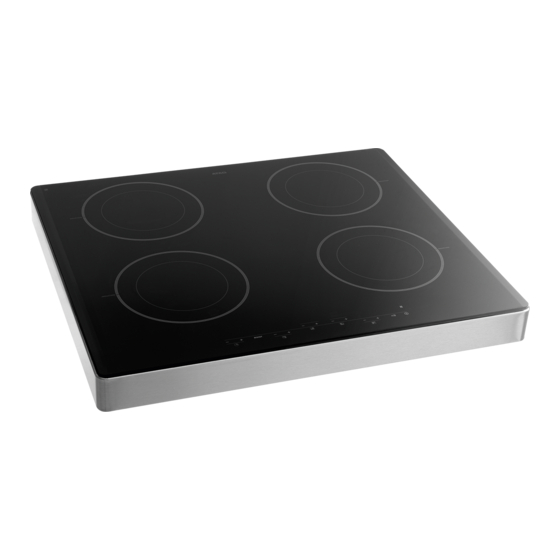
- Page 5 Beschrijving UW INDUCTIEKOOKPLAAT KI6111P Kookzone linksvoor Ø180 3,0 kW Kookzone linksachter Ø180 3,0 kW Kookzone rechtsachter Ø180 3,0 kW Kookzone rechtsvoor Ø180 3,0 kW NL 6...
- Page 6 Veiligheidsvoorschriften UW INDUCTIEKOOKPLAAT Waar u op moet letten Inductiekoken is uiterst veilig. De kookplaat is uitgerust met diverse beveiligingen zoals restwarmte-signalering en kookduurbegrenzing. Toch is er net als bij elk toestel een aantal zaken waar u op moet letten. Aansluiten en reparatie •...
- Page 7 Veiligheidsvoorschriften UW INDUCTIEKOOKPLAAT • De kookzones worden warm tijdens gebruik en blijven na gebruik ook een tijd warm. Laat geen kleine kinderen in de buurt tijdens en vlak na het koken. • Vet en olie zijn bij oververhitting ontvlambaar. Ga niet te dicht bij de pan staan.
- Page 8 Veiligheidsvoorschriften UW INDUCTIEKOOKPLAAT Temperatuurbeveiliging • Elke kookzone is voorzien van een sensor. Deze sensor controleert ononderbroken de temperatuur van de bodem van de kookpan en van de onderdelen van de kookplaat om elk risico op oververhitting, bij bijvoorbeeld een drooggekookte pan, te vermijden.
- Page 9 Even wennen GEBRUIK Werking van de aanraaktoetsen Het bedienen van de kookplaat door middel van de aanraaktoetsen is even wennen als u andere bediening gewend bent. Leg uw vingertoppen plat op de toetsen voor het beste effect. U hoeft niet hard te drukken.
- Page 10 Even wennen GEBRUIK Werking inductie In het toestel wordt een magnetisch veld opgewekt. Door een pan met een ijzeren bodem op een kookzone te plaatsen ontstaat in de panbodem een inductiestroom. Deze inductiestroom wekt warmte op in de panbodem. Comfortabel De spoel (1) in de De elektronische regeling is nauwkeurig en eenvoudig in te stellen.
- Page 11 Pannen GEBRUIK Pannen voor inductiekoken Inductiekoken stelt eisen aan de kwaliteit van de pannen. Let op • Pannen waarmee al eerder op een gaskookplaat is gekookt, zijn niet meer geschikt voor inductiekoken. • Gebruik alleen pannen die geschikt zijn voor elektrisch- en inductiekoken met: º...
- Page 12 Pannen GEBRUIK Let op Gebruik nooit pannen met een vervormde bodem. Een holle of bolle bodem kan de werking van de oververhittingsbeveiliging belemmeren. Het toestel kan dan te warm worden waardoor de glasplaat kan barsten en de panbodem kan smelten. Schade, ontstaan door het gebruik van ongeschikte pannen of droogkoken, valt buiten de garantie.
- Page 13 (als er een pan gedetecteerd wordt). º Drukt u de eerste keer op de toets, dan verschijnt stand ‘4.’. F00002557 - LED Screen ATAG TC (700002940000) º Drukt u de eerste keer op de toets, dan verschijnt stand ‘9.’. 24-08-09 IH...
- Page 14 De boost functie is ingeschakeld, in de display is ‘P.’ zichtbaar. 1. Druk op de toets. In de display verschijnt vermogensstand 9 , de boost functie is 00002557 - LED Screen ATAG TC (700002940000) 00002557 - LED Screen ATAG TC (700002940000) uitgeschakeld. 24-08-09 IH 4-08-09 IH 2.
- Page 15 Alle kookzones tegelijk uitschakelen De kookplaat staat in stand-by modus, of één of meerdere kookzones is actief. F00002557 - LED Screen ATAG TC (700002940000) F00002557 - LED Screen ATAG TC (700002940000) 1. Druk kort op de aan-/uittoets om alle kookzones gelijktijdig...
- Page 16 (Kinder)slot U kunt de kookplaat met het (kinder)slot vergrendelen. Onbedoeld inschakelen of wijzigen van instellingen van de kookzones wordt F00002557 - LED Screen ATAG TC (700002940000) hiermee voorkomen. 24-08-09 IH F00002557 - LED Screen ATAG TC (700002940000)
- Page 17 Zet de kookplaat in de kinderslot modus voordat u de kookplaat gaat reinigen om te voorkomen dat deze per ongeluk inschakelt. Pauze F00002557 - LED Screen ATAG TC (700002940000) 24-08-09 IH Met de pauze functie kunt u de gehele kookplaat tijdens het koken gedurende 10 minuten ‘op pauze’...
- Page 18 (De instellingen zijn terug te halen zo lang het rode lampje rechtsboven de toets knippert). Herkennen van een modus F00002557 - LED Screen ATAG TC (700002940000) 24-08-09 IH In de display van elke kookzone is ‘0.’ zichtbaar. Het rode lampje rechtsboven de...
- Page 19 10 seconden automatisch uit. De eierwekker uitschakelen F00002557 - LED Screen ATAG TC (700002940000) F00002557 - LED Screen ATAG TC (700002940000) (Stap 1 en 2 zijn niet van toepassing indien één of meerdere kookzones 24-08-09 IH 24-08-09 IH actief zijn).
- Page 20 Het rode lampje van de kookwekker van de actieve kookzone blijft knipperen. Als u geen tijd instelt met de toets gaat de kookwekker F00002557 - LED Screen ATAG TC (700002940000) F00002557 - LED Screen ATAG TC (700002940000) na 10 seconden automatisch uit. 24-08-09 IH 24-08-09 IH 3.
- Page 21 BEDIENING Gezond koken Rookpunt van verschillende oliesoorten Om gezond te bakken, adviseert ATAG om de oliesoort af te stemmen op de baktemperatuur. Elke oliesoort heeft een ander rookpunt waarbij giftige gassen vrijkomen. In onderstaande tabel ziet u de rookpunten van verschillende oliesoorten.
- Page 22 Koken BEDIENING Kookstanden Het onderstaande overzicht is uitsluitend bedoeld als leidraad, omdat de instelwaarde afhankelijk is van de hoeveelheid en samenstelling van het gerecht en de pan. Gebruik ‘boost’ en stand 9 voor: • snel aan de kook brengen; • slinken van bladgroenten;...
- Page 23 • Gebruik ook nooit scherpe voorwerpen, zoals staalwol en schuursponsjes. Atag Shine Atag Nederland heeft een serie exclusieve schoonmaakmiddelen samengesteld. Deze zijn te verkrijgen via de website ‘www.atagservice.nl’. Hier vindt u ook diverse schoonmaak- en gebruikerstips. NL 24...
- Page 24 Algemeen STORINGEN Algemeen Voor het telefoonnummer van de servicedienst kunt u de bijgeleverde garantiekaart raadplegen of kijken op ‘www.atagservice.nl’. Indien u een barstje of scheurtje (hoe klein ook) op de glasplaat ziet, schakel dan de kookplaat onmiddellijk uit, neem direct de stekker van de kookplaat uit het stopcontact, verbreek de (automatische) zekering(en) in de meterkast of zet de schakelaar in de meterkast op nul bij een vaste aansluiting.
- Page 25 Algemeen STORINGEN SYMPTOOM MOGELIJKE OORZAAK OPLOSSING Nadat u een kookzone heeft De gebruikte kookpan is Gebruik een goede pan (zie ingeschakeld blijft de display niet geschikt voor koken op pagina 12 en 13). knipperen. inductie of heeft een diameter kleiner dan 12 cm. Een kookzone stopt plotseling De ingestelde timertijd is Schakel het signaal uit door...
- Page 26 Algemeen INSTALLATIEVOORSCHRIFT Veiligheidsvoorschriften installatie • De aansluiting moet voldoen aan de nationale en lokale voorschriften. • Het toestel moet altijd geaard zijn. • Alleen een erkend elektrotechnisch installateur mag dit toestel aansluiten. • Schade ontstaan door verkeerd aansluiten, verkeerd inbouwen of verkeerd gebruik valt niet onder de garantie.
- Page 27 Elektrische aansluiting INSTALLATIEVOORSCHRIFT Aansluitingen Veel voorkomende aansluitingen: • 3 fasen met 1 nul aansluiting (3 1N, 400 V ~ / 50 Hz): º De spanning tussen de fasen en de nul is 230 V ~. Tussen de fasen staat een spanning van 400 V ~. Breng een verbindingsbrug aan tussen de aansluitpunten 4-5.
- Page 28 Afvoeren toestel en verpakking BIJLAGE Afvoeren toestel en verpakking Bij de vervaardiging van dit toestel is gebruik gemaakt van duurzame materialen. Dit toestel moet aan het eind van zijn levenscyclus op verantwoorde wijze worden afgevoerd. De overheid kan u hierover informatie verschaffen.
- Page 29 Technische gegevens BIJLAGE Vermogens- en inbouwtabel Dit toestel voldoet aan alle relevante CE richtlijnen. Kookplaattype KI6111P Inductie Aansluiting 230V - 50Hz Aantal fasen Max. vermogen kookzones Linksvoor 3 kW (Ø180) Linksachter 3 kW (Ø180) Rechtsachter 3 kW (Ø180) Rechtsvoor 3 kW (Ø180)
-
Page 30: Table Of Contents
Contents MANUAL Your induction hob Introduction Control panel Description Safety instructions 7 - 9 Getting used to it... 10 - 11 Pans 12 - 13 Operation Settings 14 - 21 Cooking 22 - 23 Maintenance Cleaning Troubleshooting General 25 - 26 Installation instructions General Elektrical connection... -
Page 31: Your Induction Hob
Introduction YOUR INDUCTION HOB This hob has been designed for the real lover of cooking. Cooking on an induction hob has a number of advantages. It is easy, because the hob reacts quickly and can also be set to a very low power level. Because, moreover, it can also be set to a high power level, it can bring things to the boil very quickly. - Page 32 Control panel YOUR INDUCTION HOB ‘Reduce the time’ button ‘Raise the time’ button Boost with indicator Reduce power zone front left Cooking zone indicator Raise power zone front left Operation other cooking zones (Childproof ) lock with indicator On/off button with indicator Pause button with indicator Level indicator zone front right Level indicator zone rear right...
- Page 33 Description YOUR INDUCTION HOB KI6111P Cooking zone front left Ø180 3,0 kW Cooking zone rear left Ø180 3,0 kW Cooking zone rear right Ø180 3,0 kW Cooking zone front right Ø180 3,0 kW GB 6...
- Page 34 Safety instructions YOUR INDUCTION HOB Safety instructions Induction cooking is extremely safe. Various safety devices have been incorporated in the hob such as a residual heat indicator and a cooking time limiter. There are nevertheless a number of precautions you should take. Connection and repair •...
- Page 35 Safety instructions YOUR INDUCTION HOB • Grease and oil are inflammable when overheated. Do not stand too close to the pan. Should oil catch fire, never try to extinguish the fire with water. Put a lid on the pan immediately and switch the cooking zone off.
- Page 36 Safety instructions YOUR INDUCTION HOB Cooking-time limiter The cooking-time limiter is a safety function of your cooking appliance. It will operate if you forget to switch off your hob. Depending on the setting you have chosen, the cooking time will be limited as follows: Setting The cooking zone switches auto-...
-
Page 37: Use
Getting used to it... Operation of the touch-sensitive buttons The operation of the hob by means of the touch-sensitive buttons takes a while getting used to when you’re used to a different operation. For the best effect, place your finger tips flat on the buttons. You don’t have to push hard. - Page 38 Getting used to it... How induction works A magnetic field is generated in the appliance. By placing a pan with an iron base on a cooking zone, a current is induced in the pan base. This induced current generates heat in the base of the pan. Easy The electronic controls are accurate and easy to set.
-
Page 39: Pans
Pans Pans for induction cooking Induction cooking requires a particular quality of pan. Attention • Pans that have already been used for cooking on a gas hob are no longer suitable for use on an induction hob. • Only use pans that are suitable for electric and induction cooking with: º... - Page 40 Pans Attention Never use pans with a misshapen base. A hollow or rounded base can interfere with the operation of the overheating protection, so that the appliance becomes too hot. This may lead to the glass top cracking and the pan base melting. Damage arising from the use of unsuitable pans or from boiling dry is excluded from the guarantee.
-
Page 41: Operation
(if a pan is detected). º If you press the button for the first time, setting ‘4’ will appear. F00002557 - LED Screen ATAG TC (700002940000) º If you press the button for the first time, setting ‘9’ will appear. - Page 42 3 seconds and then go out. A single beep will be heard. Switching off the boost function The boost function is switched on, ‘P’ is visible on the display. 02557 - LED Screen ATAG TC (700002940000) 02557 - LED Screen ATAG TC (700002940000) 1. Press the button. 8-09 IH...
- Page 43 The hob is in the stand-by mode, or one or more cooking zones are active. 1. Press the on-/off button for a short time to switch off all F00002557 - LED Screen ATAG TC (700002940000) F00002557 - LED Screen ATAG TC (700002940000) cooking zones at the same time.
- Page 44 (Childproof ) lock Your induction hob is equipped with a childproof lock that lets you lock the appliance. It prevents unintended switching on. F00002557 - LED Screen ATAG TC (700002940000) With the button you have access to the following two functions:...
- Page 45 Set the hob to the childproof lock mode before cleaning the hob to prevent it from accidentally switching on. Pause F00002557 - LED Screen ATAG TC (700002940000) With this pause function, you can set the entire hob to ‘pause’ for 24-08-09 IH 10 minutes during cooking.
- Page 46 (The settings can be retrieved as long as the red light to the top right of the button flashes). Recognizing a mode F00002557 - LED Screen ATAG TC (700002940000) 24-08-09 IH ‘0.’ is visible on the display of every cooking zone. The red light to the top right of the on/...
- Page 47 If you do not set a time with the button, the egg timer will automatically switch off after 10 seconds. F00002557 - LED Screen ATAG TC (700002940000) F00002557 - LED Screen ATAG TC (700002940000) Switching off the egg timer 24-08-09 IH 24-08-09 IH (Step 1 and 2 do not apply when one or more cooking zones are active).
- Page 48 If you do not set a time with the button, the kitchen F00002557 - LED Screen ATAG TC (700002940000) F00002557 - LED Screen ATAG TC (700002940000) timer will automatically switch off after 10 seconds. 24-08-09 IH 24-08-09 IH 3.
- Page 49 Healthy cooking Burning point of separate kinds of oil ATAG advises to choose an oil based on the baking temperature to bake in a healthy way. Each oil has a different burning point at which toxic gasses are released. The below table shows the burning points for various types of oil.
- Page 50 Cooking OPERATION Cooking settings Because the settings depend on the quantity and composition of the contents of the pan, the table below is intended as a guideline only. Use setting ‘boost’ and setting 9 to: • bring the food or liquid to the boil quickly; •...
-
Page 51: Maintenance
• Never use anything sharp such as steel wool or scourers. Atag Shine ATAG has developed a range of cleaning agents called Atag Shine. These are available via the website ‘www.atag.nl’. The site also has various use and care tips. -
Page 52: General
General The service department telephone number can be found on the guarantee card provided or on ‘www.atag.nl’. If you notice a crack in the glass top (however small), switch the hob off immediately, unplug the hob, turn off the (automatic) fuse switch(es) in the meter cupboard or, in the event of a permanent connection, set the switch in the power supply lead to zero.) Contact... - Page 53 General TROUBLESHOOTING SYMPTOOM POSSIBLE CAUSE SOLUTION The display will keep on The pan you are using is Use a suitable pan, see (refer flashing after you have not suitable for induction to pages 12 and 13). switched on a cooking zone. cooking.
- Page 54 General INSTALLATION INSTRUCTIONS Safety instructions for the installation • The connection must comply with national and local regulations. • The appliance must always be earthed. • This appliance may only be connected by a competent electrical installer. • Damage caused by incorrect connection, installation or use, will not be covered by the guarantee.
- Page 55 Electrical connection INSTALLATION INSTRUCTIONS Connection • The hob is connected according to diagram 230V 2Nac (see the diagram at the bottom of the appliance). If another connection is required, let a registered electrical service technician make the connection. • If you want to make a fixed connection, make sure that a multi- polar switch with a contact separation of at least 3 mm is fitted in the supply line.
-
Page 56: Disposal Of Appliance And Packaging
Disposal of packaging and appliance APPENDIX Disposal of packaging and appliance In the manufacturing of this appliance durable materials were used. Make sure to dispose of this equipment responsibly at the end of its lifecycle. Ask the authorities for more information regarding this. The appliance packaging is recyclable. -
Page 57: Technical Details
Technical details APPENDIX Capacity and dimensions table This appliance complies with all relevant CE directives. Hob type KI6111P Induction Connection 230V - 50Hz Max. capacity cooking zones Front left 3 kW (Ø180) Rear left 3 kW (Ø180) Rear right 3 kW (Ø180) Front right 3 kW (Ø180) - Page 58 Gebruikte pictogrammen - Pictograms used Belangrijk om te weten Important information...
Need help?
Do you have a question about the KI6111P and is the answer not in the manual?
Questions and answers