
Related Manuals for Greencut GLM880XE


Summary of Contents for Greencut GLM880XE
- Page 1 CORTACÉSPED GLM880XE Manual de instrucciones Manuel d’utilisation Manuale di istruzioni Instruction manual Betriebsanleitung...
-
Page 3: Table Of Contents
DECLARACIÓN DE CONFORMIDAD (CE) INTRODUCCIÓN Gracias por elegir este producto GREENCUT. Estamos seguros de que apreciará su calidad y cubrirá sus necesidades por un largo periodo de tiempo. Recuerde que puede contactar con nuestro Servicio Técnico Oficial para consultas sobre montaje, uso, mantenimiento, identificación y solución de problemas y para la compra de recambios y/o accesorios. - Page 4 Toda la información incluida en este manual es relevante para su propia seguridad y la de su entorno. Si tiene alguna duda sobre la información incluida en este manual consulte a un profesional o contacte con el Servicio Técnico Oficial. La siguiente información sobre peligros y precauciones incluye las situaciones más probables que se pueden originar durante el uso de esta máquina.
- Page 5 ROPA DE TRABAJO • Vístase apropiadamente. No use ropa suelta o joyas que puedan quedar atrapadas en las piezas móviles. Recomendamos el uso de: Protección ocular (gafas de seguridad/malla/pantallas de metacrilato). Protección auditiva (orejeras/tapones para los oídos). Protección para la cabeza y la cara (casco y mascarilla). Protección para las manos (guantes/mitones).
- Page 6 • Asegúrese que el tapón del combustible queda correctamente cerrado. • El combustible almacenado en el carburador durante largos periodos de tiempo puede causar un arranque duro e incrementar las reparaciones y el mantenimiento de la máquina. • Almacene siempre el combustible en recipientes homologados. No utilice combustible almacenado por más de 2 meses, hará...
-
Page 7: Iconos De Advertencia
ICONOS DE ADVERTENCIA Los iconos en las etiquetas de advertencia que aparecen en ésta máquina y/o en el manual indican información necesaria para la utilización segura de ésta máquina. Compruebe que no existen fugas de ¡Atención peligro! combustible. No use esta máquina en pendientes con Lea atentamente este manual antes de poner la máquina en marcha. -
Page 8: Descripción Del Producto
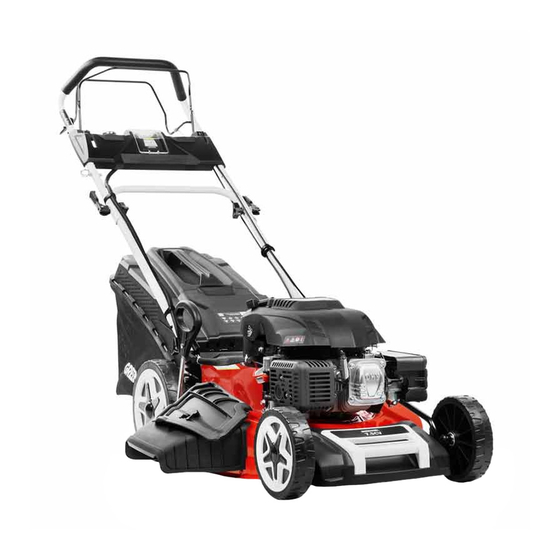
DESCRIPCIÓN DEL PRODUCTO CONDICIONES DE USO Corte únicamente césped. No utilice esta máquina para otros fines no previstos. Por ejemplo: no utilice el cortacésped para desbrozar, para cortar pasto o arbustos, y no lo utilice como triturador. Cualquier otro uso diferente al descrito anteriormente puede provocar situaciones peligrosas y exime al fabricante de toda responsabilidad. - Page 9 Altura de corte 25-75mm / 8 alturas de corte Anchura de corte 530mm (21") Capacidad del saco de recogida Chasis Acero Nivel de potencia sonora 98dB(A) Peso 43Kg NOTA: GREENCUT se reserva el derecho de modificar las características técnicas sin previo aviso.
-
Page 10: Montaje
MONTAJE ATENCIÓN: El cortacésped se suministra sin combustible y aceite en el motor. Su nuevo cortacésped ha sido probado en la planta de producción lo que significa que el motor puede contener una pequeña cantidad de aceite residual. MONTAJE DEL MANILLAR Inserte la parte inferior del manillar en el orificio correspondiente y asegúrelo con los tornillos y perillas. - Page 11 MONTAJE DE LA CESTA DE RECOGIDA Fije los clips de plástico de la cesta sobre el marco metálico del cortacésped. Asegúrese de que estos clips están completamente asegurados al marco. Cubierta cesta Marco Cesta INSTALACIÓN DE LA CESTA DE RECOGIDA Levante la tapa de descarga trasera con una mano y enganche la cesta de recogida.
- Page 12 INSTALACIÓN DE LA DESCARGA LATERAL ATENCIÓN: Antes de utilizar su máquina con la descarga lateral retire todo el césped. Levante la tapa de descarga lateral con una mano y enganche el conducto de descarga lateral con la otra. Suelte la tapa de descarga lateral para asegurar el conducto en su posición.
-
Page 13: Uso Del Producto
USO DEL PRODUCTO ANTES DE USAR FILTRO DE AIRE El filtro de aire se utiliza para evitar que la suciedad y otras partículas puedan entrar en el motor y causar daños internos. El filtro de aire requiere un mantenimiento regular. Compruebe siempre el filtro de aire antes de arrancar el motor. - Page 14 ARRANQUE Y PARADA DEL MOTOR ARRANQUE DEL MOTOR Para el arranque manual tire del tirador de arranque hacia el mango superior 10-15cm aproximadamente hasta que sienta una resistencia y luego encienda el motor con un fuerte tirón. Si el motor esta frío pulse el cebador de 3 a 5 veces.
- Page 15 Cuando el motor está en ralentí (velocidad de marcha continua más lenta), la acción de corte es mínima. A medida que aumenta la velocidad del motor, la acción de corte se hace más eficiente. Haga funcionar el motor a una velocidad suficiente para proporcionar la acción de corte deseada, lo que puede variar según el tipo de hierba, altura y densidad de la hierba, etc.
- Page 16 CORTE CON DESCARGA LATERAL Utilice su mano para levantar la tapa de la descarga lateral y coloque el deflector de descarga lateral. ATENCIÓN: Sujete y quite el deflector de la descarga lateral sólo cuando el motor se encuentre apagado. CONSIDERACIONES MEDIOAMBIENTALES ALTITUD Si el motor se utiliza en altitudes de 1500 m.
- Page 17 • Evite trabajar en pendientes demasiado empinadas, cuando corte el césped en una pendiente, corte a través de la pendiente, no de arriba abajo. • Tenga cuidado cuando de marcha atrás o cuando tire del equipo hacia usted y al cambiar de dirección. •...
-
Page 18: Mantenimiento
MANTENIMIENTO • El motor tiene que estar apagado y frío como para tocarlo antes de hacer cualquier tipo de mantenimiento. • Para mantener el equipo funcionando a su máxima eficacia, es necesario realizar un buen mantenimiento de forma periódica. De esta manera asegurará el mejor rendimiento de su máquina y conseguirá prolongar la vida útil de su producto considerablemente. - Page 19 COMPROBACIÓN Y CAMBIO DE ACEITE Este producto NO se suministra con aceite de motor, aunque se pueden encontrar rastros de ello del proceso de fabricación. Es esencial que agregue aceite de motor del tipo correcto antes de usarlo, de modo contrario la garantía queda anulada.
- Page 20 COMPROBAR, LIMPIAR O REEMPLAZAR EL FILTRO DE AIRE ATENCIÓN: Si se utiliza la máquina sin un filtro de aire funcional se puede dañar el motor, lo que anulará la garantía. • Un filtro de aire sucio o saturado restringirá la circulación de aire, lo que se puede confundir como problemas con el sistema combustible.
- Page 21 Ajuste la distancia según las especificaciones. Si la distancia se tiene que reducir, golpee ligeramente el electrodo según sea necesario. Si la distancia se tiene que incrementar, utilice alicates para tirar suavemente del electrodo según sea necesario. Vuelva a medir la distancia y asegúrese que está dentro del rango especificado antes de volver a poner la bujía. PARA RETIRAR LA BUJÍA Tire del capuchón (B) del cable eléctrico (A) Limpie la zona alrededor de la bujía para que no haya suciedad u otros...
-
Page 22: Identificación Y Solución De Problemas
GUÍA DE LIMPIEZA ATENCIÓN: No utilice disolventes, productos químicos o abrasivos cuando limpie la máquina ya que se podrían dañar algunas superficies. • Utilice guantes o herramientas apropiadas para la limpieza. No lo haga con las manos desprotegidas. • Limpie la máquina después de cada uso para asegurar el mejor rendimiento y duración de ella. •... - Page 23 VIBRACIÓN EXCESIVA CAUSA SOLUCIÓN Cuchillas desafiladas o dañadas Afílelas o reemplace las cuchillas de corte. Asegúrese que todas las abrazaderas y tornillos a su alcance estén bien Abrazaderas/Tornillos sueltos apretados. Eje de salida del motor gastados Repare las piezas gastadas o dañadas según sea necesario. o doblados DIFICULTAD PARA ENCENDER EL MOTOR DESPUÉS DE SU USO O SE PARA DE GOLPE CAUSA...
-
Page 24: Transporte Y Almacenamiento
NO CORTA LO SUFICIENTEMENTE BIEN CAUSA SOLUCIÓN Cuchillas desafiladas o dañadas Afílelas o reemplace las cuchillas de corte. Ajuste la altura de corte al ritmo de corte de césped para reducir la carga del Se ha cortado demasiado en una motor. -
Page 25: Eliminación / Reciclaje
Los materiales utilizados en el embalaje de la máquina son reciclables: por favor, tírelos en el contenedor adecuado. GARANTÍA GREENCUT garantiza todos los productos por un periodo de 2 años (válido para Europa). La garantía está sujeta a la fecha de compra teniendo en cuenta la intención de uso del producto. -
Page 26: Declaración De Conformidad (Ce)
Nosotros, PRAT INTERNATIONAL BRANDS S.L., propietaria de la marca GREENCUT, con sede en C/Blanquers. Parcela 7-8 43800 Valls - Tarragona, SPAIN, declaramos que el cortacésped GREENCUT GLM880XE, a partir del número de serie del año 2019 en adelante, son conformes con los requerimientos de las Directivas del Parlamento Europeo y del Consejo aplicables: •... - Page 27 DÉCLARATION DE CONFORMITÉ (CE) INTRODUCTION Merci d’avoir choisi ce produit GREENCUT. Nous sommes confiants que vous apprécierez sa qualité et répondrez à vos besoins pour une longue période de temps. N’oubliez pas que vous pouvez contacter notre Service Technique Officiel pour des questions concernant le montage, l’utilisation, l’entretien, l’identification et le dépannage, ainsi que pour l’achat de pièces de rechange et/ou d’accessoires.
- Page 28 Toutes les informations inclues dans ce manuel sont de grande importance pour votre propre sécurité et pour celle des personnes, animaux et objets se trouvant à proximité. Dans le cas d’un quelconque doute concernant ce manuel, demandez conseil à un professionnel ou mettez-vous en contact avec le Service Technique Officiel. L’information suivante concernant les dangers et précautions fait référence aux situations les plus probables qui peuvent avoir lieu lors de l’utilisation de cette machine.
- Page 29 • Ne touchez aucun des composants du moteur pendant que la machine est en marche ou juste après qu’elle s’est arrêtée en raison des températures élevées qu’elle atteint. • Ne pas utiliser la machine sous la pluie ou dans des conditions d’humidité extrême. •...
- Page 30 • Le carburant et l’huile sont des produits chimiques dangereux et hautement inflammables. N’apportez pas de flammes, d’étincelles ou de sources de chaleur à proximité de la machine. Ne fumez pas lorsque vous transportez du carburant, lorsque vous remplissez le réservoir ou lorsque vous travaillez. En cas d’incendie, éteindre le feu avec un extincteur à...
- Page 31 ICÔNES D’AVERTISSEMENT Les icônes sur les étiquettes d’avertissement qui apparaissent sur cette machine et/ou dans le manuel indiquent les informations nécessaires pour une utilisation en toute sécurité de cette machine. Attention, danger ! Vérifiez s'il y a des fuites de carburant. Lisez attentivement ce manuel avant de N'utilisez pas cette machine sur des démarrer la machine.
- Page 32 DESCRIPTION DU PRODUIT CONDITIONS D’USAGE Coupez du gazon uniquement. N’utilisez pas cette machine à d’autres fins. Par-exemple, ne l’utilisez pas pour débrouissailler, pour couper des arbustes ou comme broyeur. Toute autre utilisation que celle décrite ci-dessus peut entraîner des situations dangereuses et exempte le fabricant de toute responsabilité. DESCRIPTION DETAILLÉE DU PRODUIT Levier de vitesse Décharge latérale...
- Page 33 Hauteur de coupe 25-75mm / 8 hauteurs de coupe Largeur de coupe 530mm (21”) Capacité du sac collecteur Châssis Acier Niveau de puissance sonore 98dB(A) Poids 43Kg NOTE: GREENCUT se réserve le droit de modifier les caractéristiques techniques sans préavis.
- Page 34 ASSEMBLAGE ATTENTION: La tondeuse est fournie sans carburant et sans huile dans le moteur. Votre nouvelle tondeuse a été testée sur le site de production, ce qui signifie que le moteur peut contenir une petite quantité d’huile résiduelle. MONTAGE DU GUIDON Insérez le bas du guidon dans le trou approprié...
- Page 35 ASSEMBLAGE DU PANIER DE COLLECTE Fixez les clips du panier en plastique au châssis métallique de la tondeuse. Assurez-vous que ces clips sont bien fixés au cadre. Couvercle de panier Cadre Panier INSTALLATION DU PANIER DE COLLECTE Soulevez le couvercle d’éjection arrière d’une main et accrochez le panier de ramassage. Déverrouillez le bouchon d’éjection arrière pour fixer le sac à...
- Page 36 INSTALLATION À ÉJECTION LATÉRALE ATTENTION: Retirez toute l’herbe avant d’utiliser votre machine avec l’éjection latérale. Soulevez le couvercle de l’éjection latérale d’une main et accrochez la conduite d’éjection latérale de l’autre main. Relâchez le volet d’échappement latéral pour fixer la conduite en position. Couvercle d’éjection latérale Goulotte d’éjection latérale INSTALLATION DU PANNEAU DE CONTRÔLE...
- Page 37 USAGE DU PRODUIT AVANT D’UTILISER FILTRE À AIR Le filtre à air est utilisé pour empêcher la saleté et autres particules d’entrer dans le moteur et de causer des dommages internes. Le filtre à air nécessite un entretien régulier. Vérifiez toujours le filtre à air avant de démarrer le moteur. HUILE MOTEUR 4 TEMPS Le produit n’est PAS fourni avec de l’huile moteur, bien que l’huile résiduelle puisse être présente à...
- Page 38 DÉMARRAGE ET ARRÊT DU MOTEUR DÉMARRAGE DU MOTEUR Pour un démarrage manuel, tirez la poignée du démarreur vers la poignée supérieure d’environ 10-15 cm jusqu’à ce que vous sentiez une résistance, puis démarrez le moteur en tirant fortement. Pour le démarrage électrique, tirez sur la poignée du démarreur et appuyez sur le bouton jusqu’à...
- Page 39 UTILISATION Lorsque le moteur tourne au ralenti (vitesse continue plus lente), l’action de coupe est minimale. Au fur et à mesure que le régime moteur augmente, l’action de coupe devient plus efficace. Faites tourner le moteur à une vitesse suffisante pour obtenir l’action de tonte souhaitée, qui peut varier en fonction du type d’herbe, de la hauteur et de la densité...
- Page 40 COUPE AVEC ÉJECTION LATÉRALE Utilisez votre main pour soulever le couvercle d’éjection latérale et placer le déflecteur d’éjection latérale. ATTENTION Maintenez et retirez le déflecteur d’éjection latérale uniquement lorsque le moteur est arrêté. CONSIDÉRATIONS ENVIRONNEMENTALES ALTITUDE Si le moteur est utilisé à une altitude de 1500 m. il peut être nécessaire d’ajuster le carburateur. En effet, il y a moins d’oxygène dans l’air dès que l’altitude augmente et la machine ne tourne donc pas aussi efficacement..
- Page 41 • N’utilisez pas l’appareil à d’autres fins que celles pour lesquelles il a été conçu, telles que broyer des feuilles ou broyer du bois. • Évitez de travailler sur des pentes trop prononcées et lorsque vous tondez la pelouse sur une pente, coupez en travers et jamais de haut en bas.
- Page 42 ENTRETIEN • Le moteur doit être arrêté et suffisamment froid pour pouvoir être touché avant d’effectuer toute opération d’entretien. • Pour que l’appareil fonctionne au maximum de son rendement , il est nécessaire d’effectuer régulièrement un bon entretien. Cela garantira les meilleures performances de votre machine et prolongera considérablement la durée de vie de votre appareil.
- Page 43 VÉRIFICATION ET VIDANGE D’HUILE Cette machine N’EST PAS LIVRÉE avec de l’huile moteur, malgré qu’il puisse y en avoir un peu de par le processus de fabrication. Il est essentiel d’ajouter de l’huile moteur de type correct avant l’utilisation; dans le cas contraire la garantie serait annulée.
- Page 44 CVÉRIFEIR, NETTOYER OU REMPLACER LE FILTRE À AIR ATTENTION: Si vous utilisez la machine sans le filtre à air adéquat vous pourriez endommager le moteur, ce qui annulerait la garantie. • Un filtre à air sale ou saturé limitera la circulation d’air, ce qui pourrait être pris pour des problèmes de combustible.
- Page 45 POUR RETIRER LA BOUGIE Tirez sur le capuchon (B) du câble électrique (A). Nettoyez la zone autour de la bougie afin qu’il n’y ait aucune saleté qui puisse entrer dans le moteur au moment de retirer la bougie. Utilisez la clé à bougie ( C ) pour la retirer (tournez vers la gauche). Pour remonter la bougie Mettez la bougie dans son orifice et vissez (vers la droite) jusqu’à...
- Page 46 GUIDE DE NETTOYAGE ATTENTION: N’utilisez pas de dissolvants , de produits chimiques ou abrasifs lorsque vous nettoierez la machine étant donné que cela pourrait abîmer certaines surfaces. • Utilisez des gants ou des outils appropriés pour le nettoyage. Ne le faites pas mains nues. •...
- Page 47 VIBRATION EXCESSIVE CAUSE SOLUTION Lame peu affûtée ou Affûtez ou remplacez la lame. endommagée Assurez-vous que toutes les brides et boulons à votre portée soient bien Brides/boulons défaits serrés. Axe de sortie du moteur usé ou Réparez les pièces usées ou endommagées si nécessaire. plié...
- Page 48 LA COUPE N’EST PAS SATISFAISANTE CAUSE SOLUTION Lame mal affûtée ou Affûtez ou remplacez la lame de coupe. endommagée Ajustez la hauteur de coupe à la vitesse de coupe pour réduire la charge sur le Gazon trop coupé d’un coup moteur.
- Page 49 GARANTIE GREENCUT garantit tous les produits pour une période de 2 ans (pour toute l’Europe). La garantie est sujette à la date d’achat. Comme condition à la garantie, il est nécessaire de présenter le reçu original en indiquant la date d’achat et sa description et remettre l’outil défectueux.
- Page 50 Nous, PRAT INTERNATIONAL BRANDS S.L., propriétaire de la marque GREENCUT, située c/Blanquers. Parcela 7-8 43800 Valls - Tarragona, ESPAGNE, nous déclarons que la tondeuse GREENCUT GLM880XE, à partir du numéro de série 2019, sont conformes aux exigences des directives du Parlement européen et du Conseil applicable: •...
-
Page 51: Introduzione
DICHIARAZIONE DI CONFORMITÀ (CE) INTRODUZIONE Grazie per aver scelto questo prodotto GREENCUT. Siamo certi che apprezzerete la sua qualità e che soddisferete le vostre esigenze per un lungo periodo di tempo. Ricorda che puoi contattare il nostro Servizio Tecnico Ufficiale per domande su montaggio, uso, manutenzione, identificazione e risoluzione dei problemi e per l’acquisto di ricambi e/o accessori. - Page 52 Tutte le informazioni contenute nel presente manuale sono rilevanti per la sicurezza propria e dell’ambiente circostante. In caso di domande sulle informazioni contenute nel presente manuale, rivolgersi a un professionista o al Servizio Tecnico Ufficiale. Le seguenti informazioni sui pericoli e sulle precauzioni includono le situazioni più probabili che possono verificarsi durante l’uso della macchina.
- Page 53 ABITI DA LAVORO • Indossare in modo appropriato. Non indossare indumenti larghi o gioielli che potrebbero rimanere impigliati nelle parti in movimento. Si consiglia l’uso di: Occhiali protettivi (occhiali protettivi). Protezione dell’udito. Protezione della testa e del viso (casco e maschera). Protezione delle mani (guanti resistenti e antiscivolo).
- Page 54 • Rifornire sempre in aree ben ventilate e mai con il motore acceso o caldo. • Se si riscontra una perdita di carburante, non avviare o far funzionare il motore fino a quando la perdita non è stata riparata. • Accertarsi che il tappo del serbatoio sia chiuso correttamente.
-
Page 55: Icone Di Avvertimento
ICONE DI AVVERTIMENTO Le icone sulle etichette di avvertenza che appaiono su questa macchina e/o nel manuale forniscono le informazioni necessarie per l’utilizzo sicuro di questa macchina. Controllare che non vi siano perdite di Attenzione, pericolo! carburante. Leggere attentamente il presente Non utilizzare la macchina su pendii con manuale prima di avviare la macchina. -
Page 56: Descrizione Del Prodotto
DESCRIZIONE DEL PRODOTTO CONDIZIONI DI UTILIZZO Tagli esclusivamente l’erba. Non utilizzi questa macchina per altri fino non previsti. Per esempio: non utilizzi il tagliaerba per triturare, per tagliare l’erba o gli arbusti, e non lo utilizzi come trituratore. Qualsiasi utilizzo diverso da quello sopra descritto può... - Page 57 Altezza di taglio 25-75mm / 8 altezze di taglio Larghezza di taglio 530mm (21") Capacità della borsa di raccolta Telaio Acciaio Livello di potenza sonora 98dB(A) Peso 43Kg NOTA: GREENCUT si riserva il diritto a modificare le caratteristiche tecniche senza nessun preavviso.
-
Page 58: Montaggio
MONTAGGIO ATTENZIONE: Il tagliaerba viene consegnato senza carburante e olio nel motore. Il suo nuovo tagliaerba è stato testato nello stabilimento di produzione, ciò significa che il motore può contenere una piccola quantità di olio residuale. MONTAGGIO MANUBRIO Inserire la parte inferiore del manubrio nell’apposito foro e fissarlo con le viti e le manopole. Inserire la parte superiore del manubrio in modo che i fori coincidano. - Page 59 MONTAGGIO DEL CESTINO DI RACCOLTA Fissare le clip del cestello di plastica al telaio metallico della falciatrice. Assicurarsi che queste clip siano completamente fissate al telaio. Copri cestino Telaio Cestino INSTALLAZIONE DEL CESTINO DI RACCOLTA Sollevare il coperchio posteriore di scarico con una mano e agganciare il cestello di raccolta. Rilasciare il tappo di scarico posteriore per fissare il sacchetto d’erba.
- Page 60 INSTALLAZIONE DI SCARICO LATERALE ATTENZIONE: Rimuovere tutta l’erba prima di utilizzare la macchina con lo scarico laterale. Sollevare il coperchio di scarico laterale con una mano e agganciare il cavo di scarico laterale con l’altra mano. Rilasciare lo sportello di scarico laterale per fissare la linea in posizione. Coperchio di scarico laterale Scivolo di scarico laterale INSTALLAZIONE DEL PANNELLO DI CONTROLLO...
-
Page 61: Uso Del Prodotto
USO DEL PRODOTTO PRIMA DI USARE FILTRO DELL’ARIA Il filtro dell’aria si utilizza per evitare che la sporcizia e altre particelle possano entrare nel motore e causare danni interni. Il filtro dell’aria richiede una manutenzione regolare. Controlli sempre il filtro dell’aria prima di avviare il motore. OLIO DEL MOTORE DA 4 TEMPI Il prodotto NON viene consegnato con l’olio del motore, anche se può... - Page 62 AVVIAMENTO E ARRESTO DEL MOTORE AVVIAMENTO DEL MOTORE Per l’avviamento manuale, tirare la maniglia di avviamento verso l’impugnatura superiore di circa 10-15 cm fino a sentire una resistenza e poi avviare il motore con una forte spinta. Per l’avviamento elettrico, tirare la maniglia di avviamento e premere il pulsante fino a quando non si avvia.
- Page 63 Quando il motore è al minimo (velocità di marcia continua più lenta), l’azione di taglio è minima. Man mano che aumenta la velocità del motore, l’azione di taglio sarà più efficiente. Faccia funzionare il motore ad una velocità sufficiente per garantire l’azione di taglio desiderata, ciò...
- Page 64 TAGLIO CON SCARICA LATERALE Utilizzi la sua mano per sollevare il tappo dello scarico laterale e collochi il deflettore di scarica laterale. ATTENZIONE: Afferri e rimuova il deflettore dello scarico laterale solo quando il motore è spento. CONSIDERAZIONI SULL’AMBIENTE ALTITUDINE Se il motore si utilizza ad altitudini di 1500m è...
- Page 65 • Eviti di tagliare erba molto alta. Se l’erba è molto alta, la tagli in varie passate, riducendo l’altezza del taglio ogni volta. • Non utilizzi l’impianto per altri fini per i quali non è concepita, come triturare foglie o rompere la legna. •...
-
Page 66: Manutenzione
MANUTENZIONE • Il motore deve essere spento e deve essere freddo per poterlo toccare prima di qualsiasi tipo di manutenzione. • Per mantenere l’impianto in funzione alla sua massima efficienza, è necessario realizzare una buona manutenzione in modo periodico. In questo modo assicurerà il miglior rendimento della sua macchina e riuscirà a prolungare la vita utile del suo prodotto in modo considerevole. - Page 67 CONTROLLO E CAMBIO DELL’OLIO Questo prodotto NON viene consegnato con l’olio del motore, anche se si possono trovare resti di esso del processo di fabbricazione. È essenziale che aggiunga olio del motore del tipo corretto prima di usarlo, al contrario la garanzia verrà...
- Page 68 CONTROLLARE, PULIRE O SOSTITUIRE IL FILTRO DELL’ARIA ATTENZIONE: Se si utilizza la macchina senza un filtro dell’aria che funzioni si può danneggiare il motore, e ciò annullerà la garanzia. * Un filtro dell’aria sporco o intasato limiterà la circolazione dell’aria, e si può confondere questo problema come un problema del sistema del carburante. Controlli che il filtro dell’aria si trovi in buone condizioni prima di regolare il minimo del motore, quando è...
- Page 69 Regoli la distanza secondo le specifiche. Se la distanza deve essere ridotta, colpisca leggermente l’elettrodo se necessario. Se la distanza deve essere aumentata, utilizzi delle pinze per tirare leggermente l’elettrodo se necessario. Misuri nuovamente la distanza e si assicuri che si trovi all’interno del rango specificato prima di collocare di nuovo la candela.
-
Page 70: Identificazione E Soluzione Dei Problemi
GUIDA ALLA PULIZIA ATTENZIONE: Non utilizzi solventi, prodotti chimici o abrasivi quando pulisce la macchina siccome potrebbero danneggiare alcune superfici. • Utilizzi guanti o strumenti appropriati per la pulizia. Non lo faccia con le mani non protette. • Pulisca la macchina dopo ogni uso per assicurare il miglior rendimento e la migliore durata. •... - Page 71 VIBRAZIONE ECCESSIVA CAUSA SOLUZIONE Lame smussate Le affili o sostituisca le lame di taglio. o danneggiate Morsetti/Viti allentate Si assicuri che tutti i morsetti e viti siano ben stretti. Assi di uscita del motore Ripari i pezzi usurati o danneggiati se necessario. consumati o piegati DIFFICOLTÀ...
-
Page 72: Trasporto E Stoccaggio
NON TAGLIA IN MODO ADEGUATO CAUSA SOLUZIONE Lame non affilate Affili o sostituisca le lame di taglio. o danneggiate Regoli l’altezza di taglio al ritmo di taglio dell’erba per ridurre la carica del Taglio eccessivo in una sola motore. Per prati molto folti o alti, tagli con varie passate. Non provi a tagliare passata oltre la capacità... -
Page 73: Smaltimento E Riciclaggio
I materiali utilizzati per l’imballaggio della macchina sono riciclabili: per favore, li depositi nel contenitore adeguato. GARANZIA GREENCUT garantisce tutti i prodotti per un periodo di 2 anni (valido per l’Europa). La garanzia è soggetta alla data di acquisto, tenendo in conto l’intenzione dell’uso del prodotto. -
Page 74: Dichiarazione Di Conformità (Ce)
C/Blanquers. Parcela 7-8 43800 Valls - Tarragona, SPAIN, dichiariamo che il tagliaerba GREENCUT GLM880XE, a partire dal numero di serie dell’anno 2019 in avanti, sono conformi ai requisiti delle Direttive del Parlamento Europeo e del Consiglio applicabili: •... - Page 75 DECLARATION OF CONFORMITY (EC) INTRODUCTION Thank you for choosing this GREENCUT product. We are confident that you will appreciate its quality and meet your needs for a long period of time. Remember that you can contact our Official Technical Service for questions about assembly, use, maintenance, identification and troubleshooting and for the purchase of spare parts and/or accessories.
- Page 76 All information in this manual is relevant to your own safety and that of your environment. If you have any questions about the information contained in this manual, consult a professional or contact the Official Technical Service. The following information on hazards and precautions includes the most likely situations that may arise during use of this machine.
- Page 77 Eye protection (safety glasses/mesh/methacrylate screens). Hearing protection (earmuffs/earplugs). Head and face protection (helmet and mask). Hand protection (gloves/mitons). Leg protection (trousers/pants). Foot protection (safety boots). VIBRATIONS • A high level of vibration and long periods of exposure are the factors contributing to white finger disease (Raynaud’s phenomenon).
- Page 78 MAINTENANCE, TRANSPORTATION AND STORAGE SAFETY • Do not modify product controls. • Check regularly for broken parts or other conditions that may affect the correct operation of the machine. • Only replace worn or damaged parts immediately with original spare parts. •...
- Page 79 WARNING ICONS The icons on the warning labels on this machine and/or in the manual indicate information necessary for the safe use of this machine. Attention, danger! Check for fuel leaks. Read this manual carefully before starting Do not use this machine on slopes with the machine.
- Page 80 PRODUCT DESCRIPTION CONDITIONS OF USE Cut grass only. Do not use this machine for purposes it is not designed for. For example: do not use the mower to clear, to mow the fields, cut bushes, and do not use it as a shredder. Any use other than that described above may cause dangerous situations and exempts the manufacturer from any liability.
- Page 81 Central adjustment Blades 1 unit Cutting height 25-75mm / 8 cutting heights Cutting width 530mm (21") Collection bag capacity Chassis Steel Sound power level 98dB(A) Weight 43 Kg NOTE: GREENCUT reserves the right to modify technical data without prior notice.
- Page 82 ASSEMBLY ATTENTION: The lawn mower is supplied without fuel and oil in the engine. Your new lawn mower has been tested at the production site which means that the engine can contain a small amount of residual oil. ASSEMBLY OF THE HANDLEBAR Insert the bottom of the handlebar into the appropriate hole and secure it with the screws and knobs.
- Page 83 ASSEMBLY OF THE COLLECTION BASKET Attach the plastic basket clips to the mower’s metal frame. Make sure these clips are fully secured to the frame. Basket cover Frame Basket INSTALLATION OF THE COLLECTION BASKET Lift the rear discharge cover with one hand and hook the collection basket. Release the rear discharge cap to secure the grass bag.
- Page 84 SIDE DISCHARGE INSTALLATION ATTENTION: Remove all grass before using your machine with the side discharge. Lift the side discharge cover with one hand and hook the side discharge line with the other hand. Release the side exhaust flap to secure the line in position. Side discharge cover Side discharge chute CONTROL PANEL INSTALLATION...
- Page 85 PRODUCT USE BEFORE USING THE PRODUCT AIR FILTER The air filter is used to prevent dirt and other particles from possibly entering the engine causing internal damage to it. The air filter requires regular maintenance. Always check the air filter before starting the engine. STROKE ENGINE OIL The product is NOT supplied with engine oil, although there may be traces of oil from factory.
- Page 86 ENGINE STARTING AND STOPPING STARTING THE ENGINE For manual starting, pull the starter handle towards the top handle about 10-15cm until you feel a resistance and then start the engine with a strong pull. For electric start, pull the starter handle and press the button until it starts.
- Page 87 When the engine is idling (slowest continuous running speed), the cutting action is minimal. As the engine speed increases, the cutting action becomes more efficient. Operate the engine at a sufficient speed to provide the desired cutting action. This may vary depending on the type of grass, grass height and density, etc. THROTTLE Manual throttles motors usually have a choke setting on the throttle that is used to start the engine when it is cold.
- Page 88 ENVIRONMENTAL CONSIDERATIONS ALTITUDE If the engine is being used in altitudes at or above 1500m, adjustments to the carburettor may be necessary. This is because there is less oxygen in the air as altitude increases, which effectively “enriches” the ratio of fuel to the air into the engine and the higher the altitude, the richer the fuel mixture becomes.
- Page 89 • When mowing the lawn, move the mower through the lawn at a sensible rate so as not to strain the machine, thus maintaining its efficiency and to achieve the best cutting results. • Mow in slightly overlapping rows. An effective pattern is to mow in straight lines, starting along the longest edge of the work area, then turning at the end and mowing the next row and so on.
- Page 90 MAINTENANCE • The engine must be turned off and cold enough to touch before performing any maintenance work. • To keep the equipment performing at optimal efficiency, regular checks and maintenance is required. This will ensure best performance of your machine and will extend the life of your product considerably. •...
- Page 91 CHECKING AND CHANGING ENGINE OIL This product is NOT supplied with Engine oil, although trace of oil from the manufacturing process may be present. It is essential to add adequate engine oil of the correct type to the engine before use. Failure to add engine oil will void the product warranty.
- Page 92 CHECKING, CLEANING OR REPLACING THE AIR FILTER ATTENTION: Operating the machine without a functional air filter may cause severe engine damage and will void any warranty. A dirty or oil saturated air filter will restrict air flow, which can be mistaken as fuel system problems. Check the condition of the air filter before adjusting engine idle speed, where applicable.
- Page 93 TO REMOVE THE SPARK PLUG Pull the cap (B) of the electric cable (A) Clean the area around the spark plug so that no dirt or other materials can enter the engine when the plug is removed. Use the spark plug tool (C) to remove the spark plug (turn counterclockwise).
- Page 94 CLEANING GUIDELINES ATTENTION: Do not use solvents, chemicals or abrasives when cleaning the machine, as some surfaces may be damaged. • Wear gloves or use suitable tools to assist in cleaning, do not use bare hands. • Clean the machine after every use to ensure best performance and longest service life. •...
- Page 95 EXCESSIVE VIBRATION POSSIBLE FAULT SOLUTION Blade is blunt or damaged Have the blade sharpened or replace the blades. Loose brackets/screws Ensure all accessible screws and brackets are properly tightened. Engine output shaft worn or bent Repair damaged or worn parts as required. DIFFICULTY RESTARTING THE ENGINE AFTER USE OR ENGINE STOPS SUDDENLY DURING USE POSSIBLE FAULT SOLUTION...
- Page 96 GRASS CUTTING IS POOR POSSIBLE FAULT SOLUTION Blades dull or damaged Sharpen or replace cutting blades. Adjust the cutting height and rate of mowing to reduce load on the engine. Cutting too much in one pass. For tall or very thick grass, cut in several passes. Do not attempt to cut beyond the capacity of the machine.
- Page 97 In the event that repairs or modifications have been made by the consumer or other than with original GREENCUT spare parts, the warranty will be voided.
- Page 98 PRAT INTERNATIONAL BRANDS S.L., owner of the GREENCUT brand, located in C/Blanquers. Parcela 7-8 43800 Valls - Tarragona, SPAIN, declares that the GREENCUT GLM880XE lawn mower, as from 2019 series onwards, are in accordance with the requirements of the applicable European Parliament Directives and of the Council: •...
-
Page 99: Einleitung
EG-KONFORMITÄTSERKLÄRUNG EINLEITUNG Vielen Dank, dass Sie sich für dieses GREENCUT Produkt entschieden haben. Wir sind zuversichtlich, dass Sie die Qualität schätzen und Ihre Bedürfnisse über einen langen Zeitraum erfüllen werden. Denken Sie daran, dass Sie sich bei Fragen zur Montage, Verwendung, Wartung, Identifikation und Fehlersuche sowie zum Kauf von Ersatzteilen und/oder Zubehör an unseren Technischen Dienst wenden können. - Page 100 Alle Informationen in diesem Handbuch sind für Ihre eigene Sicherheit und die Ihrer Umgebung relevant. Wenn Sie Fragen zu den in diesem Handbuch enthaltenen Informationen haben, wenden Sie sich an einen Fachmann oder an den Technischen Dienst. Die folgenden Informationen über Gefahren und Vorsichtsmaßnahmen enthalten die wahrscheinlichsten Situationen, die während des Gebrauchs dieser Maschine auftreten können.
- Page 101 • Berühren Sie keine Motorkomponenten bei laufender Maschine oder kurz nach dem Stillstand aufgrund der hohen Temperaturen. • Betreiben Sie das Gerät nicht bei Regen oder extremer Luftfeuchtigkeit. • Lassen Sie dieses Gerät während des Betriebs nicht unbeaufsichtigt. ARBEITSKLEIDUNGEN • Ziehen Sie sich angemessen an.
- Page 102 • Kraftstoff und Öl sind gefährliche und leicht entzündliche Chemikalien. Bringen Sie keine Flammen, Funken oder Wärmequellen in die Nähe der Maschine. Rauchen Sie nicht, wenn Sie Kraftstoff transportieren, den Tank füllen oder arbeiten. Im Brandfall das Feuer mit einem Trockenpulverlöscher löschen. •...
-
Page 103: Warnsymbole
WARNSYMBOLE Die Symbole auf den Warnschildern dieses Systems und/oder in der Bedienungsanleitung weisen auf Informationen hin, die für den sicheren Betrieb dieses Systems erforderlich sind. Achtung, Gefahr! Auf Kraftstoffleckagen prüfen. Lesen Sie diese Anleitung sorgfältig Verwenden Sie diese Maschine nicht an durch, bevor Sie das Gerät in Betrieb Hängen mit einer Neigung von mehr als nehmen. - Page 104 WARENBESCHREIBUNG NUTZUNGSBEDINGUNGEN Nur Rasen mähen. Verwenden Sie dieses Gerät nicht für andere als die vorgesehenen Zwecke. Zum Beispiel: Verwenden Sie den Mäher nicht zum Räumen, Mähen von Gras oder Sträuchern und verwenden Sie ihn nicht als Schredder. Jede andere als die vorstehend beschriebene Verwendung kann zu gefährlichen Situationen führen und entbindet den Hersteller von jeglicher Haftung.
- Page 105 Höhenverstellung des Lenkers Zentrale Einstellung Klingen 1 Einheit Schnitthöhe 25-75mm / 8 Schnitthöhen Schnittbreite 530 mm (21") Fassungsvermögen des Sammelbeutels Fahrgestell Stahl Schallleistungspegel 98dB(A) Gewicht 43Kg NOTIZ: GREENCUT behält sich das Recht vor, die technischen Daten ohne vorherige Ankündigung zu ändern.
-
Page 106: Montieren
MONTIEREN ACHTUNG: Der Rasenmäher wird ohne Kraftstoff und Öl im Motor geliefert. Ihr neuer Mäher wurde im Werk getestet, was bedeutet, dass der Motor eine geringe Menge an Restöl enthalten kann. LENKERMONTAGE Führen Sie den unteren Teil des Lenkers in das entsprechende Loch ein und befestigen Sie ihn mit den Schrauben und Knöpfen. - Page 107 MONTAGE DES SAMMELKORBES Befestigen Sie die Kunststoff-Korbklemmen am Metallrahmen des Mähers. Stellen Sie sicher, dass diese Clips vollständig am Rahmen befestigt sind. Korbdeckel Rahmen Warenkorb EINBAU DES SAMMELKORBES Heben Sie den hinteren Auslaufdeckel mit einer Hand an und hängen Sie den Auffangkorb ein. Lösen Sie die hintere Auslaufkappe, um den Grasfangsack zu sichern.
- Page 108 INSTALLATION MIT SEITLICHER ENTLADUNG ACHTUNG: Entfernen Sie alles Gras, bevor Sie Ihre Maschine mit dem Seitenauswurf verwenden. Heben Sie mit einer Hand den Seitenauslassdeckel an und haken Sie mit der anderen Hand die Seitenauslassleitung ein. Lassen Sie die seitliche Abluftklappe los, um die Leitung zu sichern. Seitlicher Auslaufdeckel Seitliche Austragsrinne INSTALLATION DER SYSTEMSTEUERUNG...
-
Page 109: Produkt-Nutzung
PRODUKT-NUTZUNG VOR DER VERWENDUNG LUFTFILTER Der Luftfilter wird verwendet, um zu verhindern, dass Schmutz und andere Partikel in den Motor gelangen und innere Schäden verursachen. Der Luftfilter muss regelmäßig gewartet werden. Überprüfen Sie immer den Luftfilter, bevor Sie den Motor starten. 4-TAKT-MOTORENÖL Das Produkt wird NICHT mit Motoröl geliefert, obwohl Restöl im Werk vorhanden sein kann. - Page 110 STARTEN UND STOPPEN DES MOTORS STARTEN DES MOTORS Zum manuellen Anlassen ziehen Sie den Startergriff ca. 10-15cm nach oben, bis Sie einen Widerstand spüren und starten den Motor mit einem kräftigen Zug. Für den Elektrostart ziehen Sie den Startergriff und drücken Sie den Knopf, bis er anspringt.
- Page 111 NUTZUNG Wenn sich der Motor im Leerlauf befindet (langsamere Dauerlaufdrehzahl), ist die Schneidwirkung minimal. Mit zunehmender Motordrehzahl wird die Schneidwirkung effizienter. Lassen Sie den Motor mit einer Geschwindigkeit laufen, die ausreicht, um die gewünschte Schneidwirkung zu erzielen, die je nach Grasart, Grashöhe und -dichte usw. variieren kann. BESCHLEUNIGER Manuelle Drosselklappenmotoren haben im Allgemeinen eine Drosselklappenkonfiguration auf der Drosselklappe, mit der der Motor bei Kälte gestartet wird.
- Page 112 SCHNEIDEN MIT SEITLICHER ENTLADUNG Heben Sie die Seitenauswurfabdeckung mit der Hand an und platzieren Sie den Seitenauswurfabweiser. ACHTUNG: Halten und entfernen Sie die Seitenabweiser nur bei abgestelltem Motor. ÖKOLOGISCHE ÜBERLEGUNGEN HÖHE Wird der Motor in einer Höhe von 1500 m eingesetzt, können Anpassungen am Vergaser erforderlich sein. Dies liegt daran, dass mit zunehmender Höhe weniger Sauerstoff in der Luft ist, was das Verhältnis von Kraftstoff zu Luft, die in den Motor eintritt, effektiv “bereichert”, und je höher die Höhe, desto reicher das Kraftstoffgemisch.
- Page 113 • Vermeiden Sie es, das Gras zu hoch zu mähen. Wenn das Gras zu hoch ist, mähen Sie es in mehreren Durchgängen, wodurch die Mähhöhe verringert wird. • Verwenden Sie das Gerät nicht für andere Zwecke, für die es nicht vorgesehen ist, wie z.B. das Zerkleinern von Blättern oder das Hacken von Holz.
-
Page 114: Wartung
WARTUNG • Der Motor muss abgestellt und ausreichend gekühlt sein, um ihn zu berühren, bevor eine Wartung durchgeführt wird. • Um die Anlage auf höchstem Niveau zu halten, ist eine gute Wartung notwendig. Das sichert die beste Leistung Ihrer Maschine und verlängert die Lebensdauer Ihres Produktes erheblich. •... - Page 115 ÖLKONTROLLE UND ÖLWECHSEL Dieses Produkt wird NICHT mit Motoröl geliefert, obwohl Spuren davon aus dem Herstellungsprozess zu finden sind. Es ist wichtig, dass Sie vor dem Gebrauch das richtige Motoröl hinzufügen, da sonst die Garantie erlischt. • Kontrollieren Sie immer den Ölstand, wenn die Maschine auf einer ebenen, ebenen Fläche steht. •...
- Page 116 LUFTFILTER PRÜFEN, REINIGEN ODER AUSTAUSCHEN ACHTUNG: Die Verwendung des Geräts ohne funktionsfähigen Luftfilter kann den Motor beschädigen, wodurch die Garantie erlischt. • Ein verschmutzter oder gesättigter Luftfilter schränkt die Luftzirkulation ein, was mit Problemen mit dem Kraftstoffsystem verwechselt werden kann. Überprüfen Sie, ob der Luftfilter in gutem Zustand ist, bevor Sie gegebenenfalls die Leerlaufdrehzahl des Motors einstellen.
- Page 117 Stellen Sie den Abstand entsprechend den Vorgaben ein. Wenn der Abstand verringert werden soll, tippen Sie die Elektrode nach Bedarf an. Wenn der Abstand vergrößert werden muss, ziehen Sie die Elektrode mit einer Zange vorsichtig nach Bedarf. Messen Sie den Abstand neu und vergewissern Sie sich, dass er innerhalb des angegebenen Bereichs liegt, bevor Sie die Zündkerze austauschen.
-
Page 118: Identifikation Und Problemlösung
REINIGUNGSANLEITUNG ACHTUNG: Verwenden Sie bei der Reinigung der Maschine keine Lösungsmittel, Chemikalien oder Scheuermittel, da dies einige Oberflächen beschädigen kann. • Zur Reinigung geeignete Handschuhe oder Werkzeuge verwenden. Tue es nicht, wenn deine Hände ungeschützt sind. • Reinigen Sie die Maschine nach jedem Gebrauch, um eine optimale Leistung und Haltbarkeit zu gewährleisten. •... - Page 119 ÜBERMÄSSIGE VIBRATIONEN URSACHE SOLUCIÓN Stumpfe oder beschädigte Schärfen oder ersetzen Sie die Schneidmesser. Klingen Stellen Sie sicher, dass alle Klammern und Schrauben in Ihrer Reichweite fest Klemmen/Schrauben lose angezogen sind. Abgenutzte oder gebogene Reparieren Sie verschlissene oder beschädigte Teile nach Bedarf. Motorabtriebswelle SCHWIERIGKEITEN BEIM STARTEN DES MOTORS NACH GEBRAUCH ODER PLÖTZLICHES ANHALTEN URSACHE...
-
Page 120: Transport Und Lagerung
SCHNEIDET NICHT GUT GENUG URSACHE LÖSUNG Stumpfe oder beschädigte Schärfen oder ersetzen Sie die Schneidmesser. Klingen Stellen Sie die Mähhöhe auf die Mähgeschwindigkeit ein, um die Motorlast zu Er hat sich in einem Durchgang zu reduzieren. Für sehr dickes Gras oder hohes Mähen in mehreren Übergängen. sehr geschnitten. -
Page 121: Entsorgung Und Recycling
Behälter. GARANTIE GREENCUT gewährt auf alle GREENCUT Produkte eine Garantie von 2 Jahren (gültig für Europa). Die Gewährleistung richtet sich nach dem Kaufdatum unter Berücksichtigung des Verwendungszwecks des Produkts. Als Garantiebedingung muss der Originalbeleg mit Angabe des Kaufdatums und seiner Beschreibung sowie des defekten Werkzeugs vorgelegt werden. -
Page 122: Eg-Konformitätserklärung
EG-KONFORMITÄTSERKLÄRUNG Wir, PRAT INTERNATIONAL BRANDS S.L., Inhaber der Marke GREENCUT, mit Sitz in der C/Blanquers. Parcela 7-8 43800 Valls - Tarragona, Spanien, wir erklären, dass der GREENCUT GLM880XE Rasenmäher, ab der Seriennummer des Jahres 2019 den Anforderungen der geltenden Richtlinien des Europäischen Parlaments und des Rates entspricht: •... - Page 124 Manual revisado en octubre de 2020...
Need help?
Do you have a question about the GLM880XE and is the answer not in the manual?
Questions and answers
COMO PUEDO REDUCIR LA VELOCIDAD DE LA CORTACESPED
To reduce the speed of the Greencut GLM880XE lawn mower, you can:
- Move the mower at a moderate pace across the lawn to avoid overloading the machine.
- Clean or unblock components that may reduce engine power or speed, such as:
- Air filter: Clean if blocked.
- Carburettor: Clean if choked.
- Spark plug: Remove and clean carbon deposits.
- Engine combustion chamber and exhaust silencer: Remove carbon build-up.
These actions help maintain or reduce the mower’s speed appropriately during use.
This answer is automatically generated