Table of Contents
Advertisement
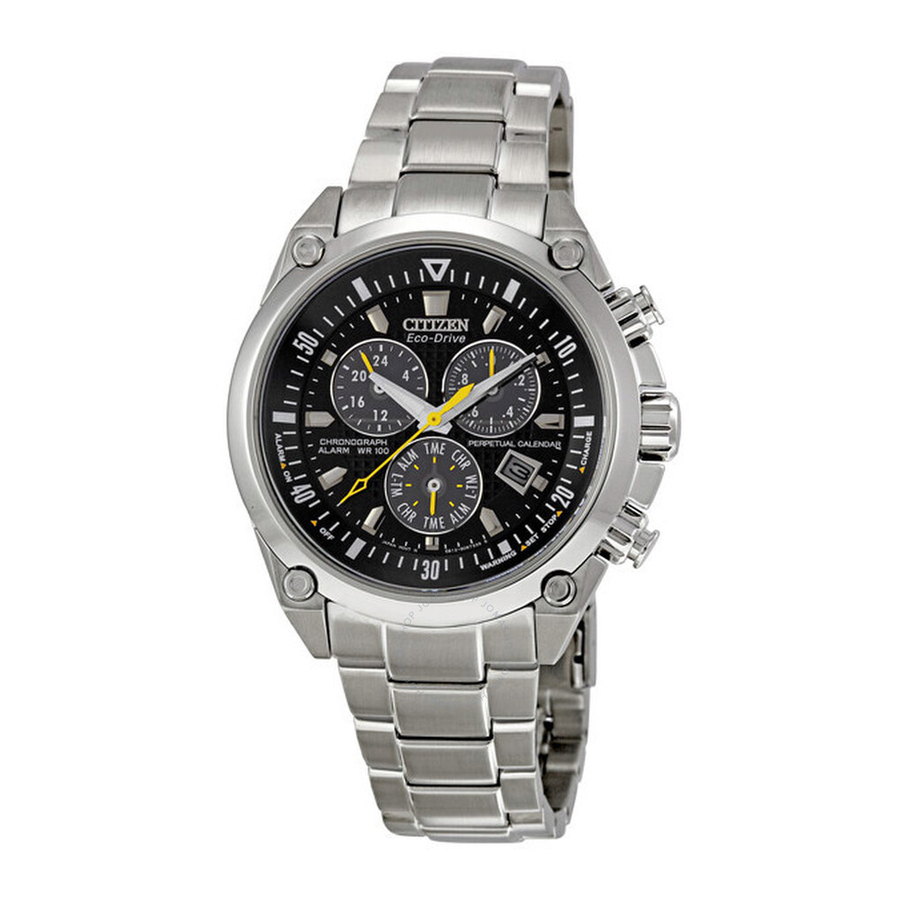
Name of
Nom des pièces
Components
① Hour hand
Aiguille des heures
Aiguille des 24
② 24 hour hand
heures
Alarme ON/OFF
③ Alarm ON/OFF
(active/désactivée)
④ Second hand
Trotteuse
⑤ Mode hand
Aiguille de mode
⑥ Button (B)
Bouton (B)
⑦ Date
Date
Crown
Couronne
⑧
(Normal position)
(Position normale)
⑨ Minute hand
Aiguille des minutes Manecilla de minutos Minutenzeiger
⑩ Button (A)
Bouton (A)
⑪ Function hand
Aiguille de fonction Manecilla de función Funktionszeiger
ii
Nombre de los
Bezeichnungen
componentes
der Bauteile
Manecilla de hora
Stundenzeiger
Manecilla de 24
24-Stunden-Zeiger
horas
Alarma ON/OFF
Alarm ON (EIN)/
(activación/desactivación)
OFF (AUS)
Manecilla de segundos Sekundenzeiger
Manecilla de modo
Moduszeiger
Botón (B)
Knopf (B)
Fecha
Datum
Corona
Krone
(Posición normal)
(in Normalposition)
Botón (A)
Knopf (A)
Nome dei
Nome dos
componenti
componentes
① Lancetta delle ore
Ponteiro das horas
② Lancetta delle 24 ore Ponteiro de 24 horas 24 小時針
ON/OFF (attivazione/
ON/OFF (ativação/
③
disattivazione) dell'allarme
desativação) do despertador
④ Lancetta dei secondi Ponteiro dos segundos 秒針
⑤ Lancetta di modalità Ponteiro de modo
⑥ Pulsante (B)
Botão (B)
⑦ Data
Dia
Corona
Coroa
⑧
(posizione normale)
(posição normal)
⑨ Lancetta dei minuti
Ponteiro dos minutos 分針
⑩ Pulsante (A)
Botão (A)
⑪ Lancetta delle funzionì Ponteiro de função
組件名稱
部件名称
時針
时针
24 小时针
ON(開啟)/
闹钟 ON(设定)/
OFF(解除)鬧鈴
OFF(取消)
秒针
模式針
模式针
(B) 鈕
(B) 钮
日期
日期
錶冠(正常位置) 表把(正常位置)
分针
(A) 鈕
(A) 钮
功能針
功能针
iii
Advertisement
Chapters
Table of Contents

Related Manuals for Citizen Perpetual Calendar BL5380-58E


Summary of Contents for Citizen Perpetual Calendar BL5380-58E
- Page 1 Name of Nombre de los Nom des pièces Components componentes ① Hour hand Aiguille des heures Manecilla de hora Aiguille des 24 Manecilla de 24 ② 24 hour hand heures horas Alarme ON/OFF Alarma ON/OFF ③ Alarm ON/OFF (active/désactivée) (activación/desactivación) ④...
- Page 2 Model Indication The caliber No. (Movement No.) of your watch is engraved on the back as shown in the figure below. Check the back of your watch for the caliber number and be sure to use your watch according to the instruction manual.
- Page 3 Precautions ... 60 About Solar Powered Watches • This Eco-Drive watch features a solar panel under the dial and is powered by converting solar energy into electrical energy. • This watch also features functions such as a perpetual calendar ( which automatically adjusts the date at month ends and leap years) a daily alarm (that can be set according to a 24-hour system), and a chronograph (capable of measuring up to 59 minutes, 59.95...
-
Page 4: Guide To Charging Time
Always store the watch in a bright location for best results. • When you take your watch off, place it in a location so that the dial (face) can receive light, such as a window sill, where sunlight can directly strike the watch dial (face). - Page 5 If the watch becomes insufficiently charged, the second hand will automatically move to the low charge warning, informing you of a “Charge warning” and “Time setting warning”. Always take care to charge your watch so that the charge does not become insufficient. [Normal time display] If watch becomes insufficiently charged As the watch recharges If the second hand points to the SET position, it indicates that the time must be set.
-
Page 6: Overcharging Prevention Function
<Low Power Warning> Regardless what mode the watch is in, if the power becomes very low, the watch will switch to the time display and the second hand will move to the ‘CHARGE’ position indicating that recharging is necessary. After the second hand has moved to the ‘CHARGE’ position, the watch will switch to display the time in the following sequence, 24-hour hand, hour hand, minute hand, date (function hand). - Page 7 However, if the watch is in insufficient charge warning mode, the second hand will stop at the CHARGE position. If the watch is in time setting warning mode, the second hand will stop at the SET position. If the watch is stopped, the second hand will stop at the STOP position.
-
Page 8: Table Of Contents
7. All-Reset Operation ... 34 Switching the Mode (Display Function) This watch has 4 modes: time/calendar, chronograph, local time, and alarm. The mode can be switched by rotating the crown. Check the current mode with the mode hand. [Mode/display function]... -
Page 9: Setting The Time And Calendar
If the rapid advance is not stopped, the hand will automatically stop after “12 hours” (Normal position) of rotation. Adjust the watch according to a reliable time source and then return the crown to the Date closed position (normal position). -
Page 10: [Setting The Calendar]
Once the calendar is set, it will operate as a perpetual calendar that automatically changes the year, month, and date including leap years. Provided the watch does not stop due to an insufficient charge, once set no further setting is necessary. - Page 11 Press the upper right button (A) to correct the year (number of years elapsed since leap year). Press the upper right button (A) to align the mode hand with the position corresponding to the year (number of years elapsed since leap year). * Year indication/function hand position * Leap year : 0 minute position...
-
Page 12: [When The Date Position Has Shifted Off Center In The Calendar Window]
[When the date position has shifted off center in the calendar window] If the date position has shifted from the calendar window due to a strong impact, be sure to reset the correct reference or 0-position for each hand and the date in chronograph mode. - Page 13 If the crown is turned to align the mode hand with chronograph [CHR] as indicated on the mode sub dial, the second hand and function hand will rapidly advance to the 0-position and the watch will enter chronograph mode. Second hand: •...
-
Page 14: Setting The Local (Secondary) Time
Setting the Local (Secondary) Time Local time (secondary time) is a function that can be used to set the time for another region separately from the current time. Local time can be adjusted as a time difference in units of hours only and is taken from the current time set (time mode/TME) . -
Page 15: Using The Alarm
After adjustment of the local time, push the crown in two steps to its normal position. Note: • If the hour hand passes the 12:00 midnight position, the date will be corrected by 1 day. Be sure to pay attention to AM/PM indicated by the 24-hour sub dial when setting the time difference. - Page 16 Pull the crown out two ‘steps’ to position 2 (alarm set position). • The alarm setting is automatically turned ON. Rotate the crown to set the alarm time. (1) Rotate the crown to the right (clockwise) by 1 click to move the hour hand and minute clockwise.
-
Page 17: Checking And Correcting The Reference Or 0-Position Of Each Hand
What is a Reference or 0-Position? The term “reference or 0-position” refers to the hand and date base positions used as a reference for correct operation of the watch. If this position is not correctly set, the watch will not display its functions correctly. -
Page 18: [Correcting The Reference Or 0-Position]
[Correcting the Reference or 0-Position] <Correcting the Reference or 0-Positions of the 24-Hour Hand, Hour Hand, Minute Hand, and Second Hand> Pull the crown out two ‘steps’ to position 2 while in chronograph [CHR] mode to correct the reference or 0-position of each hand. Press the upper right button (A) to correct the second hand by 1-second each time the button is pressed. -
Page 19: All-Reset Operation
If subjected to static electricity or strong shock, the watch may cease to operate correctly. In such cases, correct reference or 0-positions after performing the all-reset. Before executing the all-reset, first ensure the watch is fully charged and that the second hand is moving in 1-second intervals. Note: If the all-reset is executed while the watch is insufficiently charged, subsequent operations will become impossible and the watch will completely stop. -
Page 20: Operating Instructions
Note: Take care to perform operations correctly as the watch will not function if the crown is returned to the normal position before adjustment is complete. If this happens, you must repeat the all-reset operation and reset the reference or 0-positions. -
Page 21: Local Time Mode
7. All-Reset Operation ... 55 Switching the Mode (Display Function) This watch has four modes: time/calendar, chronograph, local time, and alarm. The mode can be switched by turning the crown while in position 1. Use the mode hand to check the current mode. -
Page 22: Setting The Time And Calendar
Setting the Time and Calendar Once the calendar is adjusted, a perpetual calendar capable of automatically changing the year, month, and date, including leap years (until February 28, 2100) begins operating. [Setting the Time] Hour hand Pull the crown out one step to position 1. -
Page 23: [Setting The Calendar]
[Setting the Calendar] Press and release the upper right button (A) to correct the year (number of years elapsed since the last leap year). Rotate the crown and align the function hand with the position corresponding to the year (number of years elapsed since the last leap year). * Year indication/function hand position * Leap year : 0 minute position... -
Page 24: Using The Chronograph
[CHR] as indicated on the mode sub dial. The second and Month Date function hands will rapidly advance to the 0 position and the watch will enter chronograph mode. • Second hand: chronograph second hand. The second hand rapidly moves 1 revolution when starting from 0 second position, and then advances in 1-second intervals to indicate chronograph second. -
Page 25: Setting The Local (Secondary) Time
[Chronograph Measurement] With the crown one step out in position 1, rotate the crown to align the mode hand to chronograph [CHR] mode as indicated on the mode sub dial. Return the crown to the normal position to complete the adjustment. Press and release the upper right button (A) to start and stop measurement. -
Page 26: Using The Alarm
Rotate the crown to the left (counterclockwise) or right (clockwise) to adjust the desired time difference (hours only). • Rotate the crown to the right (clockwise) 1 ‘click’ to move the hour hand, minute hand, 24 hour hand clockwise by 1 hour. •... -
Page 27: Checking And Correcting The Reference Or 0-Position Of Each Hand
(A) or (B) to stop the alarm sound. Checking and Correcting the Reference or 0-Position of Each Hand Before using this watch, be sure to check that the functions of the watch all operate correctly. What is a Reference or 0-Position? The term “reference or 0-position”... -
Page 28: [Correcting The Reference Or 0-Position]
Correct reference or 0-positions for each hand and the date Correct reference or 0-positions are given below. 24-hour hand : 0:00 Hour hand, minute hand : 0:00 Second hand : 00 seconds Function hand : 0 position (12:00 position) Date : 1st If any of the hands or the date shows a reference or 0-position other than given... -
Page 29: All-Reset Operation
Note: The second hand cannot be moved in the reverse direction. All-Reset Operation If subjected to static electricity or strong shock, the watch may cease to operate correctly. In such cases, perform the all-reset and adjust the reference or 0-positions. - Page 30 WARNING Handling the rechargeable cell • Do not remove the rechargeable cell from the watch yourself. This is a specialized cell with contacts that must be placed correctly to the movement for correct operation. • If you must remove the rechargeable cell, store it out of reach of children to avoid accidental ingestion.
-
Page 31: Specifications
Average monthly deviation: +/-15 seconds When used in normal temperature (+5°C to +35°C/41F°to95F°) Acceptable temperature range: › › Operational temperature range of the watch: -10°C to +60°C/14F°to140F° Display functions › › Time: 24-hour, hour, minute and second Calendar: Perpetual calendar... - Page 32 10/20 atmospheres 100/200 WATER RESIST(ANT) For correct use within the design limits of the watch, confirm the level of water- resistance of your watch, as indicated on the dial and case, and consult the table. Moderate exposure to Minor exposure to water water (washing, kitchen (washing face, rain, etc.)
- Page 33 If moisture has entered the watch, or if the inside of the crystal is fogged up and does not become clear within a day, immediately take the watch to your dealer or Citizen Service Center for repair. Leaving the watch in such a state will allow corrosion to form inside.
- Page 34 Using the watch where temperatures are outside the specified range, may result in deterioration of functions or even stoppage of the watch. • Do NOT use the watch in places where it is exposed to high temperature, such as in a sauna. Doing so may result in a skin burn. •...
Need help?
Do you have a question about the Perpetual Calendar BL5380-58E and is the answer not in the manual?
Questions and answers