Table of Contents
Advertisement
Quick Links
TRANSLATION OF THE ORIGINAL INSTRUCTIONS
We advise you to read this manual carefully, which contains all the instructions for
maintaining the appliance's aesthetic and functional qualities.
For further information on the product: www.smeg.com
Contents
4
4
8
9
10
11
11
11
13
13
14
14
22
23
26
28
29
29
29
29
29
30
31
31
32
32
33
33
34
3
Advertisement
Table of Contents

Subscribe to Our Youtube Channel
Related Manuals for Smeg SAI3963B


Summary of Contents for Smeg SAI3963B
-
Page 1: Table Of Contents
5.5 Section cut from the countertop 5.6 Mounting TRANSLATION OF THE ORIGINAL INSTRUCTIONS We advise you to read this manual carefully, which contains all the instructions for maintaining the appliance’s aesthetic and functional qualities. For further information on the product: www.smeg.com... -
Page 2: Instructions
Instructions 1 Instructions • Keep children under the age of 8 away from the appliance when it 1.1 General safety instructions is in use. • Cleaning and maintenance must Risk of personal injury not be carried out by • During use the appliance and its unsupervised children. - Page 3 Instructions • Do not place metal objects, such • Installation and servicing should as dishes or cutlery, on the hob be carried out by qualified surface during use as they may personnel in accordance with overheat. current standards. • Do not insert pointed metal •...
- Page 4 Instructions • Fire hazard: Never leave objects • Do not use rough or abrasive on the cooking surfaces. materials or sharp metal scrapers. • DO NOT FOR ANY REASON • Do not use cleaning products USE THE APPLIANCE AS A containing chlorine, ammonia or SPACE HEATER.
- Page 5 Instructions • Use cables that can withstand • Activate the controls lock when temperatures of at least 90 °C. you have children or pets which could reach the hob. • The tightening torque of the screws of the terminal supply •...
-
Page 6: Appliance Purpose
Instructions • Let the cooking surface cool 1.3 Manufacturer’s liability down before closing the cover. • The manufacturer declines all liability for damage to persons or • People who have pacemakers or property caused by: other similar devices fitted must make sure that the operation of •... -
Page 7: Disposal
Instructions 1.6 Disposal • Deliver the appliance to the appropriate recycling centre for This appliance conforms to the electrical and electronic WEEE European directive equipment waste, or return it to (2012/19/EU) and must be the retailer when purchasing an disposed of separately from other equivalent product, on a one for waste at the end of its service life. -
Page 8: How To Read The User Manual
Instructions 1.7 How to read the user manual This user manual uses the following reading conventions: Instructions General information on this user manual, on safety and final disposal. Description Description of the appliance and its accessories. Information on the use of the appliance and its accessories, cooking advice. -
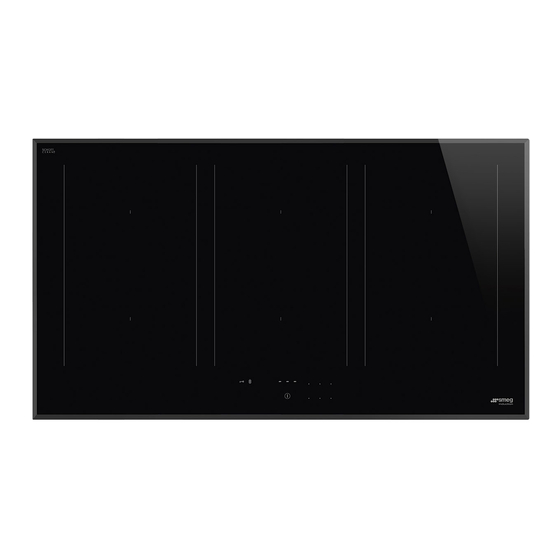
Page 9: Description
Description 2 Description 2.1 General Description 90 cm = Left cooking zones = Centre cooking zones = Right cooking zones 2.2 Control panel 1 Special functions buttons 2 Timer setting area 3 Cooking zones setting area 4 Scroll bar 5 On/Off button... - Page 10 Description Maximum power consumption table Dimensions Level 9 Booster Double Booster H x L (mm) Single zone 180 x 240 2100 W 2500 W 3000 W Multizone 360 x 240 3000 W 3700 W * power levels are approximate and may vary according to the pan used or the settings made. Advantages of induction cooking Power control The hob is fitted with a power control...
-
Page 11: Use
3 Use Improper use Risk of damage to surfaces 3.1 Instructions High temperature • Do not use the hob if the pyrolytic cycle is taking place inside any oven installed Danger of burns below. • Never place pans with bases which are •... -
Page 12: Preliminary Operations
3.2 Preliminary operations List of symbols In order to remove any moisture that could On/Off button: turns the hob on or off. have accumulated during the manufacturing process and for the electronic circuits and Pause button: pauses cooking. control keypad to work properly: 1. - Page 13 Minimum cookware diameter To see whether the pan is suitable, bring a magnet close to the bottom: if it is attracted, Make sure that the minimum diameter of the the pan is suitable for induction cooking. pans are those indicated in the following If you do not have a magnet, you can put a table, for both configurations.
- Page 14 Limiting the cooking duration Advice on energy-saving The hob has an automatic device which • The diameter of the base of the pan must limits the duration of use. not exceed the width of the silk-screened cooking zone. If the cooking zone settings are not changed, the maximum duration of •...
- Page 15 Power levels Switching on the cooking zone automatically The power in the cooking zone can be adjusted to various levels. The table shows The hob is provided with an the levels suitable for various types of automatic pan sensing system. cooking.
- Page 16 2. Move your finger to the left or right on Quick selection the scroll bar to select the power level, This function allows you to quickly set the cooking zones to the from or activate the Booster required power. function (see “Booster Function”). After switching on the hob and having selected a cooking zone: 1.
- Page 17 After switching on the hob and having The Booster function can be activated selected a cooking zone: quickly. 1. Place a finger on the left-hand side of the • After switching on the hob, place your scroll bar. finger at the far right of the scroll bar of the cooking zone you wish to use.
- Page 18 The same parameters are set on both Multizone function cooking zones. This function can be used to operate two cooking zones (front It is only possible to activate the and rear) simultaneously when Multizone function between using pans like fish kettles or cooking zones that are vertically rectangular pans.
- Page 19 Cooking guidelines The table below shows the power values which can be set, together with the corresponding type of food. Settings may vary depending on the amount of food and consumer taste. Power level Suitable for: Reheating food, keeping small amounts of water on the boil, 1 - 2 and whipping up sauces with...
-
Page 20: Special Functions
Residual heat Pause function Improper use This function pauses the operation Danger of burns of all the cooking zones. • Supervise children carefully as they To activate the Pause function: cannot easily see the residual heat 1. Switch on at least one cooking zone. indicator. -
Page 21: Additional Functions
Grill Function Controls lock This function is used to This function allows you to disable automatically activate the all the buttons of the appliance. Multizone function for the left zones only. It is used when using a This is useful when cleaning the appliance griddle or cooking with long pans. - Page 22 • After the heating time has elapsed, the 4. When the time elapses, a series of beeps cooking zone reverts to the previously will sound. Press any button to deactivate selected power level. them. This function can be deactivated by pressing and holding the set power level for A maximum of 9 hours and 59 at least 3 seconds, or by selecting a lower...
- Page 23 3. Use the + and - buttons to modify or reset • The flashing symbol will appear the timer. above the cooking zone display. 4. After 10 seconds, the timer will start the 3. Use the + and - buttons to select the new countdown or will be deactivated.
-
Page 24: User Menu
3.6 User menu The user menu is used to modify the operating characteristics of the appliance. 7 options in the user menu can be modified. Each option is indicated on the display with the letter “U”, which alternates with a progressive number. - Page 25 7. Press the segments of the scroll bar Option U4 modifies the brightness of the display. 10 levels can be selected. (except the first two) to select the • 0: maximum brightness. available options. • 9: minimum brightness. Option U5 allows you to display the countdown of the minute minder timer and timed cooking in seconds, from 59 to 0 seconds.
-
Page 26: Error Codes
Exiting the user menu There are two ways to exit from the user menu: 1. Press the button. Any modifications will be discarded and the hob will be switched off. 2. Press and hold the On/Off button for at least 2 seconds. The modifications will be saved and the hob will be switched off. -
Page 27: Cleaning And Maintenance
Cleaning and maintenance 4 Cleaning and maintenance 4.3 Ordinary weekly cleaning Clean and maintain the hob once a week 4.1 Instructions using an ordinary glass cleaning product. Always follow the manufacturer’s Improper use instructions. The silicon in these products Risk of damage to surfaces creates a protective, water-repellent membrane which also resists dirt. -
Page 28: What To Do If
Cleaning and maintenance Changes in colour do not affect the The cooking results are unsatisfactory: operation and stability of the glass. These • Make sure that the cooking temperature are not alterations to the material of the hob is not too high or too low. but just residues which have not been The hob smokes: removed and have then carbonised. -
Page 29: Installation
Installation 5 Installation • 380-415 V 3N~ 5.1 Electrical connection Power voltage Danger of electrocution 5 x 2.5 mm² five-core cable. • Have the electrical connection performed by authorised technical personnel. • 220-240 V 3~ / 380-415 V 2N~ • Use personal protective equipment. •... -
Page 30: Instructions For The Installer
Installation Fixed connection 5.3 Power limitation procedure (for installer only) Fit the power line with an all-pole circuit breaker in compliance with installation In order to change the maximum power regulations. The circuit breaker should be draw of the appliance, it is necessary to located near the appliance and in an easily access the user menu (see “User menu”). -
Page 31: Safety Instructions
Installation Table of power draws 5.5 Section cut from the countertop Minimum Maximum The following operation requires Model power (kW) power (kW) building and/or carpentry work and must therefore be carried out 90 cm 11,1 by a competent tradesman. 5.4 Safety instructions Installation can be carried out on various materials such as masonry, Heat production during appliance... -
Page 32: Mounting
Installation Hob seal If installed above an oven, a space must be left between the bottom of the hob and the To prevent leakage of liquid between the top of the appliance installed below. frame of the hob and the countertop, place the adhesive seal provided along the entire outer edge of the hob before assembly. - Page 33 Installation It must only be possible to remove the Ventilation double-layer base using suitable The illustrations below show two examples equipment. of installation suitable for proper ventilation and one example of incorrect installation to be avoided. opens on bottom opens on rear Failure to install the double-layer wooden base exposes the user to possible accidental contact with...
- Page 34 Installation Spring clips To ensure the hob is fixed and centred as accurately as possible, the clips provided must be positioned as described below: 1. Fit the clips by gently pressing them horizontally into the appropriate space. 2. Then turn them upwards to fix them in place.
Need help?
Do you have a question about the SAI3963B and is the answer not in the manual?
Questions and answers