Table of Contents
Advertisement
Quick Links
Android Box
ENJOY TV QUAD CORE BOX
ATV1815H
User's Guide
Thank you for purchasing this Geniatech product.
.Before using it, be sure to read the precautions contained in this User's Guide.
.Keep the User's Guide in a safe place for future reference.
.For the most up-to-date information about this product, visit official website at
http://www.geniatech.com
1
Advertisement
Table of Contents

Related Manuals for Geniatech ATV1815H


Summary of Contents for Geniatech ATV1815H
- Page 1 ENJOY TV QUAD CORE BOX ATV1815H User’s Guide Thank you for purchasing this Geniatech product. .Before using it, be sure to read the precautions contained in this User’s Guide. .Keep the User’s Guide in a safe place for future reference.
-
Page 2: Table Of Contents
Contents 1. Safety Information, P4-5 1.1 Warning, P4 1.2 Precautions, P4 1.3 Handling Cautions, P5 2. Introduction, P6-8 2.1 Package Contents, P6 2.2 Product Features, P6 2.3 Panel Introduction, P7 2.4 Remote Controller, P7 2.5 Setup Connection, P8 2.6 Display when Power Up, P8 3. - Page 3 6. DTV Player settings , P27-29 6.1 Program Edit, P27 6.2 EPG, P27 6.3 PVR, P28 6.4 Timeshift, P28 6.5 System, P28 6.6 Option, P29 7.Apps Install & Uninstall , P30 8. Firmware Update , P31 9. Trouble Shooting/FAQ , P32 10.
-
Page 4: Safety Information
1. Safety Information Read and understand all instructions before using this product. If damage is caused by failure to follow the instructions, the warranty does not apply. 1.1 Warning To reduce the risk of electric shock, DO NOT remove the cover (or back). DO NOT attempt to repair the product, this could lead to the risk of injury, damage to the product . -
Page 5: Handling Cautions, P5
convenience receptacles, and the point where it exits the apparatus. 1.2.10 Only use attachments/accessories specified by the manufacturer. 1.2.11 Use only with the cart, stand, tripod, bracket, or table specified by the manufacturer, or sold with the apparatus. When a cart is used , use caution when moving the cart/apparatus combination to avoid injury from tip-over. -
Page 6: Introduction
2. Introduction 2.1 Package Contents Enjoy TV Quad Core Box - ATV1815H User’s Guide HDMI Cable IR Remote Controller (IR RC) Optional Remote Controller 2.4G wireless Remote Controller USB wire/wireless Mouse & Keyboard Power Adapter, Input: AC100 ~ 240V, 50/60Hz, Output: 5V, 2A 2.2 Product Features... -
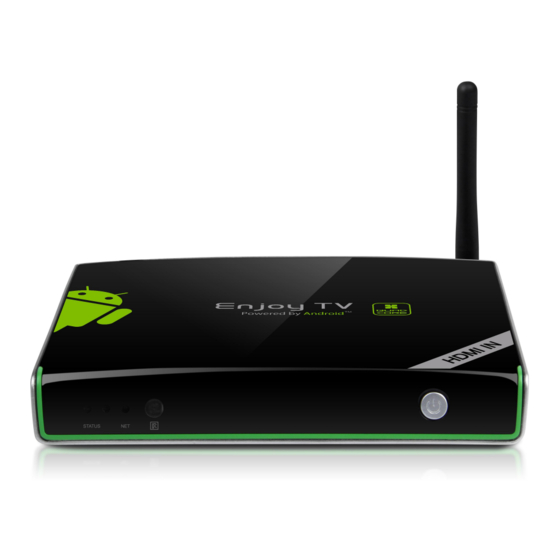
Page 7: Panel Introduction, P7
2.3 Panel Introduction 2.4 Remote Controller ⑩ Home ① Power ⑪ Background App ② Mode ⑫ Menu ③ Mute ⑬ Vol+ ④ Upwards ⑭ Notification ⑤ Towards the left ⑮ Page Up ⑥ Towards the right ⑯ Vol- ⑦ Downwards ⑰... -
Page 8: Setup Connection, P8
2.5 Setup Connection Place ATV1815H on a flat platform near the TV, and make sure nothing block the remote control signal. 2.6 Display when Power Up 2.6.1 After power up, the TV will first show a green robot during loading. When loading is finished, it will go to Home screen. -
Page 9: Settings
3. Settings Using Navigation (4 directions), OK, EXIT, and Menu keys of Remote Controller to select the options, the option selected will be highlighted and confirmed by pressing OK key. Same operation for text input if needed. Select icon then press OK key. Select icon and select icon... - Page 10 3.1.3 Once build up the connection with a certain WiFi network successfully, ATV1815H will connect this WiFi network automatically when restart. Note: If factory reset, the password of WiFi network have to be reset. 3.2 Bluetooth...
-
Page 11: Date Usage, P11
3.3 Ethernet Connect Box and Router by RJ45 network cable. Press “ ON” in Ethernet setting, it will connect to network automatically. 3.4 Date usage Show data usage information. -
Page 12: More
3.5 More... 3.5.1 VPN Build and set VPN 3.5.2 Portable hotspot 3.5.2.1 Enable Portable hotspot 3.5.2.2 Set up WiFi hotspot Note: WiFi and hotspot connection can not be applied at same time. Disconnect WiFi and connect Ethernet while using hotspot function. - Page 13 3.6 Sound 3.6.1 Volumes Increase or decrease sound volumes 3.6.2 Touch Sounds If enable Touch sound, sound will be heard while move remote controller. 3.7 Display 3.7.1 Auto Brightness Auto set brightness to save power 3.7.2 Font size Change the font size of OSD...
- Page 14 3.8 Storage Shows the storage used of the OS and SD card. 3.9 Apps List all apps installed. You can choose an application and force to shut down the app, uninstall the app, clear user data, move to SD card and clear cache data.
- Page 15 3.10 Permissions 3.11 Location...
-
Page 16: Language & Input, P16
3.12 Security 3.13 Language & input Change OSD language and input method. The default input method is android standard keyboard. If you are using our IR remote control, enter into “Default” option and switch to remote controller input method. -
Page 17: Backup & Reset, P17
3.14 Backup & reset Back up my data: You can backup your application data, WiFi password and other settings. Factory data rest: You can reset all the settings and apps to factory default. Note: You might want to backup important data before resetting the box. Once you choose to rest to factory default, all data/apps will be deleted. -
Page 18: Developer Options, P18
3.16 Accessibility 3.17 Developer options. -
Page 19: About Device, P19
3.18 About device. -
Page 20: Dtv Player
4.DTV Player 4.1 Click DTV Player icon in the all apps 4.2 Scan Channel Please make sure plug in RF antenna well beforehand . When run the Apk at first time, no any program, please scan channel first Search Menu (click the search) Please setup Area at first , select your country( for example in USA, please choose the area U.S ATSC Air ) -
Page 21: To Choose Auto Scan Tv Channels , P21
There are two kinds of scan methods, you can choose either of them: 4.3 To choose Auto Scan TV Channels After setup the correct area, you can select Auto Scan to start scanning for channels. It is blind scan, please be patient, which may takes few minutes, since it will scan the whole frequency range . - Page 22 Choose to change scan by channel Click Yes. Click Ch No,choose the channel 177000KHZ ( Please setup it according to your local channel frequency )
- Page 23 Click search after setup well the above There is process bar to show the schedule.
- Page 24 After scan well, press OK to show the program Attention: If u scanned the channels before, but did not get full list. Please do Factory data reset before to scan any new program once again Please click: System Settings ---- Factory Data reset ---- input the passwords : 0000 ---- then u can clear all the channels .
-
Page 25: Dtv Function
Parents Lock: Can set new passwords 5.DTV function You can press the OK button to bring up the channel list, in there you can select TV channels, Radio channels or your favorite channels. - Page 26 You can press Left or Right button to bring up the channel sub menu, from the menu you can change the display size , access EPG , change audio language , change subtitle change TTX region and start recording If you want to return to the setup menu, just press the menu button on the remote control.
-
Page 27: Dtv Player Settings
6.DTV Player settings 6.1 Program Edit In program edit option, you can re-order the channel list, select Favorite channels (channel will mark with a heart icon) and lock channels (channel will mark with a lock icon). The default password is 0000. You can change the password in system menu. 6.2 EPG In EPG option, you can check TV shows schedule for the coming 7 days, and also can setup schedule recording. - Page 28 6.3 PVR In PVR Configure, you can select which device to store the recorded files. You can also change the Time shift size to select how long the time shift should be. In PVR Manager, all recorded files will be list here, you can playback the file, delete the file or format the storage device.
- Page 29 Subtitle Switch: Enable or disable subtitle switch function Factory data reset: Reset all settings to factory default Set password: Change the password for program edit and parental rating age, they use the same password. Parental rating age: can set Parent control by age 4~18 or all(no parent control) TTX Region: Set the TTX language 6.6 Option Under Option menu, there are:...
-
Page 30: Apps Install & Uninstall
7. Apps Install & Uninstall On ATV1815H, you can install apps from Android Market over the Internet or other sources, such as other online sources, the internal storage and the USB storage device and SD card that you have mounted onto ATV1815H. -
Page 31: Firmware Update
8. Firmware Update You can download newest firmware from Geniatech Official website: www.geniatech.com... -
Page 32: Trouble Shooting/Faq
9. Trouble Shooting/FAQ 9.1 No Picture Refer to the TV user manual for how to select the correct video input channel. 9.2 USB Content cannot be read . The format of USB storage device is not supported . The supported memory size is 32G maximum. . -
Page 33: Repairs
We will provide you with the amount of the administration fee before we make a home visit or begin any work on your player. We recommend you read this manual throughly, search for a solution on line at www.geniatech.com, or contact Geniatech Customer Care before seeking to repair your player. -
Page 34: Specification
11. Specification Quad core A9r4 CPU@2.0GHz Mali 450MP8 @600MHz 2G DDR3 8G EMMC Android 4.4 OS Optional DOLBY USB2.0 x4 HDMI V1.4a DC Input 5.0V-2A SD Slot Max: 32G Video Output HDMI/CVBS Audio Output HDMI/RCA IR receiver RF input 75 Ohm Digital TV Antenna Input; Receive Frequency; TV 48.25~863.25MHZ RJ45 10/100M AC Ethernet interface WiFi IEEE 802.11 B/G/N 2.4G /5.8G... -
Page 35: Trademark Notice
12. Trademark Notice The terms HDMI and HDMI High-Definition Multimedia Interface, and the HDMI Logo are trademarks or registered trademarks of HDMI Licensing LLC in United States and other countries.
Need help?
Do you have a question about the ATV1815H and is the answer not in the manual?
Questions and answers