
Subscribe to Our Youtube Channel
Related Manuals for LG G5300S


Summary of Contents for LG G5300S
- Page 1 ENGLISH GPRS Phone USER’S MANUAL MODEL: G5300S Please read this manual carefully before operating your set. Retain it for future reference.
- Page 3 G5300S Phone...
- Page 4 For Your Safety Important Information This user guide contains important information on the use and operation of this phone. Please read all the information carefully for optimal performance and to prevent any damage to, or misuse of, the phone. Any changes or modifications not expressly approved in this user guide could void your warranty for this equipment.
- Page 5 Safety Information Please read and observe the following information for the safe and proper use of your phone and to prevent any unanticipated damage. Also, keep the user’s manual in an accessible place at all the times after reading it. •...
- Page 6 For Your Safety • Using a damaged battery or placing a battery in your mouth may cause serious injury. • Do not place items containing magnetic components such as a credit card, phone card, bank book or a subway ticket, near your phone.
- Page 7 Body-worn Operation This device was tested for typical body-worn operations with the back of the phone kept 1.5 cm from the body. To comply with FCC RF exposure requirements, a minimum separation distance of 1.5 cm must be maintained between the user’s body and the back of the phone.
- Page 8 For Your Safety Battery Disposal • Please dispose of your battery properly or bring to your local wireless carrier for recycling. • Do not dispose in fire or with hazardous or flammable materials. Adapter (Charger) Cautions • Using the wrong battery charger could damage your phone and void your warranty.
-
Page 9: Table Of Contents
Contents Overview ..............Part of the Phone • Front of the Phone ............. 13 • Rear of the Phone .............. 14 ..............Key Description • Alphanumeric Keys ............17 Display Information ............. Display Information • On-Screen Icons ..............18 Getting Started ................ - Page 10 Accessing the Menu ................Phonebook ................Menu Tree ............. Messages [Menu 1] • Write short message [Menu 1-1] ........30 • Write multimedia message [Menu 1-2] ......32 • Inbox [Menu 1-3] ..............38 • Outbox [Menu 1-4] ............. 40 •...
- Page 11 ..............Settings [Menu 4] • Alarm clock [Menu 4-1] ............54 • Date & Time [Menu 4-2] ............. 54 • Phone settings [Menu 4-3] ..........55 • Call settings [Menu 4-4] ............. 57 • Security settings [Menu 4-5] ..........61 •...
- Page 12 ..............Java [Menu 8] • Applications [Menu 8-1] ............. 84 • Memory status [Menu 8-2] ..........85 • Download [Menu 8-3] ............85 ............Internet On-line menu Additional Functions ..........How to Use Data and Fax call • Sending Data or Fax Calls ..........87 •...
-
Page 13: Overview
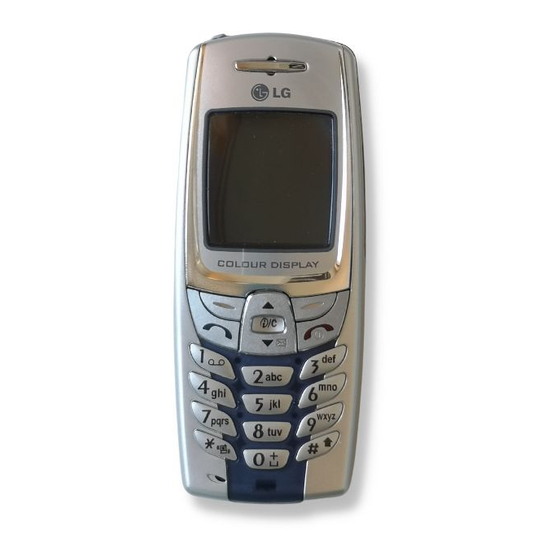
Part of the Phone Overview Front of the Phone Earpiece END/PWR keys Display Screen 9 Numeric Keys Soft Left Key Hash Key Navigation Keys Microphone Send Key Ear Microphone Connector Star Key 13 WAP Hotkey/ Soft Right Key Clear key... -
Page 14: Rear Of The Phone
Part of the Phone Overview Rear of the Phone 1 Battery 2 Cable Connector/ Battery Charging Connector/ Hands-Free Car kit Connector 3 Battery Terminals 4 SIM Card Socket 5 Handstrap Hole 6 Battery Lock 7 Ear Microphone Connector... -
Page 15: Key Description
Key Description Overview The following shows key components of the phone. Keypad Description Description Soft Left Key / Soft Right Key < > Each of these keys performs the function indicated by the text on the display immediately above it. WAP Hotkey / Clear key Used to connect to WAP directly by pressing this key. - Page 16 Key Description Overview Description Used to enter the vibration mode by pressing this key for a long time. Used to call by voice dial with long pressing this key. This key is also used as Ear mic. hook key when connecting Ear mic.
-
Page 17: Alphanumeric Keys
Overview Alphanumeric Keys The alphabet and numerical keypad mapping relation are listed as the following table. Description . , / ? ! - : ’ " A B C 2 Ä À Á Â Ã Å Æ Ç a b c ä à á â ã å ç... -
Page 18: Display Information
Display Information Display Information The screen displays several icons the following describe each of them you may see on the phone. On-Screen Icons Icon/Indicator Description Tells you the strength of the network signal. Call is connected. You can use GPRS service. Shows that you are using a roaming service. - Page 19 Display Information Icon/Indicator Description Headset menu in profile. Car menu in profile. You can divert a call. You can use Push message service through WAP. Top Menu Icons Icon Description Messages Call Register Profiles Settings Organizer Fun & Tools Wap services Java...
-
Page 20: Getting Started
Installation Getting Started – Inserting the SIM Card Locate the SIM card socket in the back of the phone. Follow the steps below to install the SIM card. 1. Remove the battery if attached. 2. Slide the SIM card into the slot, under the silvery holders, with the golden connectors facing down and the cut corner to the right. -
Page 21: Installing The Battery
Getting Started — Installing the Battery 1. Place the battery on the back of the phone. 2. Push it until you hear a click. -
Page 22: Charging The Battery
Installation Getting Started ˜ Charging the Battery To connect the travel adapter to the phone, you must have installed the battery. 1. Insert one end of the travel adapter into the bottom of the phone. 2. Connect the other end of the travel adapter to an AC wall outlet. -
Page 23: Disconnecting The Charger
Getting Started ™ Disconnecting the charger Disconnect the travel adapter from the phone by pressing its side buttons. Notice • The battery delivered with your phone has to be fully charged before using it. • Do not remove your battery or the SIM card while charging. •... -
Page 24: Powering On Sequence
Powering On Sequence Getting Started – To get started with the phone 1. Press and hold key until you hear a tone. 2. Depending on setting PIN code request, you can enter PIN code or not. 3. If your phone connects to a network, the network name will be displayed shortly. -
Page 25: Access Codes
Access Codes Getting Started You can use the access codes described in this section to avoid unauthorised use of your phone. The access codes (except PUK1 and PUK2 codes) can be changed by using [Menu 4-5-6]. PIN code (4 to 8 digits) The PIN (Personal Identification Number) code protects your SIM card against unauthorised use. -
Page 26: Puk2 Code (4 To 8 Digits)
Access Codes Getting Started PUK2 code (4 to 8 digits) The PUK2 code, supplied with some SIM cards, is required to change a blocked PIN2 code. If you lose the code, also contact your service provider. Security code (4 to 8 digits) The security code protects the unauthorised use of your phone. -
Page 27: Accessing The Menu
Phonebook Accessing the Menu To select a menu in phonebook, press [Names] in standby mode and then scroll to a desired item. Name Description Name Description Search Allows you to search for a specific name, number. Add new Allows you to add new names and numbers. Allows you to assign up to 8 ( 2 - 9 ) Speed dials one-touch dial allocations. -
Page 28: Menu Tree
Menu Tree Accessing the Menu 1 Messages 3 Profiles 1 Write short message 1 Vibrate only 2 Write multimedia message 2 Quiet 3 Inbox 3 General 4 Outbox 4 Loud 5 Voice mail 5 Headset 6 Info service 6 Car 7 Templates 8 Settings 4 Settings... - Page 29 Accessing the Menu 5 Organizer 7 WAP services 1 Home 1 Scheduler 2 Phone book 2 Bookmarks 3 Push messages 4 Profiles 5 Go to URL 6 Cache settings 6 Fun & Tools 7 Security certifications 8 Reset profiles 1 Calculator 2 My folder 3 Game 4 Unit converter...
-
Page 30: Messages [Menu 1]
Messages [Menu 1] Accessing the Menu This menu includes functions related to SMS (Short Message Service), MMS (Multimedia Message Service), voice mail, as well as the network’s service messages. Write short message [Menu 1-1] You can write and edit text messages, checking the number of characters. - Page 31 Accessing the Menu • Phonebook You can add phone numbers or e-mail addresses in Phonebook. • Business card You can add your contact information to the message. Options • Send Sends text messages. 1. Enter numbers of recipient. 2. Press D key to add more recipients. 3.
-
Page 32: Write Multimedia Message [Menu 1-2]
Messages [Menu 1] Accessing the Menu • Add T9 dictionary You can add your own word. This menu can be shown only when edit mode is Predictive (T9Abc/T9abc/T9ABC). • T9 langauges Select a T9 input mode. • Exit If you press Exit while writing a message, you can end the writing message and back to the Message menu. - Page 33 Accessing the Menu Options • Preview You can preview multimedia messages you wrote. • Send You can send multimedia messages to multiple recipients, prioritise your message, and make it sent later as well. • Save You can save multimedia messages in the outbox or as templates. •...
- Page 34 Messages [Menu 1] Accessing the Menu • Add T9 dictionary You can add your own word. This menu can be shown only when edit mode is Predictive (T9Abc/T9abc/T9ABC). • T9 langauges Select a T9 input mode. • Exit You can back to the Message menu.
- Page 35 Accessing the Menu How to Use T9 T9 allows you to input text quickly. In T9, you only need to press the key with the corresponding letter once. This is based on a built-in dictionary to which you can also add new words. •...
- Page 36 Messages [Menu 1] Accessing the Menu To delete a character to the left, press C. To insert several numbers, hold # down and key in the numbers. If you hold * down, you can change the type of language. (You can also use options.) Also, the phone supports three modes: Predictive (T9Abc, T9ABC, T9abc), Multitap (ABC, abc), Numeric (123).
- Page 37 Accessing the Menu Input your LGGSM word ➭ 3. To insert a punctuation mark, press 1 repeatedly until the desired mark appears. T9 languages • You can select T9 Languages by selecting Menu. In T9 mode, you can also select T9 Off menu. (Default is T9 On)
-
Page 38: Inbox [Menu 1-3]
Messages [Menu 1] Accessing the Menu Inbox [Menu 1-3] You will be alerted when you have received messages. They will be stored in Inbox. In Inbox, you can identify each message by icons. For detail, see the icon directive. Icon directive ] Multimedia message ] Short message ] SIM message... - Page 39 Accessing the Menu Reply You can reply to the sender. Forward You can forward the selected message to another party. Return call You can call back to the sender. Delete You can delete the current message. Extract You can extract picture, sound and text. They will be saved in My folder or Phonebook.
-
Page 40: Outbox [Menu 1-4]
Messages [Menu 1] Accessing the Menu Replay (applicable to Multimedia message only) You can replay multimedia messages. ❇ Receive (In case of notification message) If Multimedia message is set to Auto download off, you can get only Notification. To receive a message, you need to select [Receive]. -
Page 41: Voice Mail [Menu 1-5]
Accessing the Menu Delete The selected message is deleted. View information Shows whether the message was sent, unsent or delivered successfully. Voice mail [Menu 1-5] Listen to voice mail You can listen to voice mail. Voice mail centre You can get the voicemail if this feature is supported by the network service provider. -
Page 42: Info Service [Menu 1-6]
Messages [Menu 1] Accessing the Menu Info service [Menu 1-6] (Dependent to network and subscription) Cell Broadcast messages (CB Message) are text messages by the network to GSM phone users. They provide general information such as weather reports, traffic news, taxis, pharmacies, and stock prices. Each type of information has the number;... -
Page 43: Templates [Menu 1-7]
Accessing the Menu Topics (Dependent to network and subscription) • Add new You can add the CB message category in the Phone memory with its nickname. • View list You can see the CB message category which you added. If you press [Options], you can edit and delete CB message category which you added. -
Page 44: Settings [Menu 1-8]
Messages [Menu 1] Accessing the Menu Multimedia Allows you to edit predefined Multimedia messages. You can use the following option for Text and Multimedia. Edit : You can edit multimedia templates. Add new : Allows you to add new multimedia templates. Write message : You can write multimedia messages using multimedia templates. - Page 45 Accessing the Menu • Delivery report If you set Yes in this menu, you can check whether your message is sent successfully or not. • Reply via same service centre When a message is sent, it allows the person to whom you sent the message to reply and charges the cost of the reply to your telephone bill.
- Page 46 Messages [Menu 1] Accessing the Menu • Network settings If you select multimedia message server, you can set IP address for multimedia message server. • Permitted message types Personal : Persornal message. Advertisements : Commercial message. Information : Necessary information. Memory status You can check how many free and in-use are in the SIM memory or the Phone memory.
-
Page 47: Call Register [Menu 2]
Call Register [Menu 2] Accessing the Menu Missed calls [Menu 2-1] This menu shows recently missed numbers. You can call by this number, also save and view date and time this menu as well as writing messages. Received calls [Menu 2-2] This menu shows recently received numbers. - Page 48 Call Register [Menu 2] Accessing the Menu Call charge [Menu 2-6] Within these submenus, you can view the duration and the call cost of your calls. Call duration This function allows you to view the duration of your Last Call, All Calls, Received calls and Dialled calls in hours, minutes and seconds.
-
Page 49: Call Charge [Menu 2-6]
Accessing the Menu Settings [SIM Dependent] • Set tariff You can set the currency type and the unit price. Contact your services providers to obtain charging unit prices. To select the currency or unit in this menu, you need the PIN2 code. •... -
Page 50: Gprs Information [Menu 2-7]
Call Register [Menu 2] Accessing the Menu GPRS information [Menu 2-7] You can check the amount of data transferred over the network through GPRS. In addition, you can also view how much time you are online. Call duration You can check the duration of GPRS call. You can also reset the call timers. -
Page 51: Profiles [Menu 3]
Profiles [Menu 3] Accessing the Menu In this menu, you can adjust and customize the phone tones for different events, environments and caller’s group. Note • When your phone is connected to the Handsfree kit, it’ll be automatically set to the Car profiles menu and when your phone is connected to the Earmic, it’ll be automatically set to Headset profiles menu then each submenu related to them will be displayed automatically. -
Page 52: Car [Menu 3-6]
Profiles [Menu 3] Accessing the Menu Car [Menu 3-6] You can adjust the Profiles as Car when you activate Handsfree Kit. A Group of Profiles submenus Profiles menu have the submenus as shown below. Incoming alert type Allows to alert for the incoming call for adjusting environment. Ring tone Allows to set the ringing tone for adjusting environment. - Page 53 Accessing the Menu Auto answer Allows to set to answer automatically for adjusting environment. Please note that only Car and Headset has this sub menu so that you can activate this function. • Off Even though your phone is ringing, your phone will not answer automatically.
-
Page 54: Settings [Menu 4]
Settings [Menu 4] Accessing the Menu You can set the following menus for your convenience and preferences. Alarm clock [Menu 4-1] You can set the alarm to go off at a specified time. 1. Select On and enter the alarm time you want. 2. -
Page 55: Phone Settings [Menu 4-3]
Accessing the Menu Time The phone has its own clock. In this menu you can set the time and select between the 12-hour or 24-hour time formats. • Set time: You can set time of your phone in this menu. •... - Page 56 Settings [Menu 4] Accessing the Menu • Greeting note If you select yes, this menu allows you select the standby display. In text mode, you can edit the text. • Backlight You can set the light-up duration you want whenever you press a key.
-
Page 57: Call Settings [Menu 4-4]
Accessing the Menu Call settings [Menu 4-4] You can set the menu relevant to a call by pressing [Select] in Setting menu. Call divert The Call divert service allows you to divert incoming voice calls, fax calls, and data calls to another number. For details, contact your service provider. - Page 58 Settings [Menu 4] Accessing the Menu • Cancel all Cancels all call divert service. • The submenus Call divert menus have the submenus as shown below. - Activate Activating the corresponding service. To other number Inputs the number for diverting. To favorite number You can check 5 diverted numbers.
- Page 59 Accessing the Menu Anykey answer • On If you select this menu, you can receive a call by pressing any key except key. • Off If you select this menu, you can receive an incoming call by only pressing key. Note •...
- Page 60 Settings [Menu 4] Accessing the Menu Call waiting (network dependent) If this service is Enable, you can accept a waiting (incoming) call. • On Activating the corresponding service. • Off Deactivating the corresponding service. • View status Checking the Status of the service. Minute minder If you select On, you can check the call duration by beep sound every minute during a call.
-
Page 61: Security Settings [Menu 4-5]
Accessing the Menu Select line This function is only used if Alternate line service supported by the Service Provider. Two independent phone numbers are registered for the phone. This function provides you with the selection the currently used phone number. If this function is supported by your service provider, the following menu will be displayed. - Page 62 Settings [Menu 4] Accessing the Menu Phone lock You can use security code to avoid unauthorized use of your phone. When you switch on your phone, your phone will request security code always if you set phone lock to “On”. If you set phone lock to “Automatic”, your phone will request security code only when you change your SIM card.
- Page 63 Accessing the Menu Call barring The Call barring service prevents your phone from making or receiving certain category of calls. This function requires the call barring password. You can view the following submenus. • All outgoing : The barring service of all outgoing calls. •...
-
Page 64: Network Settings [Menu 4-6]
Settings [Menu 4] Accessing the Menu Fixed dial number (SIM dependent) You can restrict your outgoing calls to selected phone number. The numbers are protected by your PIN2 code. • Activate You can restrict your outgoing calls to selected phone number. •... -
Page 65: Reset Settings [Menu 4-7]
Accessing the Menu Manual The phone will find the list of available networks and show you them. Then you can select the network which you want to use if this network has a roaming agreement with your home network operator. Preferred You can set a list of preferred networks the handset should attempt to register with first, before attempting to register to any other... -
Page 66: Organizer [Menu 5]
Organizer [Menu 5] Accessing the Menu Scheduler [Menu 5-1] On top of the screen there are sections for date and icons. Whenever you change the date, the calendar will be updated according to the date. And square cursor will be used to locate the certain day. -
Page 67: Phone Book [Menu 5-2]
Accessing the Menu View day Shows the note for the chosen day. Use U , D to browse through the note lists. If you set alarm for the note, Alarm watch is displayed. Press [Options] to delete, edit the note you selected. View all Shows the notes that are set for all days. - Page 68 Organizer [Menu 5] Accessing the Menu 3. Depending on setting Search by, the below menu may not appear. • Name • Number 4. You can find an entry by name and number. 5. Select [Search]. 6. You can check the names and numbers by pressing [List]. 7.
- Page 69 Accessing the Menu Add new You can add phonebook entry by using this function. Phone memory capacity is 200 entries. SIM card memory capacity depends on the service provider. You can also save 20 characters of name in the Phone memory, and you can save characters in the SIM card.
- Page 70 Organizer [Menu 5] Accessing the Menu Note • The voice can only be attached to main number which you set. For example, if you change main number voice will be automatically attached changed number. • You can add voice tag to phone number in SIM card. The voice tag can be erased removing or changing SIM card.
- Page 71 Accessing the Menu Voice list You can see all phone numbers which contain voice. You can also call directly by pressing [Send]. After selecting phone number by using U and D press [Options], you can see following the submenus. • Play You can play voice which is attached to phone number.
- Page 72 Organizer [Menu 5] Accessing the Menu 5. Then submenus below will be displayed. • View member - You can view the number list in Caller groups. - You can select the member you want by pressing [Options] then you can enable the submenu such as Edit, Delete, Write message, Copy, Voice and Main number.
- Page 73 Accessing the Menu Copy all You can copy/move entries from SIM card memory to Phone memory or from Phone memory to SIM card memory. 1. Open the phonebook first by pressing [Names] in standby mode. 2. Scroll to Copy all, then press [Select] to enter this menu. 3.
- Page 74 Organizer [Menu 5] Accessing the Menu 1. Open the phonebook first by pressing [Names] in a standby mode. 2. Scroll to Settings, then Press [Select] to enter. 3. Then submenus below will be displayed. • Set memory 1. Scroll to highlight Set memory, then press [Select] to enter. 2.
- Page 75 Accessing the Menu Information • Service dial number Use this function to access a particular list of services provided by your network operator (if supported by the SIM card). • Memory status This feature allows you to see how many free and in-use are in your phonebook.
-
Page 76: Fun & Tools [Menu 6]
Fun & Tools [Menu 6] Accessing the Menu Calculator [Menu 6-1] This contains the standard functions such as +, –, *, ÷ : Add, Subtract, Multiply, Divide. 1. Input the numbers by pressing numeric keys. 2. Press U key once for Add and long press for Multiply. Press D key once for Subtract and long press for divide. -
Page 77: Game [Menu 6-3]
Accessing the Menu Game [Menu 6-3] The phone offers you enjoyable games to play with. Note The Control keys are different for each game. But each game has screens to explain the main control key (see key info.). Other common control keys are below. [Common Key Function] <... -
Page 78: Unit Converter [Menu 6-4]
Fun & Tools [Menu 6] Accessing the Menu Unit converter [Menu 6-4] This converts any measurement into a unit you Length want. There are 4 types that can be converted into units: Length, Area, Weight, and Volume. 1. You can select one of four unit types by pressing [Next] key. -
Page 79: Wap Services [Menu 7]
WAP services [Menu 7] Accessing the Menu Your phone supports services based on Wireless Application Protocol (WAP). You can access services supported by your network. The services menu allows you to get the information such as news, weather reports, and flight times. Home [Menu 7-1] You can connect to the configured homepage of the activated profile. -
Page 80: Profiles [Menu 7-4]
WAP services [Menu 7] Accessing the Menu Setting You can set push the messages. Profiles [Menu 7-4] You can make up to 5 profiles and activate only one of them. Scroll to the desired profile and press < to access available options. •... - Page 81 Accessing the Menu - Conn. security The options are On and Off depend on the gateway you are using. - Gateway information Most of WAP gateways do not require a User ID and Password. If your gateway need them to connect to it, then your network should provide them, and you must set them up correctly before trying to browse a WAP site.
-
Page 82: Go To Url [Menu 7-5]
WAP services [Menu 7] Accessing the Menu - GPRS settings The service settings are only available when GPRS is chosen as a bearer service. - Linger timer You can input timeout periods between 30sec, and 300sec. if any data wasn’t input or transferred, the service will be unavailable. •... -
Page 83: Cache Settings [Menu 7-6]
Accessing the Menu Cache settings [Menu 7-6] You can remove the contents of Cache memory and change the Cache check mode. Clear cache The contents of Cache memory will be removed. Check cache You can change the time for checking the Cache memory. •... -
Page 84: Java [Menu 8]
Java [Menu 8] Accessing the Menu Applications [Menu 8-1] Java Menu Options Scroll to an application and select Options. 1. Open : Launches the selected MIDlet. 2. Delete : Deletes the selected MIDlet. 3. Update : Accesses the server and updates the selected MIDlet. -
Page 85: Memory Status [Menu 8-2]
Accessing the Menu Memory status [Menu 8-2] Shows the size of memory available for game and application installations. You can also see the whole memory status of Handset. Download [Menu 8-3] See [Menu 7-2]. You can edit and set MIDlet server address. Download MIDlets using WAP Browser and store them in the phone. -
Page 86: Internet On-Line Menu
Internet On-line menu Accessing the Menu If you are on line, you can see the following menus. ❏ Home This is the same as [Menu 7-1]. ❏ Reload This reloads the current page. ❏ Bookmarks This is the same as [Menu 7-2]. ❏... -
Page 87: Additional Functions
How to Use Data and Fax call Additional Functions To be able to data or fax service, you need the communicate software such as a data or a fax program. Before using these functions, you need to connect your phone to a computer or make sure that your phone is in connection with a compatible device. - Page 88 How to Use Data and Fax call Additional Functions Receiving Data or Fax Calls – Single number If you have a SIM card that does not support separate voice, data and fax numbers, the phone does not recognize the type of incoming call.
-
Page 89: In Call Menu
In call Menu Additional Functions During a call, the following menus will be displayed, not in a standby mode. 1 During a call 1-1 Putting a Call on Hold You can place a call on hold or retrieve by just pressing the [Send] key. - Page 90 In call Menu Additional Functions 1-4 Answering an Incoming Call To answer an incoming call, simply press the [Send] key. The handset is also able to warn you of an incoming call while you are already in a call. A tone sounds in the earpiece, and the display will show that a second call is waiting.
-
Page 91: Multiparty Or Conference Calls
Additional Functions 1-8 Switching DTMF Tones on During a Call To turn DTMF tones on during a call, for example, to allow your handset to make use of an automated switchboard, select the [Options] key, then DTMF On. DTMF tones can be turned off the same way. - Page 92 In call Menu Additional Functions 2-1 Making a Second Call You can make a second call while you are already in a call. To do this, enter the second number and press [Send]. When you get second call the first call is automatically put on hold. You can swap between calls by selecting the [Options] key then Swap.
- Page 93 Additional Functions 2-7 Putting a Member of a Multiparty Call on Hold To place one selected caller (whose number is currently displayed on-screen) of a multiparty call on hold, select the [Options] key then Multiparty/Exclude. 2-8 A Private Call in a Multiparty Call To have a private call with one caller of a multiparty call, display the number of the caller you wish to talk to on the screen, then select the [Options] key and Multiparty/Private to put all the other callers on...
-
Page 94: Accessories
Accessories There are various accessories for your mobile phone. You can select these options according to your personal communication requirements. Standard Battery Portable Handsfree This connects to your phone, allowing handsfree operation. Travel Adapter This charger allows you to charge the battery while away from home or your office. - Page 95 Data Kit/CD You can connect your phone to PC to exchange the data between them. Handsfree Kit The handsfree car kit enables you to attach the phone to the power jack in your car, providing you with handsfree operation. Note •...
-
Page 96: Safety Guidelines
Safety Guidelines TIA Safety Information Provided herein is the complete TIA Safety Information for Wireless Handheld phones. Inclusion of the text covering Pacemakers, Hearing Aids, and Other Medical Devices is required in the owner’s manual for CTIA Certification. Use of the remaining TIA language is encouraged when appropriate. - Page 97 Antenna Care Use only the supplied or an approved replacement antenna. Unauthorized antennas, modifications, or attachments could damage the phone and may violate FCC regulations. Phone Operation NORMAL POSITION: Hold the phone as you would any other telephone with the antenna pointed up and over your shoulder. Tips on Efficient Operation For your phone to operate most efficiently: •...
- Page 98 Safety Guidelines Pacemakers The Health Industry Manufacturers Association recommends that a minimum separation of six (6”) inches be maintained between a handheld wireless phone and a pacemaker to avoid potential interference with the pacemaker. These recommendations are consistent with the independent research by and recommendations of Wireless Technology Research.
- Page 99 Vehicles RF signals may affect improperly installed or inadequately shielded electronic systems in motor vehicles. Check with the manufacturer or its representative regarding your vehicle. You should also consult the manufacturer of any equipment that has been added to your vehicle. Posted Facilities Turn your phone OFF in any facility where posted notices so require.
- Page 100 Safety Guidelines For Vehicles Equipped with an Air Bag An air bag inflates with great force. DO NOT place objects, including either installed or portable wireless equipment, in the area over the air bag or in the air bag deployment area. If in-vehicle wireless equipment is improperly installed and the air bag inflates, serious injury could result.
- Page 101 2.What is the FDA's role concerning the safety of wireless phones? Under the law, the FDA does not review the safety of radiation- emitting consumer products such as wireless phones before they can be sold, as it does with new drugs or medical devices. However, the agency has authority to take action if wireless phones are shown to emit radiofrequency energy (RF) at a level that is hazardous to the user.
- Page 102 Safety Guidelines The National Institutes of Health participates in some interagency working group activities, as well. The FDA shares regulatory responsibilities for wireless phones with the Federal Communications Commission (FCC). All phones that are sold in the United States must comply with FCC safety guidelines that limit RF exposure.
- Page 103 4.What are the results of the research done already? The research done thus far has produced conflicting results, and many studies have suffered from flaws in their research methods. Animal experiments investigating the effects of radiofrequency energy (RF) exposures characteristic of wireless phones have yielded conflicting results that often cannot be repeated in other laboratories.
- Page 104 Safety Guidelines 5.What research is needed to decide whether RF exposure from wireless phones poses a health risk? A combination of laboratory studies and epidemiological studies of people actually using wireless phones would provide some of the data that are needed. Lifetime animal exposure studies could be completed in a few years.
- Page 105 The FDA and the Cellular Telecommunications & Internet Association (CTIA) have a formal Cooperative Research and Development Agreement (CRADA) to do research on wireless phone safety. The FDA provides the scientific oversight, obtaining input from experts in government, industry, and academic organizations. CTIA-funded research is conducted through contracts with independent investigators.
- Page 106 Safety Guidelines 8.What has the FDA done to measure the radio frequency energy coming from wireless phones? The Institute of Electrical and Electronic Engineers (IEEE) is developing a technical standard for measuring the radio frequency energy (RF) exposure from wireless phones and other wireless handsets with the participation and leadership of FDA scientists and engineers.
- Page 107 If you must conduct extended conversations by wireless phone every day, you could place more distance between your body and the source of the RF, since the exposure level drops off dramatically with distance. For example, you could use a headset and carry the wireless phone away from your body or use a wireless phone connected to a remote antenna.
- Page 108 Safety Guidelines interference (EMI) of implanted cardiac pacemakers and defibrillators from wireless telephones. This test method is now part of a standard sponsored by the Association for the Advancement of Medical instrumentation (AAMI). The final draft, a joint effort by the FDA, medical device manufacturers, and many other groups, was completed in late 2000.
- Page 109 Consumer Information on SAR (Specific Absorption Rate) This Model Phone Meets the Government’s Requirements for Exposure to Radio Waves. Your wireless phone is a radio transmitter and receiver. It is designed and manufactured not to exceed the emission limits for exposure to radio frequency (RF) energy set by the Federal Communications Commission (FCC) of the U.S.
- Page 110 Safety Guidelines model. The highest SAR value for this model phone when tested for use at the ear is 0.31 W/kg and when worn on the body, as described in this user’s manual, is 0.13 W/kg. (Body-worn measurements differ among phone models, depending upon available accessories and FCC requirements.) While there may be differences between SAR levels of various phones and at various positions, they all meet the government requirement for safe...
-
Page 111: Technical Data
Technical Data General Product Name : G5300S System : GSM 900/DCS 1800 Ambient Temperatures Max : +55°C Min : -10°C... - Page 113 Memo...
- Page 114 Memo...
Need help?
Do you have a question about the G5300S and is the answer not in the manual?
Questions and answers