Table of Contents
Advertisement
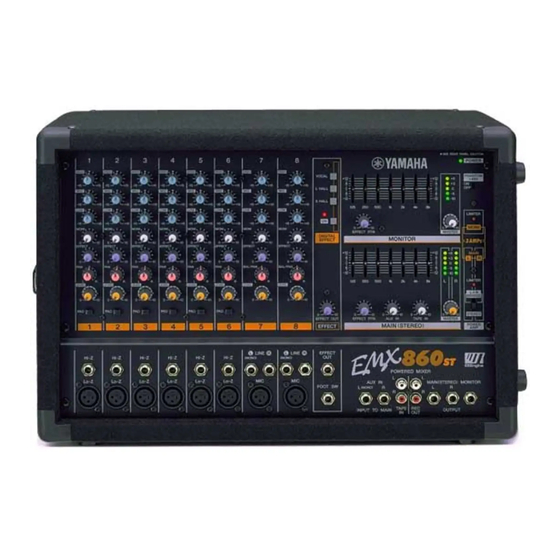
Owner's Manual
1
HIGH
HIGH
–15
+15
–15
MID
MID
–15
+15
–15
LOW
LOW
–15
+15
–15
MONI
MONI
0
10
EFFECT
EFFECT
0
10
PAN
PAN
L
R
LEVEL
LEVEL
0
10
PAD
PAD
1
Hi-Z
Lo-Z
2
3
4
5
6
HIGH
HIGH
HIGH
HIGH
+15
–15
+15
–15
+15
–15
–15
+15
MID
MID
MID
MID
+15
–15
+15
–15
+15
–15
+15
–15
LOW
LOW
LOW
LOW
+15
–15
+15
–15
+15
–15
+15
–15
MONI
MONI
MONI
MONI
0
10
0
10
0
10
0
0
10
EFFECT
EFFECT
EFFECT
EFFECT
0
10
0
10
0
10
0
10
0
PAN
PAN
PAN
PAN
L
R
L
R
L
R
L
R
L
R
LEVEL
LEVEL
LEVEL
LEVEL
0
10
0
10
0
10
0
0
10
PAD
PAD
PAD
PAD
2
3
4
5
6
Hi-Z
Hi-Z
Hi-Z
Hi-Z
Hi-Z
Lo-Z
Lo-Z
Lo-Z
Lo-Z
Lo-Z
7
8
HIGH
HIGH
VOCAL
–12
•
6
+15
–15
+15
–15
+15
•
L HALL
0
MID
MID
•
6
•
+12
S HALL
+15
–15
+15
–15
+15
125
LOW
LOW
ON
+15
–15
+15
–15
+15
0
MONI
MONI
EFFECT RTN
DIGITAL
EFFECT
10
0
10
0
10
EFFECT
EFFECT
–12
•
6
•
10
0
10
0
10
0
•
BAL/PAN
BAL/PAN
6
•
+12
125
L
R
L
R
LEVEL
LEVEL
10
0
10
0
10
0
10
0
EFFECT OUT
EFFECT RTN
7
8
EFFECT
L
LINE
R
L
LINE
R
EFFECT
(MONO)
(MONO)
OUT
MIC
MIC
FOOT SW
L
INPUT TO MAIN
SEE REAR PANEL CAUTION.
POWER
PHANTOM
+6
–12
+48V
•
6
+3
ON
•
OFF
0
0
•
–5
6
•
+12
–10
250
500
1k
2k
4k
8k
LIMITER
MONI
10
0
10
MASTER
MONITOR
–12
+6
MAIN
•
6
+3
L
R
•
0
0
•
6
–5
•
+12
–10
L
R
250
500
1k
2k
4k
8k
LIMITER
L+R
BRIDGE
STEREO
10
0
10
0
10
0
10
AUX IN
TAPE IN
MASTER
POWER
MAIN STEREO
AMP
POWERED MIXER
L
L
AUX IN
MAIN(STEREO) MONITOR
R
L
R
(MONO)
R
R
TAPE
REC
OUTPUT
IN
OUT
E
Advertisement
Table of Contents

Related Manuals for Yamaha EMX860ST


Summary of Contents for Yamaha EMX860ST
- Page 1 Owner’s Manual HIGH HIGH HIGH –15 –15 –15 –15 –15 –15 –15 –15 –15 MONI MONI MONI EFFECT EFFECT EFFECT LEVEL LEVEL LEVEL Hi-Z Hi-Z Hi-Z Lo-Z Lo-Z Lo-Z HIGH HIGH HIGH HIGH HIGH VOCAL –15 –15 –15 –15 –15 L HALL S HALL –15...
- Page 2 FCC requirements. Modifications not expressly approved by Yamaha may void your authority, granted by the FCC, to use the product. 2. IMPORTANT: When connecting this product to accessories and/or another product use only high quality shielded cables.
- Page 3 Important Read the Following Before operating the EMX860ST Warnings • Do not allow water to enter this unit or allow the unit to become wet. Fire or electrical shock may result. • Connect this unit’s power cord only to an AC outlet of the type stated in this Owner's Manual or as marked on the unit.
-
Page 4: Operating Notes
• The performance of components with moving contacts, such switches, rotary controls, faders, and connectors, deteriorates over time. The rate of deterioration depends on the operating environment and is unavoidable. Consult your dealer about replacing defective components. EMX860ST—Owner’s Manual... -
Page 5: Table Of Contents
Thank you for purchasing the Yamaha EMX860ST Powered Mixer. The EMX860ST has the following features. In order to take full advantage of the EMX860ST and enjoy long and trouble-free per- formance, please read this owner’s manual carefully, and keep it in a safe place for future reference. -
Page 6: Front And Rear Panel
15 dB peaking type LOW: 100 Hz 15 dB shelving type EMX860ST—Owner’s Manual Monitor controls (MONI) For each channel, this controls the amount of sig- nal that is sent to the MONI bus. The signal of the MONI bus is sent to the speak- ers connected to the MONITOR A/B jacks and to the MONITOR jacks (input/output panel 6 ). -
Page 7: Effect Section
EFFECT OUT control This adjusts the effect send level for an external effect device connected to the EFFECT OUT jack (input/output panel 3). Note: The EFFECT OUT control does not affect the level sent to the built-in digital effect. EMX860ST—Owner’s Manual... -
Page 8: Monitor Section
• EFFECT RTN MONITOR Graphic equalizer The EMX860ST has a 7-band graphic equalizer for adjusting the frequency response of the MONI bus signal. This allows you to cut or boost each frequency band by a maximum of 12dB. You can use these sliders to reduce the level of fre- quency bands at which feedback easily occurs. -
Page 9: Power Amp Section
PHANTOM +48V POWER indicator This indicator will light when the power of the EMX860ST is turned on. PHANTOM +48 V switch This switch turns the phantom power supply on/ off for the Lo-Z input jacks of channels 1–6 and MIC input jacks of channels 7–8. -
Page 10: Input/Output Panel
The nominal output level and impedance are +4 dB/10 k . Foot switch jack (FOOT SW) You can connect a Yamaha FC5 foot switch (sold separately) to this jack and use it to turn the built-in digital effect on and off. The Digital Effect ON switch on the front panel must always be set to ON in order to use the foot switch. - Page 11 REC OUT/MONITOR/MAIN (STEREO) jacks These are output jacks which send line level sig- nals from the EMX860ST to external devices. A stereo recording device such as a cassette recorder or MD recorder can be connected to the REC OUT jacks, and a playback device such a power amp can be connected to the MONITOR and MAIN (STEREO) jacks.
-
Page 12: Rear Panel
Note: Do not connect anything to the SPEAK- ERS L/R jacks if you use this BRIDGE connec- tion. Power switch This switch turns the power of the EMX860ST on/off. Note: Before turning the EMX860ST on/off, turn down fully the MASTER controls of the MONITOR and MAIN section. -
Page 13: Connections
BRIDGE STEREO Connecting two speakers: 8 –16 SPEAKERS BRIDGE Not used 4 –8 4 –8 SPEAKERS BRIDGE Not used 8 –16 Connections MONITOR 8 –16 SPEAKERS BRIDGE Not used 8 –16 8 –16 8 –16 8 –16 EMX860ST—Owner’s Manual... -
Page 14: Example Connections
Example connections Synthesizer, Drum Box Hi-Z Hi-Z Hi-Z Hi-Z Hi-Z Lo-Z Lo-Z Lo-Z Lo-Z Lo-Z Microphone (YAMAHA FC5) EMX860ST—Owner’s Manual CD Player LINE LINE EFFECT Hi-Z (MONO) (MONO) Lo-Z AUX IN FOOT SW (MONO) INPUT TO MAIN Foot switch Effect Processor... -
Page 15: Basic Operation
(where applicable) is turned off. Also make sure that the level controls of each channel of the EMX860ST and the MASTER control of the MAIN section are turned down. Connect cables to your mics and instru- ments, and insert the other end of the cable firmly into the appropriate Lo-Z/Hi-... -
Page 16: Example Setups
As a conference PA system/installed sound system This example shows the EMX860ST used as a conference PA system or sound system. A sound mix different from that of the main speakers can be sent to the monitor amp connected to the SPEAKERS MONITOR jacks. - Page 17 Start playback on the CD player, and use the MAIN section TAPE IN control to adjust the level so that the 0 LED of the MAIN section peak level meter does not light. As a conference PA system/installed sound system EMX860ST—Owner’s Manual...
-
Page 18: As A Band Pa
Example setups As a band PA Here is an example of using the EMX860ST as a small PA for a band. In this example, an external effect such as delay or reverb is also being used. Connections HIGH –15 –15 –15... -
Page 19: Using An External Effect
Adjust the input level of the external effect so that the sound is not distorted at the input of the external effect. Use the MAIN section AUX IN control to adjust the level of the sound processed by the effect. As a band PA EMX860ST—Owner’s Manual... -
Page 20: Troubleshooting
Connections between devices have come loose. Other Other EMX860ST—Owner’s Manual Cause Please wait. When the device cools off, normal opera- tion will resume automatically. However, please has operated. Possible rea- check the following two points to prevent the problem from recurring. -
Page 21: Specifications
Master level control: nominal level, All channel level controls: minimum Master level control: nominal level, 1 channel level control: nominal level 10 kHz shelving 2.5 kHz peaking 100 Hz shelving 120 V AC 60 Hz 230 V AC 50 Hz 240 V AC 50 Hz Specifications EMX860ST—Owner’s Manual... -
Page 22: Input Specifications
MONITOR OUT EFFECT OUT REC OUT (1, 2) • All output jacks are unbalanced. • 0 dB=0.775 Vrms, 0 dBV=1 Vrms. Specifications are subject to change without prior notice. EMX860ST—Owner’s Manual Input level Nominal impedance Nominal level Sensitivity 50–600 Mics –62 dB (616 V) -
Page 23: Dimensions
REC OUT [–10dBV] MONI [–16dB] Dimensions D:275 Unit: mm MAIN(STEREO) MASTER STEREO BRIDGE LIMITER MONITOR MASTER EFFECT OUT EFFECT OUT MAX.OUTPUT POWER(200W, 4 ) L, R, MONITOR[+24dB] MAIN, MONITOR, EFFECT OUT [+4dB] EMX860ST—Owner’s Manual BRIDGE SPEAKERS MONITOR –10 –20 –30 –40 –50... - Page 24 YAMAHA CORPORATION Pro Audio Division, #18/3 V296250 R0 1 IP 24 P.O. Box 3, Hamamatsu, 430-8651, Japan Printed in Taiwan...
Need help?
Do you have a question about the EMX860ST and is the answer not in the manual?
Questions and answers