
Related Manuals for Viper 5301


Summary of Contents for Viper 5301
- Page 1 Remote Start Keyless Entry Model 5301 Owner’s Guide © 2011 Directed Electronics, Vista, CA G4202V 2011-03...
-
Page 3: Table Of Contents
Contents Government regulations ... iii Warning! Safety first ... v What’s included ...1 Important information ...1 Your warranty...1 Replacement remote controls ...1 Responder LE 2- way remote ...2 1- way companion remote ...3 Transmitter configuration ...4 Control Center ...5 Basic commands ...6 Lock ...6 Unlock ...6 Remote Start ...6... - Page 4 Using your system ...19 Locking the vehicle ...19 Unlocking the vehicle ...19 Valet mode ...20 Panic Mode ...21 Overriding the optional Starter kill ...21 Using the remote start ...22 Manual transmission vehicles ...24 Timer mode ...25 Turbo timer mode ...26 Smart start activation ...27 Low runtime alert ...28 Cabin temperature ...28...
-
Page 5: Government Regulations
Government regulations This device complies with Part 15 of FCC rules. Operation is subject to the fol- lowing two conditions: (1) This device may not cause harmful interference, and (2) This device must accept any interference received, including interference that may cause undesirable operation. This equipment has been tested and found to comply with the limits for a class B digital device, pursuant to Part 15 of the FCC Rules. - Page 6 This device complies with the Industry Canada Radio Standards Specification RSS 210. Its use is authorized only on a no-interference, no-protection basis; in other words, this device must not be used if it is determined that it causes harmful interference to services authorized by IC. In addition, the user of this device must accept any radio interference that may be received, even if this interference could affect the operation of the device.
-
Page 7: Warning! Safety First
Warning! Safety first The following safety warnings must be observed at all times: Due to the complexity of this system, installation of this product must only be performed by an authorized Directed dealer. When properly installed, this system can start the vehicle via a command signal from the remote control transmitter. - Page 8 Use of this product in a manner contrary to its intended mode of operation may result in property damage, personal injury, or death. (1) Never remotely start the vehicle with the vehicle in gear, and (2) Never remotely start the vehicle with the keys in the ignition.
-
Page 9: What's Included
What’s included • One five-button/2- way Supercode Responder LE remote control • One five-button/1- way Supercode remote • The control module (installed out-of-sight) • Control Center with integrated status LED and Control button • A remote start defeat toggle switch •... -
Page 10: Responder Le 2- Way Remote
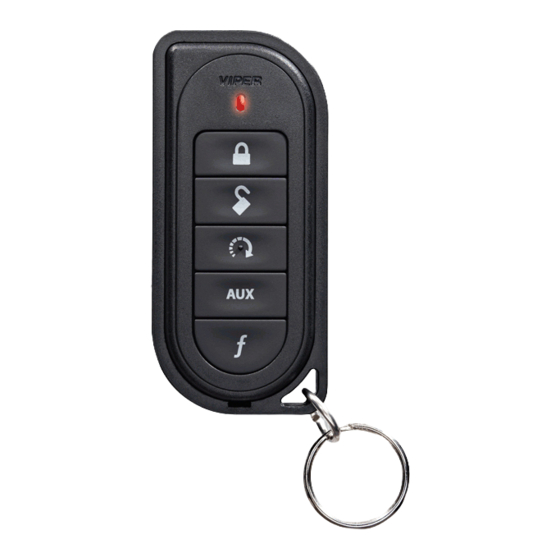
Responder LE 2- way remote Description Feature Lock button Unlock button Remote start button Auxiliary button Function button Label Battery Door Transmit indicator LED indicators Note: If Keypad Lock is On, press Press for one second to lock. Press for one second to unlock. Press for one second to activate remote start. -
Page 11: 1-Way Companion Remote
1-way companion remote Note: See call-out table for 2- way remote. © 2011 Directed Electronics. All rights reserved. -
Page 12: Transmitter Configuration
➢ Transmitter configuration Basic Commands Direct Access Level Button Lock Unlock Remote Start A U X A U X Trunk Release A U X Function Shift** *Used to access function levels for Advanced Commands with multiplier in third row implies button presses) ** Must be pressed and held to access state Advanced Commands Function... -
Page 13: Control Center
Control Center The Control Center, typically located on the upper part of the front windshield sends and receives commands or messages to and from your system. It consists • The In-vehicle system antenna, for 2- way communication to the system. •... -
Page 14: Basic Commands
Basic commands Lock Command Feedback Notes Unlock Command Feedback A U X Notes Remote Start A U X Command Feedback Notes Remote Start Command Feedback Notes Press one time to Lock Lock LED turns on with 1 beep. Press/hold for 1.5 seconds to Lock the system and then activate the Panic output* Press one time to Unlock Unlock LED turns on and remote beeps twice. -
Page 15: Function Shift
Function shift A U X Command Feedback Function Shift Notes Feedback is available on the 2- way remote only. *Horn honk is an optional feature. The panic and horn honk feature is avail- able when this option is installed. Pressing more than one button simultaneously generates an error tone and the Function LED turns on, and all other LEDs flash. -
Page 16: Advanced Commands: Function Level 1
Advanced commands: function level 1 Silent lock Command : Press Feedback: Lock LED turns on. Notes Locks the system without horn honks* Silent unlock Command : Press Feedback: Unlock LED turns on. Notes Unlocks the system without horn honks* Runtime reset Command : Press Feedback:... -
Page 17: Advanced Commands: Function Level 2
Advanced commands: function level 2 Valet mode Command : Press Feedback: Remote beeps 1 to 2 times when entering or exiting Valet Mode and unlock LED turns on. Notes: To enter or exit Valet mode, even if Locked. When entering Valet Mode the remote beeps one-time. -
Page 18: Advanced Commands: Function Level 3
Advanced commands: function level 3 Car finder Command : Press Feedback: The remote emits 1 short beep, the vehicle emits 1 long horn honk*, and the parking lights flash 10 times. Notes Lock/Unlock cancels the parking light flashes. Smart start Command : Press Feedback:... -
Page 19: Advanced Commands: Function Level 4
Advanced commands: function level 4 Rear defogger Command : Press Feedback: Remote start LED turns on, 1 beep. Notes: Manually turns on the defogger when remote start is on. If re- mote start is not active the 2- way responds with an error tone. This is an optional feature. -
Page 20: Out Of Range Notification
Out of range notification If a command is issued from the remote, but the remote is beyond the range of the vehicle to receive the command, the remote will respond with an out-of range notification. If this occurs, the transmit indicator on the remote flashes rapidly, the key LED turns on, and the remote emits the error tone sounds. -
Page 21: Low Battery Indicator
Battery Low battery indicator Clip Battery Cover When the batteries are low, the 2- way remote emits two groups of beeps, LED flashes, and additional horn honks are emitted when unlocking. It is time to change the batteries. When the battery is low on the 1- way remote the only indication is additional horn honks emitted when unlocking. -
Page 22: Configuring Your Remote
Configuring your remote The Responder LE 2- way and 1- way remote controls have menus for program- ming the remote to the system, and for configuring the remote control user features. Before you start make sure the keypad is unlocked. (See Button Auto Lock ) Button Auto Lock When On, the remote control buttons lock if more than 20 seconds lapses... - Page 23 Power Save extends battery life by turning Paging Off after 72 hours if the remote control is not used during this period. Press any button to resume system monitoring. Power Save 2 is for maximum battery life and will monitor the system only when remote start has been activated.
-
Page 24: Programming
➢ Programming Hold To enter: button for 8 seconds, the remote emits one long beep and the transmit LED turns on, the programming main menu has been ac- cessed. If Car 2 mode is on, ignore the car select at 3 seconds. Remote Features menu Press release... -
Page 25: Multi-Car Control Capability
Placing the system into the remote pair mode: Turn the ignition to the On position. Press, release, then press and hold the Control button (on the Control Center). The Control Center LED begins to flash and the horn honks once to confirm the system is in Pair mode, the Control button can be released. - Page 26 To change the Car to be operated: Press/hold the button for 3 seconds or until the remote beeps and the and/or LEDs turn on. This indicates which car the remote currently oper- ates. • Car 1: 1 beep and Lock LED on •...
-
Page 27: Using Your System
Using your system ➢ Locking the vehicle To lock the vehicle, press the button on the remote control. The horn in the vehicle honks one-time, and the parking lights flash one-time. If the power door locks are connected, the doors lock and the optional Failsafe Starter Kill activates. -
Page 28: Valet Mode
UnLocking without the honk (Silent Unlock) Press the button on the remote one-time, and then press the vehicle unlocks without the confirmation honk. The parking lights flash two- times. The 2- way remote flashes the confirmation is received, the 2- way remote emits the out-of-range signal. When unlocking in valet mode with the 2- way remote, the remote generates two error tones and the ➢... -
Page 29: Panic Mode
➢ Panic Mode If you are threatened in or near your vehicle, you can attract attention by trig- gering the system with your remote. This feature is only available if the optional horn honk is connected. • Press button on the remote for 2 seconds, to enter Panic Mode. The horn honks and the parking lights flash for 30 seconds. -
Page 30: Using The Remote Start
Using the remote start Read this user guide, including the warnings on page v. at the beginning of the guide before using the remote start. Ensure that the vehicle is parked in an open area, not in a garage. To use your remote start to pre-warm or pre-cool your vehicle, remember to set the climate controls to the desired settings before shutting off the engine. - Page 31 ➢ Runtime check To check the amount of runtime remaining: After the vehicle is remote started, press the and then hold until the remote beeps, and then release. The LEDs light up to indicate how much time is remaining. 100% runtime remaining 75% runtime remaining 50% runtime remaining 25% runtime remaining...
-
Page 32: Manual Transmission Vehicles
➢ Manual transmission vehicles When installed into a manual transmission vehicle, the system requires that the MTS mode is properly set when parking. If MTS mode is not properly set or is defeated after being properly set the system will not start the engine. With the engine running, ning. -
Page 33: Timer Mode
➢ Timer mode This unit can be programmed to start and run the engine every three hours, for a maximum of six cycles. The engine will run for the programmed run time and then shut down. After three hours, the system will restart the engine. Note: This feature works only when the system has been locked with the remote. -
Page 34: Turbo Timer Mode
To exit timer mode without the transmitter: Make sure the remote start system is not operating the engine. Turn the ignition on. Timer Mode is exited and the parking lights flash slowly four times. Note: Your authorized Directed dealer using the Bitwriter® programming tool can change the amount of times the remote start activates, and change the intervals between activations in timer mode. -
Page 35: Smart Start Activation
After exiting the vehicle, lock the system. The vehicle remains running for the programmed runtime. (The remote start feature is still enabled). You can still remote start the vehicle after the turbo timer has timed out and shut Off the vehicle. For safety reasons, if a door is opened (while the system is Locked or Unlocked) while you are away, the remote start exits the manual transmission mode and will not remote start until the MTS sequence is re- initiated. -
Page 36: Low Runtime Alert
Use one of the below methods to exit Smart Start mode: • Perform the same steps you followed to activate Smart Start mode • Turn the ignition On • Press the brake pedal The parking lights flash 5 times slowly to confirm the remote has exited Smart Start mode. -
Page 37: Turning On The Rear Defogger
➢ Turning on the rear defogger The rear defogger (if connected) is programmed to automatically activate when remote start is turned on. If the interior cabin temperature is above 55˚ F the defogger will not activate. To manually activate the rear defogger after remote start is on: •... -
Page 38: Safety Features
Safety features This system has several important safety features to ensure proper operation of the motor and prevent accidental damage to the engine or its components. ➢ Optional starter anti-grind circuitry Whenever the vehicle is remote started, advanced anti-grind circuitry prevents the starter from engaging, even if the key is turned to the start position. -
Page 39: Diagnostics
Diagnostics The microprocessor at the heart of the system is constantly monitoring the switches that are connected to the main unit. ➢ Locking If the system is locked at the same time that the door input is active, you will hear one horn honk to indicate locking, and then a second horn honk to indicate Bypass Notification. -
Page 40: Owner Recognition
Owner recognition Owner recognition lets up to four users of the system have unique settings to meet their specific needs. It is almost like having four separate systems in your vehicle, one for each user. This feature is only available to authorized dealers using the Bitwriter programming tool. -
Page 41: Programming Options
Programming options Your system has many custom programmable options. Some may require instal- lation labor. Ask your authorized dealer for details. The following is a list of the programmable options, with the factory settings in Bold. • Active locking (remote only) passive locking, the system automatically locks the doors 30-seconds after the last door is closed;... -
Page 42: Convenience Expansions
Convenience expansions Listed below are some of the expansion options available. Please consult your dealer for a complete explanation of all the options available to you. Power Trunk Release: The accessory output of the system can operate a fac- tory power release for the vehicle’s trunk or hatch. Sometimes an optional relay is required. -
Page 43: Glossary Of Terms
Glossary of terms Control Center: The Control Center contains the system’s radio-frequency antenna, the Control button, and the Status LED. For maximum remote-control range, the Control Center is usually located at the top of the windshield, centered near the rear-view mirror. Control Module: The “brain”... -
Page 45: Quick Reference Guide
Quick reference guide • Locking To lock press for one second. The doors lock. The LED on the Control Center flashes and the horn honks one time. (if connected). The parking lights flash once to confirm locking. • Unlocking To unlock press two times. - Page 46 • Remote Start Press . The parking lights turns on (if connected). The vehicle starts and runs for the programmed duration. • Rear Defogger Press four-times, and then press The parking lights flash 3 times confirming activation of the defogger output.
-
Page 48: Limited Lifetime Consumer Warranty
Limited lifetime consumer warranty Directed Electronics. (“Directed”) promises to the original purchaser to repair or replace (at Directed’s election) with a comparable reconditioned model any Directed unit (hereafter the “unit”), excluding without limitation the siren, the remote transmitters, the associated sensors and accessories, which proves to be defective in workmanship or material under reasonable use during the lifetime of the vehicle provided the following conditions are met: the unit was purchased from an authorized Directed dealer, the unit was professionally... - Page 49 WITHOUT LIMITATION, LIABILITY FOR THEFT, DAMAGE AND/OR VANDALISM. THIS WARRANTY DOES NOT COVER LABOR COSTS FOR MAINTENANCE, REMOVAL OR REINSTALLATION OF THE UNIT OR ANY CONSEQUENTIAL DAMAGES OF ANY KIND. IN THE EVENT OF A CLAIM OR A DISPUTE INVOLVING DIRECTED OR ITS SUBSIDIARY, THE VENUE SHALL BE SAN DIEGO COUNTY IN THE STATE OF CALIFORNIA.
- Page 52 The company behind this system is Directed Electronics Since its inception, Directed Electronics has had one purpose, to provide consumers with the finest vehicle security and car stereo products and accessories available. The recipient of nearly 100 patents and Innovations Awards in the field of advanced electronic technology.
Need help?
Do you have a question about the 5301 and is the answer not in the manual?
Questions and answers