Vertex Standard VXR-7000 Operating Manual
Hide thumbs
Also See for VXR-7000:
- Service manual (146 pages) ,
- Operating manual (44 pages) ,
- Alignment manual (4 pages)
Table of Contents
Advertisement
Quick Links
VXR-7000
Operating Manual
VERTEX STANDARD CO., LTD.
4-8-8 Nakameguro, Meguro-Ku, Tokyo 153-8644, Japan
VERTEX STANDARD
US Headquarters
17210 Edwards Rd., Cerritos, CA 90703, U.S.A.
International Division
8350 N.W. 52nd Terrace, Suite 201, Miami, FL 33166, U.S.A.
YAESU EUROPE B.V.
P.O. Box 75525, 1118 ZN Schiphol, The Netherlands
YAESU UK LTD.
Unit 12, Sun Valley Business Park, Winnall Close
Winchester, Hampshire, SO23 0LB, U.K.
YAESU GERMANY GmbH
Am Kronberger Hang 2, D-65824 Schwalbach, Germany
YAESU HK LTD.
11th Floor Tsim Sha Tsui Centre, 66 Mody Rd.,
Tsim Sha Tsui East, Kowloon, Hong Kong
Advertisement
Table of Contents

Related Manuals for Vertex Standard VXR-7000


Summary of Contents for Vertex Standard VXR-7000
- Page 1 VXR-7000 Operating Manual VERTEX STANDARD CO., LTD. 4-8-8 Nakameguro, Meguro-Ku, Tokyo 153-8644, Japan VERTEX STANDARD US Headquarters 17210 Edwards Rd., Cerritos, CA 90703, U.S.A. International Division 8350 N.W. 52nd Terrace, Suite 201, Miami, FL 33166, U.S.A. YAESU EUROPE B.V. P.O. Box 75525, 1118 ZN Schiphol, The Netherlands YAESU UK LTD.
-
Page 2: Table Of Contents
Contents Introduction ..........................1 Controls & Connectors .......................2 Front Panel ..........................2 Rear Panel ........................... 3 ACC Connector Port ........................4 LINE Interface Port ........................6 Installation ............................7 Antenna Considerations ......................7 AC Power Supply Voltage Selection..................7 DC Power Supply Backup ......................7 Equipment Location ........................ -
Page 3: Introduction
Please take a few minutes to read this manual carefully. The information presented here will allow you to derive maximum performance from your VXR-7000. After reading it, keep this manual handy for quick reference, in case questions arise later on. -
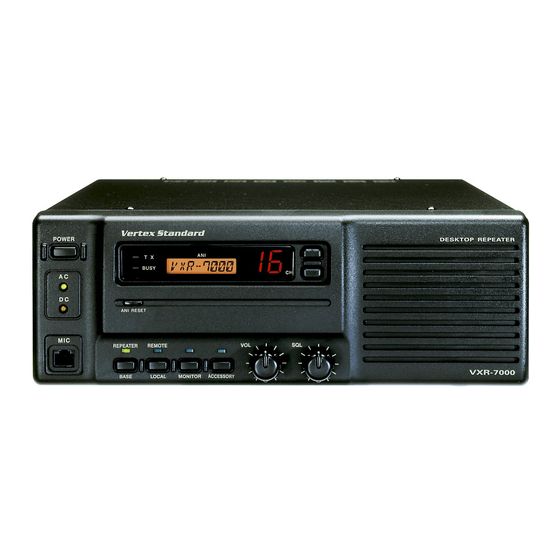
Page 4: Controls & Connectors
This switch toggles the operating mode between the such as High/Low power selection, as determined “REPEATER” mode and the “BASE” transceiver by your Vertex Standard dealer. The LED above it mode. When the “REPEATER” mode is selected, the glows green when this function is activated. For fur- LED above it glows green. -
Page 5: Rear Panel
This DB-25 connector provides a data interface be- When operating from AC mains, a small trickle cur- tween the microprocessor in the VXR-7000 and pe- rent is present at these terminals to maintain bat- ripheral devices (such as the VX-TRUNK Unit). -
Page 6: Acc Connector Port
ACC Connector Port The VXR-7000 repeater is provided with a 25-pin DB- Pin 8: RSSI [Analog Output] 25F female connector for interconnections to accesso- A DC voltage proportional to the strength of the sig- nal currently being received (Receiver Signal ries. - Page 7 [Digital Input for the DATA Communications] This pin is intended to be used as a high speed digi- tal data signal input to the repeater. This digital data signal is injected after transmitter splatter filter stage. VXR-7000 FM R EPEATER PERATING ANUAL...
-
Page 8: Line Interface Port
LINE Interface Port Pins 5 & 6: [LINE OUT (Rx Line Audio)] The VXR-7000 is provided with an 8-pin modular jack for line interfacing applications. A Western Electric Receiver audio is available from this pair, subject to ® modular-type RJ45 plug should be used to connect to internal CTCSS or DCS decode if the received sig- this jack. -
Page 9: Installation
(mini- Changing the AC input voltage wiring also requires mum) is recommended. Vertex Standard recommends changing the fuse on the FILTER Unit if the voltage is the use of the duplexer. For further details, contact your changed from 100 VAC (100-127 VAC) to 200 VAC (207- Vertex Standard dealer. -
Page 10: Changing Switching Regulator Unit Ac Mains Jumper Wiring
Switching Regulator must also change the AC fuse on the FILTER Unit. Do Unit. not replace with a slow-blow type fuse. FILTER Unit Switching Regulator Unit Figure 2 Figure 1 VXR-7000 FM R EPEATER PERATING ANUAL... - Page 11 Installation Switching Regulator Unit Figure 4 Figure 3 VXR-7000 FM R EPEATER PERATING ANUAL...
-
Page 12: Ce27 Programming Software Instruction
• CE27.HLP Before connecting the VXR-7000 for programming, turn Important Note! off both the computer and the VXR-7000. Now connect r Do not run the CE27 programming software di- the VPL-1 Connection Cable to the computer’s serial port rectly from the original distribution diskette. -
Page 13: Channel Data Items
When this parameter is set to “on,” this function causes selected code, the VXR-7000 to send out a “blip” on the portable/mo- or press the bile radio is frequency each time the portable radio is ] key to unkeyed. - Page 14 “ANI/ENI,” or “Off.” To select this feature to the “CW mitting while there is carrier present unless there also is ID” or “ANI/ENI,” the “CW ID” parameter must be en- a valid tone present. abled via the dealer programming. VXR-7000 FM R EPEATER PERATING ANUAL...
- Page 15 CE27 Programming Software Instruction TX Pwr: Transmitter Power Output Selection This parameter selects the desired power output from the VXR-7000 on the current channel. The available val- ues are HIGH and LOW. Press the [S ] bar to select “Hi” or “Lo.”...
-
Page 16: Duplexer Installation
40 Watts. If the VXR-7000 output power (50 Watts) is in excess of the range of the duplexer's capability, you may reduce the TX output power of the VXR-7000 before installing the Antenna Duplexer, using the following procedure: 1. - Page 17 8. Duplexer installation is now complete. Replace the ure 4). front panel back into place, and replace the top and bottom covers. Top Side Bottom Side Figure 1 Bottom Side Bottom Side Figure 2 Figure 3 Figure 4 VXR-7000 FM R EPEATER PERATING ANUAL...
-
Page 18: Specifications
0.3 µV for 12 dB SINAD, 0.4 µV for 20 dB NQ Selectivity: 80 dB Intermodulation: VXR-7000 80 dB VXR-7000 85 dB Spurious & Image Rejection: VXR-7000 95 dB VXR-7000 85 dB 4 W @ 4 Ω Audio Output: Transmitter RF Output:... -
Page 19: Accessories
Spare 5A AC Fuse (Q0000005) ................................1 Spare 20A DC Fuse (Q0000079) ................................ 1 Options Desktop Microphone MD-11 Antenna Cable w/mounting screw (for the Antenna Duplexer) CT-68 Programming Cable VPL-1 19” Cabinet Rack-Mount Unit MR-3 VXR-7000 FM R EPEATER PERATING ANUAL... - Page 20 Note VXR-7000 FM R EPEATER PERATING ANUAL...
- Page 21 This device complies with Part 15 of the FCC rules. Operation is subject to the condition that this device does not cause harmful interference.
- Page 22 Copyright 2000 No portion of this manual VERTEX STANDARD CO., LTD. may be reproduced All right reserved. without the permission of VERTEX STANDARD CO., LTD. Printed in Japan...
Need help?
Do you have a question about the VXR-7000 and is the answer not in the manual?
Questions and answers