Table of Contents
Advertisement
Quick Links
Advertisement
Table of Contents

Subscribe to Our Youtube Channel
Related Manuals for Toa ER-1000A-BT


Summary of Contents for Toa ER-1000A-BT
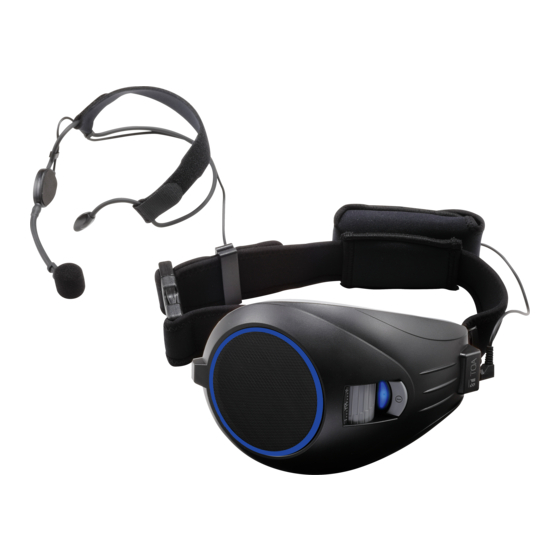
- Page 1 PERSONAL PA SYSTEM ER-1000A-BT model: AMQD01 Headset microphone (Accessory) Main PA unit Extension belt Battery spacer Thank you for purchasing TOA's Personal PA system. Please carefully follow the instructions in this manual to ensure long, trouble-free use of your equipment.
-
Page 2: Table Of Contents
9-1. Turn ON the Bluetooth function on your smartphone or audio device......13 9-2. Search for ER-1000A-BT on the Bluetooth setting screen of your device......13 9-3. Select “TOA ER-1000A-BT” and enter the PIN code according to the display on your device............................. 13 10. -
Page 3: Safety Precautions
• To prevent a fire or electric shock, never open nor modify the unit. Leave all servicing such as inspection, adjustment, and repair inside the unit to your nearest TOA dealer. • Take a firm hold of both buckles when fastening or unfastening the Belt. The Belt is elastic, so if one hand is removed when it is being fastened or unfastened, the buckles could spring out and hit something, possibly causing injury. -
Page 4: General Description
2. GENERAL DESCRIPTION TOA’s ER-1000A series is a compact, lightweight, hands-free portable public address system with a rated power output of 6 watts (9-Volt DC when used with six AA-type batteries). It can play music by pairing with Bluetooth compatible smartphone or audio player. -
Page 5: Features
• Should any of the following irregularities occur, immediately turn off the power and consult your TOA dealer. Continuing to use the product without following this instruction may cause a malfunction. · When water or foreign objects get inside the product ·... -
Page 6: Nomenclature And Functions
5. NOMENCLATURE AND FUNCTIONS [Personal PA – Top Side] Volume Control [VOL] Volume Volume increases as this knurled roller is rotated toward the speaker and decreases as it is rotated away from the speaker. Notes • The auxiliary (AUX) input volume cannot be adjusted. The volume must be adjusted at the connected external device. -
Page 7: [Personal Pa - Underside]
[Personal PA – Underside] Belt Clip Secures the loose end of the belt after length adjustment. Pouch Buckle A Holds a music player, standby batteries, battery spacers, etc. Belt (with pouch) An elastic one-touch buckle-type belt. Attach snugly around the waist. Refer to Belt Use on page 9. -
Page 8: Battery Insertion
6. BATTERY INSERTION AA-type alkaline (LR6) or nickel-metal hydride (HR15/51) batteries can be used to power the product. Please use only a single type of battery. Notes • Batteries are not included. Please purchase separately. • Explanatory diagrams for Steps 2 to 4 omit the Belt. Belt Step 1. -
Page 9: Using The Battery Spacer (Accessory)
Step 3. Insert six AA-type batteries. Notes • Batteries are not all positioned facing the same direction. Take note of the positive (+) and negative (–) ends on the batteries and insert them c or r ec tl y in the di r ect i ons indicated. -
Page 10: Belt Use
8. BELT USE Adjust the Belt to the correct length* before fastening it. The Personal PA can be worn on either side of the body. *The belt length can be adjusted between the following length; With the pre-attached belt only: 55 – 120 cm** (1.8 - 3.94 ft) With the extension belt: 85 –... -
Page 11: Fastening The Belt
8.2. Fastening the Belt Step 1. Adjust the length of the Belt. The length of the Belt is adjusted on the Buckle A side. Pulling on the long end of Note the Belt will lengthen it. To ensure a snug fit around the waist, adjust the length when worn while the Pulling on the end of the belt is being stretched. -
Page 12: Bluetooth Device
8.3. Unfastening the Belt Step 1. Take a firm grip of both Buckle A and Buckle B. Push here Unfasten Hold both (of the Belt’s) buckles to Lock Lever prevent the Main PA unit from dropping. Step 2. Simultaneously press the upper and lower Lock Levers on Buckle A. -
Page 13: Turn On The Bluetooth Function On Your Smartphone Or Audio Device
If it is not indication on your device, it may already be paired with another Bluetooth device. Please disconnect the pairing with the device. 9-3. Select “TOA ER-1000A-BT” and enter the PIN code according to the display on your device. -
Page 14: Personal Pa System - Smart Use
PERSONAL PA SYSTEM – SMART USE • Connecting a commercially available audio player to the auxiliary (AUX) input jack allows background music to be provided while the user is talking. Main PA unit Headset microphone (accessory) Commercial 3.5 mm (1/8") stereo mini-plug cable (without resistor) Commercial audio player (Adjust volume here.) -
Page 15: Specifications
SPECIFICATIONS Power Source Alkaline battery (LR6): 6 pieces (9 V DC) or 4 pieces* (6 V DC) Rechargeable nickel metal hydride (NiMH) battery (HR15/51): 6 pieces (7.2 V DC) or 4 pieces* (4.8 V DC) Output 6 W (rated) and 10 W (max) when 6 AA batteries (9 V DC) are used. 3 W (rated) and 4 W (max) when 4 AA batteries* (6 V DC) are used. -
Page 16: Manufacturer
Operation is subject to the following conditions: (1) this device may not cause harmful interference, and (2) this device must accept any interference received, including interference that may cause undesired operation. Any modification to the unit, unless expressly approved by TOA Electronics, Inc. could void your authority to operate the equipment Traceability Information for USA...
Need help?
Do you have a question about the ER-1000A-BT and is the answer not in the manual?
Questions and answers