Table of Contents
Advertisement
Quick Links
OWNER'S MANUAL
WASHING
MACHINE
Before beginning installation, read these instructions carefully.
This will simplify installation and ensure that the product is
installed correctly and safely. Leave these instructions near the
product after installation for future reference.
EN ENGLISH
WTP357B
MFL69482536
Rev.00_122120
Copyright © 2020 LG Electronics Inc. All Rights Reserved
www.lg.com
Advertisement
Table of Contents

Subscribe to Our Youtube Channel
Related Manuals for LG WTP357B


Summary of Contents for LG WTP357B
- Page 1 This will simplify installation and ensure that the product is installed correctly and safely. Leave these instructions near the product after installation for future reference. EN ENGLISH WTP357B www.lg.com MFL69482536 Rev.00_122120 Copyright © 2020 LG Electronics Inc. All Rights Reserved...
-
Page 2: Table Of Contents
Adding Cleaning Products .................21 Control Panel .....................23 Programme Table ..................24 Option Programme..................26 SMART FUNCTIONS ............... 27 LG ThinQ Application .................27 Smart Diagnosis ..................27 MAINTENANCE ............... 28 Cleaning Your Washing Machine ...............28 Tub Clean ....................29 Cleaning the Water Inlet Filter ..............29 Cleaning the Lint Filter ................30... -
Page 3: Safety Instructions
SAFETY INSTRUCTIONS The following safety guidelines are intended to prevent unforeseen risks or damage from unsafe or incorrect operation of the appliance. The guidelines are separated into ‘WARNING’ and ‘CAUTION’ as described below. This symbol is displayed to indicate matters and operations that can cause risk. - Page 4 Technical Safety •This appliance is not intended for use by persons (including children) with reduced physical, sensory or mental capabilities, or lack of experience and knowledge, unless they have been given supervision or instruction concerning use of the appliance by a person responsible for their safety.
- Page 5 Installation •Never attempt to operate the appliance if it is damaged, malfunctioning, partially disassembled, or has missing or broken parts, including a damaged cord or plug. •This appliance should only be transported by two or more people holding the appliance securely. •Do not install the appliance in a damp and dusty place.
- Page 6 Improper use can cause a fire or explosion. •In case of flood, disconnect the power plug and contact the LG Electronics customer information centre. •Do not push down the drawer excessively, when the appliance...
- Page 7 •Do not use flammable gas and combustible substances (benzene, gasoline, thinner, petroleum, alcohol, etc.) near the appliance. •If the drain hose or inlet hose is frozen during winter, use it only after thawing. •Keep all washing detergents, softener and bleach away from children.
- Page 8 Maintenance •Do not spray water inside or outside the appliance to clean it. •Disconnect the power cord before cleaning the appliance. •Never unplug the appliance by pulling on the power cable. Always grip the power plug firmly and pull straight out from the socket outlet.
-
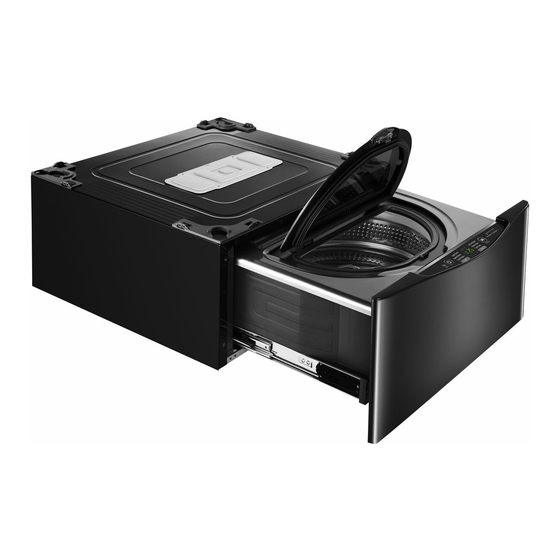
Page 9: Installation
INSTALLATION Parts Door/Lid Drum Lint Filter Control Panel Drawer Water Supply Hose Power Plug Water Drain Hose Leveling Feet Accessories Water supply hose Connecting Water drain hose Water supply hose Water drain hose (for cold water) supply hose connector connector Cable ties Anti-slip sheets Spanner... -
Page 10: Specifications
Specifications Maximum 3.5 kg Wash Load Power Supply 220 - 240 V~, 50 Hz Size 700 mm (W) x 770 mm (D) x 360 mm (H) Product Weight 48.7 kg Permissible 0.1 - 0.8 MPa (1.0 - 8.0 kgf / cm²) Water Pressure •... -
Page 11: Installation Place Requirements
Installation Place • Do not install the appliance in rooms where freezing temperatures may occur. Frozen Requirements hoses may burst under pressure. The reliability of the electronic control unit may be impaired Location at temperatures below freezing point. • Ensure that when the appliance is installed, it is easily accessible for an engineer in the 15 cm event of a breakdown. -
Page 12: Unpacking And Removing Packing Materials
Unpacking and Removing Stacking Mini Washer Packing Materials Make sure the leveling feet on the Main Lift the appliance off the foam base. front-loading washing machine are fully wound in before stacking. Place the Main • If you must lay the appliance down to front-loading washing machine on top of the remove the carton base, always protect the Mini Washer. -
Page 13: Connecting The Supply Hose
• This Mini Washer will not work as a standalone the connection to taps is sufficiently tight but not unit. overtightened. • This Mini Washer can only be used and operated when stacked under the matching LG front loading washing machine. Hose connector Connecting the Supply Hose Rubber seal •... - Page 14 Connecting Hose to Water Tap Push the adapter onto the end of the tap so that the rubber seal forms a watertight connection. Tighten the four fixing screws. Connecting Screw-Type Hose to Tap with Thread Screw the hose connector onto the cold water supply tap.
- Page 15 Connecting the Cold inlet hoses Remove the guide plate if the tap is too large to fit the adapter. to both Washing Machines Connect the water supply hose connector to the water supply hose of the Main Guide plate front-loading washing machine. Open the accessory installation package of this Mini Washer to find the Connector/Adaptor and the short connection hose.
-
Page 16: Installing The Drain Hose
Installing the Drain Hose Using the Drain Hose Connector • The drain hose should not be placed higher Connect the drain hose of the front-loading than 100 cm above the floor. Water in the washing machine and the Mini Washer to appliance may not drain or may drain slowly. -
Page 17: Leveling The Appliance
• Push or rock the top edges of the appliance unbalance. gently to make sure that the appliance does not rock. If the appliance rocks, level the appliance again. NOTE • You can obtain anti-slip sheets from an LG Service Centre or a Hardware store. -
Page 18: Operation
OPERATION Using the Appliance Choose the desired washing cycle. • Press the cycle button repeatedly until the desired cycle is selected. Sort laundry and load items. • Sort laundry by fabric type, soil level, colour and load size as needed. Open the door and load items into Mini Washer. -
Page 19: Sorting Laundry
Sorting Laundry Caring before loading. • Do not wash items that contain support or memory wire such as Bras as it may Look for the care label on your clothes. damage other clothes as well as the • This will tell you about the fabric content of washing machine and cause noise and your garment and how it should be washed. -
Page 20: Closing The Door And Drawer
Close the washing machine Lid until it clicks. • If power failure occurs during product operation, the door cannot be opened. Provide the power again or contact the LG service centre. Push the drawer completely closed. CAUTION • Do not let your hands get stuck between the door and the washing machine, as this can cause injury. -
Page 21: Adding Cleaning Products
Adding Cleaning Products Adding Detergent Measure the detergent with the detergent Detergent Dosage dispenser (rubber cup supplied with the washer) pour it into the tub. • Detergent should be used according to the instruction of the detergent manufacturer and selected according to type, colour, soiling of the fabric and washing temperature. - Page 22 Adding Softeners Adding Water Softener A water softener, such as anti-limescale can be used to cut down on the use of detergent in Adding Fabric Softener areas with high water hardness level. CASE 1. When the machine chimes during • Dispense according to the amount specified the wash: on the packaging.
-
Page 23: Control Panel
Control Panel Display Power Button • Press the Power button to turn the • The display shows the cycle status and washing machine on. estimated time remaining. : Drawer lock indicator • : Lid lock indicator • Start/Pause Button : Child lock indicator •... -
Page 24: Programme Table
Programme Table Washing Programme All programmes are cold water only. Programme Description Note Use this programme to wash • Pressing the Start/Pause button without lightly soiled normal items, selecting a programme will cause the Light Soil Light Soil except delicate fabrics such as programme to begin immediately using the wool or silk. - Page 25 Programme Description Note • Use quantity of detergent that is appropriate for load size. • Do not wash white or brightly colored laundry with darkly colored laundry that can discharge colors and contaminate clothes. Use this programme to wash • Washing can remove stains more effectively. performance garments that are Active Wear •...
-
Page 26: Option Programme
Option Programme. Child Lock Use this option to disable the controls. This Extra Rinse feature can prevent children from changing cycles or operating the appliance. Use this option to increase the number of rinsing programmes. Locking the Control Panel Press the Power button. Press and hold the Child Lock button for three seconds. -
Page 27: Smart Functions
Follow the instructions below to use the audible Application diagnosis method. Search for the LG ThinQ application from the • Launch the LG ThinQ application and select Google Play Store or Apple App Store on a the Smart Diagnosis feature in the menu. -
Page 28: Maintenance
MAINTENANCE Cleaning the Interior WARNING • Unplug the washing machine before cleaning • Use a towel or soft cloth to wipe around the to avoid the risk of electric shock. Failure to washing machine door opening and door glass. follow this warning may result in serious injury, •... -
Page 29: Tub Clean
Tub Clean Cleaning the Water Inlet Filter Use this option to keep the drum clean by • Turn off the water supply tap if the washing sterilizing germs within the drum when the machine is to be left for any length of time (e.g. alert appears on the display, or as required. -
Page 30: Cleaning The Lint Filter
Cleaning the Lint Filter NOTE • If the lint filter is damaged, contact an LG The filter is an important part for efficient service centre. washing performance result, so it needs special • Do not operate the washing machine without care from you. - Page 31 How to Manage the machine in Step 3. When the Drain Pump is Frozen Freezing conditions icon may blink on the display when • drain pump problems occur, take the following measures. Step 1. When the Door is Frozen Pour 15 ℓ warm water below 50–60 °C in the •...
-
Page 32: Troubleshooting
TROUBLESHOOTING The appliance is equipped with an automatic error-monitoring system to detect and diagnose problems at an early stage. If the appliance does not function properly or does not function at all, check the following before you call for service: Diagnosing Problems Symptoms Reason... - Page 33 Symptoms Reason Solution Supply hose connection is • Check hoses and drain hose connectors loose at the tap, washing for leaks, cracks and splits. machine, or drain hose • Tighten hose connections. connector. • The washing machine pumps out water very rapidly.
- Page 34 Symptoms Reason Solution • Make sure the inlet filter on the fill valve Filter clogged. is not clogged. Refer to the filter cleaning instructions. • Check that supply hose is not kinked or Supply hose may be kinked. clogged. • Make sure that cold water tap is turned on Insufficient water supply.
- Page 35 Symptoms Reason Solution Control panel has powered off • This is normal. Press the Power button to due to inactivity. turn the washing machine on. Washing machine is • Make sure cord is plugged securely into a unplugged. working outlet. Water supply is turned off.
- Page 36 Symptoms Reason Solution Kinked drain hose. • Ensure that the drain hose is not kinked. • Make sure that the drain hose is no higher Washing machine Drain located higher than 100 than 100 cm above the bottom of the will not drain water cm above the floor.
-
Page 37: Error Messages
Error Messages Symptoms Reason Solution • Close the drawer and press Start/Pause button to start the cycle. Drawer is not closed properly. • If the drawer is closed and the drawer lock error message is displayed, call for service. • Open the drawer and make sure the latch area is free of clothing or other obstructions. - Page 38 • The stacking switch will not operate Stacking switch is not properly if the unit is stacked under a working properly. non-LG appliance, or an LG appliance manufactured before 2009. • Thaw out the supply hose using a hot Drain hose, supply hose or water cloth.
- Page 39 Memo...
Need help?
Do you have a question about the WTP357B and is the answer not in the manual?
Questions and answers