Samsung SGH-i300 User Manual
Hide thumbs
Also See for SGH-i300:
- User manual (230 pages) ,
- Tips/troubleshooting manual (22 pages) ,
- Service manual (55 pages)

Related Manuals for Samsung SGH-i300


Summary of Contents for Samsung SGH-i300
- Page 1 Smartphone SGH-i300 User’s Guide Please read this manual before World Wide Web operating your phone, and keep it for http://www.samsungmobile.com future reference.
-
Page 2: Table Of Contents
Table of Contents Important safety precautions ....6 Getting started HAPTER What’s in the box? ......8 Getting to know your phone . - Page 3 Table of Contents Synchronisation HAPTER Installing ActiveSync ......56 Customising connection settings ....58 Connecting your phone to a computer .
- Page 4 Camera ....... . 150 SAMSUNG Media Player ..... 164 Windows Media player .
- Page 5 Table of Contents Troubleshooting HAPTER General problems ......226 Call problems ......228 Power and charging problems .
-
Page 6: Important Safety Precautions
Important safety precautions Read these guidelines before using your wireless phone. Failure to comply with them may be dangerous or illegal. Drive safely at all times Do not use a hand-held phone while driving. Park the vehicle first. Switch off the phone when refuelling Do not use the phone at a refuelling point (service station) or near fuels or chemicals. - Page 7 Keep your phone away from small children Keep the phone and all its parts, including accessories, out of the reach of small children. Accessories and batteries Use only Samsung-approved accessories and batteries. Use of any unauthorised accessories could damage your phone and may be dangerous. CAUTION: •...
-
Page 8: Getting Started
* One contains Microsoft ActiveSync software, Add-on software and applications, and the other contains User’s Guide in PDF format. In addition, you can obtain the following accessories for your phone from your local Samsung dealer: • Car charger/adapter • Desktop holder •... -
Page 9: Getting To Know Your Phone
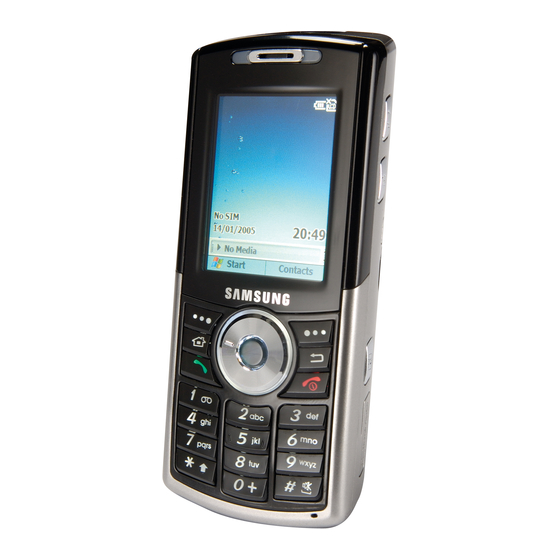
Getting to know your phone Front view Infrared port Earpiece Service light Headset jack Display Voice command key Navigation key SAMSUNG media player key OK key Left soft key Right soft key Volume key Back key End/Power Home key on or off key... - Page 10 Getting started Rear view Phone key Camera lens Camera flash Lock key Battery lock Speaker Battery Camera key Memory card slot Charging/ Communication port...
- Page 11 Getting started Keys of your phone Description • Press to open the Quick List screen. • Press and hold to turn the phone mode on or off. Press and hold to turn the backlight off and lock the keys. • Press to open the Camera application. •...
- Page 12 • Press to record a memo in the Voice Notes application. • Press and hold to open the Voice Assist application. Press to open the SAMSUNG Media Player application. • Press to adjust the voice volume during a call or the earpiece volume in Idle mode.
-
Page 13: Installing The Sim Card
Getting started Installing the SIM card When you subscribe to a cellular network, you are provided with a plug-in SIM card loaded with your subscription details, such as your PIN, any optional services available, and many others details. • Keep all miniature SIM cards out of the reach of small children. -
Page 14: Installing The Battery
Getting started Removing the SIM card To remove the SIM card, slide the card out of the holder, as shown. Installing the battery Installing the battery 1. Insert the teeth on the bottom of the battery into the corresponding slots on the phone. - Page 15 Getting started 2. Press the battery against the back of the phone. Make sure that the battery is securely locked before switching on the phone. Removing the battery 1. If necessary, switch off the phone by pressing and holding until the power-off image displays. Or, you can also press and scroll to Power off and then press the Select soft key.
-
Page 16: Charging Your Phone
Getting started Charging your phone 1. Plug the connector of the travel charger into the bottom of the phone. Check that the arrow on the connector is facing up. 2. Plug the charger into a standard AC wall outlet. You can see the LED on the charger indicating the charging progress by the following colours: •... -
Page 17: Turning Your Phone On Or Off
Getting started 3. When charging is finished, first unplug the charger from the power outlet. Then remove the charger from the phone by pressing the buttons on both sides of the connector and pulling the connector out. Low battery warning Your phone displays the Battery Very Low icon ( ) and a warning message when the battery gets very low. -
Page 18: The Basics
The basics This chapter explains basic information about using your phone, such as customising your phone and using online help. Using the Home screen You will see the Home screen when you turn on your phone. You can also display it by pressing in an application or the Home soft key from the Start menu. - Page 19 The basics Navigation bar On the top line of the screen, the navigation bar displays icons to show your phone’s current status. Followings are some of the status icons you may see: Status icon Description Shows the level of your battery power. The more bars you see, the more power you have remaining.
- Page 20 The basics Status icon Description Shows the strength of the signal. You can also view the following service status: • : You are outside a service area. • : The phone functions turn off. Appears when a GPRS connection is available in the network.
- Page 21 The basics Status icon Description Appears when you set incoming calls to be diverted to another destination. Appears when the current call is on hold. Appears when a data call is in progress. Appears when the Bluetooth feature is activate. See page 209. Changing information from the Home screen From the Home screen, you can change information,...
- Page 22 The basics Customising the Home screen You can customise the Home screen according to your preferences. To customise the Home screen: 1. On the Home screen, press the Start soft key. 2. Select Settings Home Screen. 3. Scroll to the options you want and press to select the settings.
-
Page 23: Start Menu Screen
The basics • Time out: Specify the length of time the phone waits before returning the display to the Home screen if the phone is not used. 4. When you have finished, press the Done soft key. Start menu screen On the Start menu screen, you can access all of the applications for your phone. -
Page 24: Entering Text
The basics Switching between applications You can open several applications and switch from one application to another. On the Home screen, you can view a list of applications that are currently open. Scroll to an application by pressing or spinning the Navigation key and press Closing applications Using Task Manager, you can end the applications which... - Page 25 The basics 2. Select a mode from the pop-up menu list. The text input mode indicator appears on the top line of the display. Mode Indicator T9 mode below Multipress mode page 27 123 mode page 28 Symbol mode no indicator page 28 : You can change the language for T9 mode by Note...
- Page 26 The basics 3. If the word displays correctly, go to step 4. If the word doesn’t display correctly, scroll to the word on the pop-up list, which displays alternative word choices for the keys that you have pressed. Example: Both Of and Me use .
- Page 27 The basics 3. Enter the word you want to add using Multipress mode. 4. Press the Done soft key. Multipress mode Multipress mode allows you to enter letters by pressing the key labelled with the letter you want repeatedly until it displays.
- Page 28 The basics To delete letters: Press . Press and hold to clear the entire display. To quickly include a number: Press and hold the corresponding number key. Symbol mode This mode allows you to enter various symbols and function marks. To enter a symbol: From the symbol list, scroll to the symbol you want and press the Done soft key.
-
Page 29: Using My Text
The basics Using My Text In the Messaging or MSN Messenger application, use My Text to quickly insert preset or frequently used sentences into the text entry area. To insert a My Text item while composing a message, press the Menu soft key and select Insert Text and then select a sentence. -
Page 30: Customising Your Phone
The basics Customising your phone You can customise the phone settings to suit the way you work. Regional settings Using Regional Settings, you can change number, currency, and time and date formats appropriate to the countries in question. 1. On the Home screen, press the Start soft key. 2. - Page 31 The basics Time and date settings The Date and Time setting enables you set the date, time, and time zone. 1. On the Home screen, press the Start soft key. 2. Select Settings More Date and Time. 3. Set your time zone and the current date and time. 4.
- Page 32 The basics Alarm settings You can set an alarm to ring at a specified time. To set an alarm: 1. On the Home screen, press the Start soft key. 2. Select Settings More Date and Time. 3. Scroll to the Alarm field and select whether or not the alarm rings.
- Page 33 The basics Power settings You can conserve battery power by adjusting the time-out settings for the battery and display and the display brightness. During standby, the phone goes to Sleep mode after a specified period of time of inactivity, so very little power is being consumed.
- Page 34 The basics Accessibility settings You can configure the options to increase the accessibility to your phone’s functions. 1. On the Home screen, press the Start soft key. 2. Select Settings Accessibility. 3. Select the options you want. • System font size: allows you to set the size of the font on your screen.
- Page 35 The basics • The LED indicator flashes. • Your phone vibrates. You can change phone sounds by choosing types or sounds for each event or by choosing a sound theme. To choose reminder types and sounds: 1. On the Home screen, press the Start soft key. 2.
- Page 36 The basics 3. Scroll to the theme you want and press the Done soft key. The selected sound theme affects all of the sound settings in Sounds. If you selected None, all of the sound settings in Sounds are changed to the default setting. Changing the sound profile Using Profiles, you can adjust and customise the phone tones for different events or environments and then apply...
- Page 37 The basics 2. Change the setting in each field. The settings may differ depending on the selected profile. If you selected Headset or Car in step 1, you can set the time that the phone answers an incoming call automatically when you connect the headset or car kit to your phone.
- Page 38 The basics Owner information Owner Information identifies the owner or user of the phone. Set your contact information in case you have lost the phone. 1. On the Home screen, press the Start soft key. 2. Select Settings More Owner Information. 3.
- Page 39 The basics Security settings With options in Security, you can protect your phone and SIM card from unathorised use. Locking the phone You can protect your phone using the Phone Lock feature. Once the the feature is enabled, your phone is automatically locked after the specified length of time of inactivity.
- Page 40 The basics To unlock your phone: 1. On the Home screen, press the Unlock soft key. 2. Enter the password and press the Unlock soft key. To disable the phone lock: 1. On the Security screen, select Disable Phone Lock. 2.
- Page 41 The basics Changing PIN You can change your current PIN to a new one. This option is only available the Enable SIM PIN option is activated. 1. On the Home screen, press the Start soft key. 2. Select Settings More Security.
- Page 42 The basics Menu shortcut settings The number keys can be used as shortcut keys to directly access specific applications that exist in the Start menu. : You can also assign phone numbers, e-mail addresses, Note or Web pages in Contacts to the number keys as speed dial entries.
-
Page 43: Key Lock (Keyguard)
The basics 5. Select a location in the Keypad assignment field and press the Done soft key. The application is assigned to the specified location. : Up to 99 Speed Dial locations are available. Note Locations 0 and 1 are reserved for the international call prefix “+”... -
Page 44: Using The Launcher
The basics Using the Launcher Using the Launcher, you can view the applications in the Start menu categorised by type, and quickly access the application you want. To open the Launcher: On the Home screen, press and hold or the Start soft key. - Page 45 The basics Moving an application You can move an application within a group or to another group. 1. On the Launcher screen, scroll to the application you want to move. 2. Press the Menu soft key and select Move. 3. Move the application to the position you want. To select the group to which you want the application moved, press the Menu soft key and select Change Group.
-
Page 46: Using An Optional Memory Card
The basics Managing a category You can rename and delete the categories. 1. On the Launcher screen, select the category you want by pressing the Group soft key. 2. Press the Menu soft key and select Edit Group. 3. Select Rename to rename the selected category, change the name, and then press the OK soft key. -
Page 47: Adding And Removing Programmes
The basics 2. To remove the card, push it in and release so that it is disengaged from the slot. Then slide the card out. Adding and removing programmes Programmes added to your phone at the factory are stored in ROM (Read Only Memory). You cannot remove this software, and you’ll never accidentally lose ROM contents. - Page 48 The basics Adding programmes using ActiveSync You can install programmes downloaded from the Internet or included on the supplied software CD-ROM by performing a synchronisation between your phone and your PC. First you need to determine what your phone and processor type is so that you know which version of the software to install.
- Page 49 The basics 5. Double-click the *.exe file on the PC. If the file is an installer, the installation wizard will begin. Follow the instructions on the screen. Once the software has been installed on your PC, the installer will automatically transfer the software to your phone. If the file is not an installer, you will see an error message stating that the programme is valid, but it is designed for a different type of PC.
- Page 50 The basics 3. Read any installation instructions, Read Me files, or documentation that comes with the programme. Many programmes provide special installation instructions. 4. Select the file, such as a *.xip or *.exe file. The installation wizard will start. Follow the directions on the screen.
-
Page 51: Managing Certificates
The basics Managing certificates On your phone you can add and delete public key certificates. Certificates help establish your identity when you log on to a secured network or establish the identity of other computers, such as servers, with which you connect. You can store the following two types of certificates on your phone. -
Page 52: Resetting Your Phone
The basics Resetting your phone You can perform a soft reset or a hard reset – a soft reset restarts your phone and a hard reset returns your phone to its factory setting and remove all of the programmes and data you have added. - Page 53 The basics 2. While holding , press and hold 3. Enter the initialisation password in the Enter password field. The reset password is preset to “0000” at the factory. Your phone resets the system after about 6 or 7 minutes. Changing initialisation password You can change the reset password to prevent unauthoised person from initialising your phone.
-
Page 54: Using Online Help
The basics Using online help Your phone is supported by additional information available online, or on the CD-ROM that came with your phone. For information on: see: additional programmes the supplied CD-ROM. that can be installed on your phone, connecting to and the User’s Guide or ActiveSync synchronising with a Help on your PC. - Page 55 Synchronisation ® ® Using Microsoft ActiveSync , you can synchronise data in your desktop computer with the data in your phone. Synchronisation compares the data on your phone with your desktop computer and updates both your phone and computer with the most recent data. For example: •...
-
Page 56: Installing Activesync
Synchronisation WARNING! • ActiveSync synchronises two devices using most recent data. Therefore, if you delete specific data from the phone after a synchronisation, and then perform a synchronisation again, the corresponding data on the computer will be deleted. Be careful not to lose your important data. •... - Page 57 Synchronisation 3. After installation is complete, the ActiveSync New Partnership Wizard helps you connect your phone to your desktop computer, set up a partnership so that you can synchronise information between your phone and your desktop computer and/or server, and customise your synchronisation settings.
-
Page 58: Customising Connection Settings
Synchronisation Customising connection settings To establish a connection between your computer and the phone, you must enable the connection(s) you want to use in the ActiveSync programme. By default, all connections are enabled. 1. From the ActiveSync window on your computer, select File Connection Settings.. -
Page 59: Connecting Your Phone To A Computer
Synchronisation Connecting your phone to a computer To connect the phone to your computer, you can choose one of the following ways: • Using the PC data link cable • Using the infrared port • Using a Bluetooth connection Connecting with the USB cable Connect one end of the PC data link cable to the bottom of the phone and the other end into the USB port on your computer. - Page 60 Synchronisation Connecting via Bluetooth 1. On the Home screen, press the Start soft key. 2. Select Settings Bluetooth. 3. Select the operating mode you want. For details, see page 210. 4. Press the Menu soft key and select Devices. 5. Press the Menu soft key and select New to search for a new Bluetooth compatible computer.
-
Page 61: Synchronising Information
Synchronisation Synchronising information 1. Connect your phone to your computer. For more information on connecting the phone and the computer, see page 59. 2. The ActiveSync screen on your computer automatically appears and starts synchronisation. Shows the synchronisation status. Shows types of information to be synchronised. -
Page 62: Customising Synchronisation Settings
Synchronisation Customising synchronisation settings You can customise various setting options for synchronisation with a PC and a server, and set the synchronisation schedule. : To set the synchronisation options, you first need to Note disconnect your phone from the PC. Change the synchronisation schedule You can schedule synchronisation of your phone on two separate times. - Page 63 Synchronisation • To synchronise each time you send an e-mail, select Sync outgoing items as they are sent check box. • To set the days and hours for peak times, press the Menu soft key and select Peak Times. 3. When you have finished, press the Done soft key. Setting PC synchronisation 1.
- Page 64 Synchronisation Setting server synchronisation You can synchronise information automatically as items arrive only if your company is running Microsoft Exchange Server with Exchange ActiveSync. : You can also set up a connection to synchronise Note remotely with a server when you first create a partnership between your phone and your PC.
- Page 65 Synchronisation To change Exchange server synchronisation settings: 1. In ActiveSync on your phone, press the Menu soft key and select Options Server Settings. 2. Select the types of information that you want to synchronise with the server: Inbox, Calendar, or Contacts.
- Page 66 Synchronisation...
- Page 67 Synchronisation...
-
Page 68: Phone Functions
Phone functions As well as all the standard features of a mobile phone, such as mailbox and call history, there are several dialling features unique to your phone. For example, you can take notes while talking, dial directly from Contacts and easily transfer contacts between your SIM card and your phone’s memory. -
Page 69: Turning The Phone Functions On And Off
Phone functions Turning the phone functions on and You can choose to turn off the phone functions and just use the PDA functions at any time and then turn it back on when you want. : In many countries you are required by law to turn off Note the phone functions when you fly. -
Page 70: Using The Dialer Screen
Phone functions Using the Dialer screen When you start entering a number or press , the Dialer screen opens. You can view the most recent calls you have dialled, received, and missed on the Dialer screen. From the Dialer screen, make calls, access Contacts, and view the call information by pressing the Menu soft key. - Page 71 Phone functions 2. Press to make a call. While the number dials, if the number is already in Contacts, the corresponding name displays. When a call is connected, the call duration time displays. During a call, you can use the several call options. For details, see page 77.
-
Page 72: Advanced Calling Features
Phone functions Advanced calling features You can make a call from the Contacts, Speed Dial, and Call History. Making a call from Contacts 1. On the Home screen, press the Contacts soft key. You can also press the Start soft key and select Contacts. - Page 73 Phone functions Making a call from Speed Dial Speed Dial is a list you can create of often-dialled numbers. Information on adding a number to Speed Dial is detailed on page 81. By memorising the position on the Speed Dial list, you can dial the number simply by entering that number.
- Page 74 Phone functions Making a call using name dialling You can make a phone call by saying the name that has been assigned to a contact in Contacts or on the SIM card. For details, see page 186. Making a call from the Call History 1.
- Page 75 Phone functions Making an international call 1. Press and hold until the + sign appears. The + replaces the international access code. 2. Enter the full phone number you want to dial. It includes the country code, the area code (without the leading zero), and the phone number.
-
Page 76: Answering Or Rejecting A Call
Phone functions Making an emergency call Your phone provides the emergency number 112. This number can normally be used to make an emergency call in any country, with or without a SIM card inserted, if you are within a mobile phone network’s service area. Enter the emergency number 112 and press Notes •... -
Page 77: Options During A Call
Phone functions Options during a call Your phone provides a number of control functions that you can use while a call is in progress. Putting a call on hold If a person is trying to call you when you are talking on the phone, a notification window will pop out. -
Page 78: Call-Related Features
Phone functions 4. Press the Menu soft key and select Join to join together all existing calls. You can add up to 5 participants. To talk privately to a person during a conference call, press the Menu soft key and select Private. When the list of call participants appears, select one. - Page 79 Phone functions : You can check and change the voicemail centre number. Note On the Home screen, press the Start soft key, select Settings Phone Call Options, and check Voice mail number. Adding and transferring contact information There are a number of ways in which telephone numbers and contacts can be entered and stored, and there are also a number of ways to make a phone call.
- Page 80 Phone functions • If you are using your SIM in another device, you may need the numbers stored in Contacts. • Transferring numbers to Contacts allows you to create more detailed records. Adding and transferring Contacts 1. To create a contact, see page 134. 2.
- Page 81 Phone functions : By default the Key assignment option will assign Note you the next available position in the Speed Dial list. If you put a number in a position that is already occupied, a confirmation message appears to ask you if you want to overwrite the setting.
- Page 82 Phone functions 3. Scroll to a number, e-mail address, or Web page address. 4. Press the Menu soft key and select Add Speed Dial. 5. If necessary, enter the name you want. 6. In the Keypad assignment field, select a location. 7.
- Page 83 Phone functions Managing your Call History The Call History details all incoming, outgoing, and missed calls, and also provides a summary of total calls. It can also tell you when a call was initiated and how long it lasted. On the Home screen, press the Start soft key and select Call History.
- Page 84 Phone functions Viewing details of calls • To view the duration of a call and time and date you received or made it, scroll to the call you want to view and press • To view contact information, scroll to a contact, press the Menu soft key, and select Find Contact.
- Page 85 Phone functions Viewing call timers In Call History, you can view the duration of your calls. This option is convenient for estimating your usage. To view the call timers: 1. On the Call History screen, press the Menu soft key and select View Timers.
- Page 86 Phone functions Viewing call cost This network feature lets you view the cost of calls. You can set the maximum cost to limit the cost of your calls to a certain amount of charging units or units of currency. When the max cost is active, calls can be made only as long as the preset max cost is not exceeded.
-
Page 87: Customising Your Phone Functions
Phone functions Customising your phone functions You can personalise the settings of your phone, the services you have, and the network to which you are connected. Call options You can customise settings related to call functions, such as an answering option, voice mail and SMS access numbers, and country and area codes. - Page 88 Phone functions Service LED You can change the colour of the service LED to indicate the service status. 1. On the Home screen, press the Start soft key. 2. Select Settings Phone More Service LED. 3. Select a colour and press the Done soft key. Tones You can customise additional tones for the phone.
- Page 89 Phone functions Caller ID When you place a call, your phone number can be displayed or hidden from the person that you are calling. You can enable or disable the display of your caller indentification. 1. On the Home screen, press the Start soft key. 2.
- Page 90 Phone functions 3. Set each option. The following options are available: • Index List: Set up the index list by pressing the Menu soft key and selecting Add, Delete, and Activate. • Outside Access: Enable or disable calls to numbers other than those in the Closed User Group.
- Page 91 Phone functions Selecting a network 1. On the Home screen, press the Start soft key and select Settings Phone More Networks. 2. Select either Automatic or Manual in the Network selection field (retrieving settings may take a few minutes when you select Manual). 3.
- Page 92 Phone functions Call barring This service allows you to restrict your incoming or outgoing calls. To activate or deactivate call barring: 1. On the Home screen, press the Start soft key. 2. Select Settings Phone Call Barring (retrieving settings may take a few minutes). 3.
- Page 93 Phone functions To change the barring password: You can set and change the call barring password obtained from your service provider. 1. On the Dialer screen, tap Tools Options..You can also access the screen by tapping the Start menu Settings Phone.
- Page 94 Phone functions 4. Select the Enable call forwarding check box. 5. Enter the phone number to which calls are to be forwarded. 6. Press the Done soft key. Call waiting This service allows you to receive another call while you have a call in progress.
- Page 95 Phone functions The country where your phone was purchased determines the default band that it uses. When you travel abroad, you must remember to change to an appropriate band. 1. On the Home screen, press the Start soft key. 2. Select Settings Phone Band Selection.
- Page 96 Phone functions To add new numbers to the Fixed dialling number list: 1. On the Fixed Dialling screen, press the Menu soft key and select Edit Numbers. 2. Press the Menu soft key and select Add. 3. Enter the number and press the Done soft key. 4.
-
Page 97: Message, Internet, And Messenger
Message, Internet, and Messenger Messaging In Messaging, you can create, send, receive, view, edit, and organise: • Text messages (SMS) • Multimedia message (MMS) • E-mail messages To go to Messaging, on the Home screen, press the Start soft key and select Messaging. SMS Messages You can write an SMS message of up to 160 characters. - Page 98 Message, Internet, and Messenger 4. Press the Down key and compose your message. To enter preset or frequently used messages, press the Menu soft key, select Insert Text, and select a message. 5. Press the Send soft key when you’ve finished the message.
- Page 99 Message, Internet, and Messenger • Outbox: is a temporary storage place for messages waiting to be sent. • Sent Items: stores the messages that have been sent. If you want to organise messages into additional folders on the folder list, press the Menu soft key and select Manage Folders to create new folders.
- Page 100 Message, Internet, and Messenger 3. While viewing the message, you can use the following options by pressing the Menu soft key. Available options depend on the folder you have opened. • Delete: Deletes the message. • Reply: Sends a reply to the sender. You can also send a reply by pressing the Reply soft key.
- Page 101 Message, Internet, and Messenger Inserting signatures into SMS messages You can specify a signature to be automatically inserted into SMS messages that you send. 1. On the SMS Messages screen, press the Menu soft key and select Options Signatures. 2. Select SMS Messages from the Select an account field.
- Page 102 Message, Internet, and Messenger • Receive channel list: Select to receive a list of all of the available channels from the network. To manually set up the channel list, press the Menu soft key and select Edit Channels. On the Edit Channels screen, press the Menu soft key and select Add to add a new channel.
- Page 103 Message, Internet, and Messenger Creating an MMS message 1. On the Messaging main screen, select MMS. 2. Press the New soft key. 3. Enter the recipient’s number(s) or address(es), seperating them with a semicolon. You can also retrieve number(s) or the address(es) from the contact list or the list you sent lately by pressing the Menu soft key and selecting Add Recipients.
- Page 104 Message, Internet, and Messenger • MMS Options: Allows you to change the message options, such as priority, expiry time, and hiding the sender’s address, see page 102. • Save To: Saves the message in the Draft or Template folder. • Cancel Message: Calcels creating the message. 8.
- Page 105 Message, Internet, and Messenger 2. Select the message you want to read. Read message Unread message Position only 3. While you read the message, use the following options: • To play the message, press the Play soft key. • To view the previous page, press the Left key. •...
- Page 106 Message, Internet, and Messenger • Save to Contacts: Allows you to save the sender’s address in the Contacts directory. • Properties: Shows you the message properties. 5. When you have read a message, press to return to the list screen. Configuring MMS settings You can change the default MMS settings.
- Page 107 Message, Internet, and Messenger • Receiving Options: Allows you to change the settings for receiving MMS messages. Home Network: Set how to retrieve new messages from the server in your home network. Roaming Network: Set how to retrieve new messages from the server while roaming around another network.
- Page 108 Message, Internet, and Messenger • Creation mode: Allows you to set the phone to allow the MMS creation using unsupported file format. Free: The phone adds unsupported files. Restricted: The phone does not allows you to add unsupported files. Warning: The phone alerts you if you try to add unsupported files.
- Page 109 Message, Internet, and Messenger During Synchronisation • Messages are copied from the mail folders of Exchange or Outlook on your PC to the Outlook E-mail folder in Messaging on your phone. By default, you will receive messages from only the three days, and only the first 100 lines of each message.
- Page 110 Message, Internet, and Messenger 2. Press the Menu soft key and select Options Account Setup. 3. Press the Menu soft key and select New. 4. Enter your display name and e-mail address. If you want to set up your account automatically from the Internet, select Attempt to obtain e-mail settings from the Internet.
- Page 111 Message, Internet, and Messenger 12. Set the options for downloading e-mail messages and press the Next soft key. You can select the duration of days for which you receive e-mail messages and set the maximum data volume of e-mail messages you want to download. 13.
- Page 112 Message, Internet, and Messenger Creating an E-mail message 1. On the Messaging main screen, select the e-mail account with which you want to send. 2. Press the New soft key. 3. In the To and Cc fields, enter e-mail address(es) of one or more recipients, separating them with a semicolon, or retrieve addresses from the contact list by pressing the Menu soft key and selecting Insert Contact.
- Page 113 Message, Internet, and Messenger 6. Press the Send soft key when you’ve finished the message. If you want to send the e-mail message later, press the Menu soft key and select Postpone Message. The message is automatically saved in Drafts. 7.
- Page 114 Message, Internet, and Messenger : When you first have synchronised e-mail messages, the Note Junk E-mail folder is copied from the Microsoft Outlook on your PC to Outlook E-mail on your phone. The next time you synchronise, the e-mail messages that appear to be Junk e-mail are saved in the Junk e-mail folder according to the junk e-mail options you set in the Microsoft Outlook on your PC.
- Page 115 Message, Internet, and Messenger 3. Select the message you want view. 4. While viewing the message, you can use the following options by pressing the Menu soft key. Available options depend on the folder you have opened. • Delete: Deletes the message. •...
- Page 116 Message, Internet, and Messenger You can mark the messages that you want to retrieve in full during your next synchronisation or e-mail server connection. On the message list, select the message of which full contents you want to retrieve. Press the Menu soft key and select Mark for Download.
- Page 117 Message, Internet, and Messenger Inserting signatures into e-mail messages You can specify a signature to be automatically inserted into e-mail messages that you send. To specify a signature: 1. On the Messaging main screen, select the e-mail account you want. 2.
-
Page 118: Internet Explorer
Message, Internet, and Messenger Internet Explorer ® Use Microsoft Pocket Internet Explorer to view Web HTML, cHTML, and WAP pages. You can browse by connecting to an Internet service provider (ISP) or network and browse the Web. To do this, you’ll need to create the connection first as described 216. - Page 119 Message, Internet, and Messenger Browsing the Internet 1. To connect and start browsing, do one of the following: • Press the Menu soft key and select Address Bar. Enter the web address you want to visit or select View History to open the list of the pages you last accessed.
- Page 120 Message, Internet, and Messenger Using the Favourites list You can store your favourite link while using the Internet Browser and then access them easily. Categorising them enables you to find them more quickly. Adding a Web page to the Favourites list 1.
- Page 121 Message, Internet, and Messenger Opening a link through the Favourites list 1. On the Internet Explorer screen, press the Favourites soft key. 2. Scroll to the link you want to access. If the link you want is in the certain folder, open the folder and scroll to the link.
- Page 122 Message, Internet, and Messenger Changing Explorer options You can customise Web browsing options, change the connection settings, and clear memory. On the Internet Explorer screen, press the Menu soft key and select Options. The following options are available: • General: You can select whether or not to show images or play sounds on Web pages, view the warnings when you move from a secure web page to a non-secure one, or enable or disable the receiving and...
-
Page 123: Pocket Msn
Message, Internet, and Messenger Pocket MSN Pocket MSN delivers an always-on experience that enables you to remain available to other online users and always up to date with e-mail, instant messaging (IM) and other online services without maintaining a continuous network connection to the phone. -
Page 124: Wap Browser
Message, Internet, and Messenger WAP Browser Using WAP Browser, you can browse the WAP service preset by your service provider and other WAP (Wireless Application Protocol) sites on your phone. Connecting to a WAP site 1. On the Home screen, press the Start soft key. 2. - Page 125 Message, Internet, and Messenger 4. While you are navigating through the WAP pages, you can use the following options: Press display the list of your the Favorites soft key. favorites go to the previous visited page go to the homepage the Menu soft key and select Home.
- Page 126 Message, Internet, and Messenger 3. Enter a name for the favourite site and the URL of the site. 4. Select a category under which you want to save the favourite. You can also create a new category by pressing the Menu soft key and select New Category.
- Page 127 Message, Internet, and Messenger Managing Favorite categories You can create a new category for saving favourite WAP sites and edit or delete the created category. 1. On the WAP Browser screen, press the Favorites soft key. 2. Press the Menu soft key and select New to create a new category.
- Page 128 Message, Internet, and Messenger The History screen displays the recently visited URLs. 2. To open a page in the history, scroll to the page and press the Go soft key. To clear the history: 1. From the History list, press the Menu soft key and select Clear History.
- Page 129 Message, Internet, and Messenger 3. Select the message you want to view. The Push Message Details screen displays the messages with all the details, such as the contents, the sender’s address, time and date, priority, and URL. 4. To access the URL specified in the message, press the Go To soft key.
-
Page 130: Msn Messenger
Message, Internet, and Messenger • Set as Homepage: You can change the startup homepage of the WAP browser. Access the page you want and select this option. MSN Messenger ® Messenger on your phone is an instant messaging programme that lets you: •... - Page 131 Message, Internet, and Messenger Setting up Before you can connect, you must set up the instant messaging account(s) to use. For MSN Messenger Service, you must enter a Microsoft Passport or Hotmail account. For Exchange Instant Messaging, you must enter an Exchange account.
- Page 132 Message, Internet, and Messenger Working with contacts The MSN Messenger screen shows all of your messenger contacts at a glance, divided into Online and Not Online categories. From this view, while connected, you can start a chat. Position only • To see others online without being seen, on the MSN Messenger screen, press the Menu soft key and select Chats.
- Page 133 Message, Internet, and Messenger Chatting with contacts 1. To open a chat window, scroll to the contact with whom you want to chat. 2. Press the Menu soft key and select Send Message. 3. Enter your message in the text entry area at the bottom of the screen, or press the Menu soft key and select My Text to enter a preset message.
-
Page 134: Organiser
Organiser This chapter explains how to keep track of contacts and appointments and make a list of tasks you need to do. ® Using ActiveSync , you can synchronise information in Microsoft Outlook or Microsoft Exchange on your PC with your device. - Page 135 Organiser Creating a contact card in the phone’s memory 1. On the Contacts screen, press the New soft key. 2. Enter a name and other contact information. 3. To assign the contact card to a category, scroll to the Categories field and select a category. In the contact list, you can display contacts by category.
- Page 136 Organiser Creating a contact card in the SIM card 1. On the Contacts screen, press the Menu soft key and select New SIM Contact. 2. On the SIM Contact screen, enter the name of the person you want to add. 3.
- Page 137 Organiser 3. Scroll to the location you want to save the number and press the Insert soft key. 4. Fill in the other fields by referring from step 2 on page 136. Viewing and editing a contact card When you access the Contacts application, the contact list displays the names of your contacts alphabetically, along with an abbreviation for the primary contact number or E- mail address, such as the person’s work phone number (w)
- Page 138 Organiser The following table shows possible abbreviations that might be displayed on the Contacts list and their meanings: Abbreviation Meaning work phone home phone mobile phone work phone 2 e-mail home phone 2 pager car phone work fax number (shown in the summary view) home fax number (shown in the summary view)
- Page 139 Organiser To open a contact card: 1. On the contact list, select the contact’s name you want to view. If the contact card is assigned to a certain category, press the Menu soft key and select Filter and then select the category from the pop-up list. The contact list stored in the selected category displays.
- Page 140 Organiser Assigning default numbers and addresses If a person has several phone numbers or e-mail addresses, to speed up calling and sending messages, you can define certain numbers and addresses to be used as the default. 1. On the contact list, select the contact card you want. 2.
- Page 141 Organiser To copy from the SIM card to Contacts: 1. On the contact list, select the contact card stored on the SIM card. 2. Press the Menu soft key and select Save to Contacts. 3. Select <New Item> to creat a new contact card and follow step 2 on page 136.
-
Page 142: Calendar
Organiser Deleting a contact card 1. On the contact list or on the summary screen, press the Menu soft key and select Delete. 2. Press the Yes soft key permanently delete the contact card. : If you delete a contact card on your phone and Note synchronise Contacts with your computer, you also delete the contact card in Outlook on your computer. - Page 143 Organiser Creating an appointment 1. Press the Menu soft key and select New. 2. Fill in the fields. • Subject: Enter a description of the appointment. • Start date, Start time, End date, and End time: If needed, change the date and time. •...
- Page 144 Organiser Switching to view mode You can change the view mode of the calendar to cycle through the agenda, week, and month view. In each view, press the Week, Month, or Agenda soft key. • Week View: shows the calendar of your appointments for an entire week.
- Page 145 Organiser : shows • Agenda View you the appointments for the selected day. The entries are grouped according to their starting times. : You can customise the Calendar display, such as Note changing the first day of the week, by pressing the Menu soft key and selecting Options on the agenda, week, or month view.
- Page 146 Organiser 3. Select the appointment you want to view. Shows summary information for the appointment. Shows a note, if you created one. 4. Press the Edit soft key to edit the appointment and view its details. 5. If you are editing a repeating or continuous appointment, decide if you want to edit all appointments in the series or just the current appointment by pressing the No or Yes soft key.
- Page 147 Organiser Beaming an appointment You can send an appointment to another phone via an active infrared connection. 1. On the Calendar screen, open the appointment you want. 2. Press the Menu soft key and select Beam Appointment. 3. Align the IR ports on the devices so that they are unobstructed and within a close range.
-
Page 148: Tasks
Organiser Tasks Tasks is a convenient place to create task reminders. You can mark a task as completed or delete a task. To open Tasks: On the Home screen, press the Start soft key and select More Tasks. Creating a task 1. - Page 149 Organiser To unmark, press the Activate soft key. Deleting a task 1. On the task list, scroll to the task and press the Delete soft key. 2. Press the Yes soft key to delete the task permanently.
-
Page 150: Multimedia
Multimedia Camera With the built-in camera on your phone, you can take photos of people or events while on the move. You can view and edit photos. Your phone supports JPEG, GIF, PNG, and BMP pictures. To open Camera: Press and hold on the right side of the phone, or press the Start soft key on the Home screen and select Camera. - Page 151 Multimedia 3. Adjust the camera settings: • Press the Left or Right key to adjust the brightness of the image. • Press the Up or Down key to zoom in or out. • Press to flip the image vertically. • Press to show the mirror image.
- Page 152 Multimedia Setting the camera options You can customise the camera settings. Once you set the camera settings, the corresponding icons display at the top of the Preview screen. 1. On the Preview screen, press the Menu soft key. 2. Adjust any of the following settings: •...
- Page 153 Multimedia Photo Quality: Selects an image quality. The better the image quality, the more memory the image consumes. Viewfinder: Selects a preview mode. Shutter Sound: Selects a sound when you press the shutter, Default Storage: Selects whether you want to store your images in the phone’s memory or on the memory card, if you use one.
- Page 154 Multimedia Viewing photos Captured photos are saved in the My Photos folder. Viewing a photo 1. On the Camera screen, select the My Photos soft key. By default, you can view the photos in Thumbnail view. Thumbnail view displays miniature versions of your photos.
- Page 155 Multimedia 3. Press to view the photo on the Full screen. On the Full screen view, you can pan around the photo using the Navigation key. You can access the tools to scale or rotate the photo by pressing the Menu soft key and selecting Option.
- Page 156 Multimedia To change the slide show settings: 1. Press the Menu soft key and select Slide Show Slide Show Setting. 2. Set the following options: • Slide Show Interval: select the delay interval between photos. • Continuous Play: set if the slide show repeats. •...
- Page 157 Multimedia Icon: Select an icon and move it to the place you want by pressing the Navigation key. Press the OK soft key to add the icon to the photo. Text: Enter text to be displayed on the photo. While entering, you can change the colour or size of the text by pressing the Menu soft key.
- Page 158 Multimedia Sending a photo You can send photos via multimedia messaging service or via an infrared or a Bluetooth connection. 1. Scroll to the photo you want or open the photo. 2. Press the Menu soft key and select Send. 3.
- Page 159 Multimedia Copying and moving a photo You can copy and move the photos you have taken to other folders. 1. Scroll to the photo you want to or open the photo. 2. Press the Menu soft key and select File Copy to or Move to.
- Page 160 Multimedia 3. Adjust the camera settings. • Press to flip the image vertically. • Press to view the mirror image. • Press the Up or Down key to zoom in or out on your subject. • Press the Left or Right key to adjust the brightness of the image.
- Page 161 Multimedia Setting the video options You can customise the video settings. Once you set the video settings, the corresponding icons display at the top of the Video Preview screen. 1. On the Video Preview screen, press the Menu soft key. 2.
- Page 162 1. On the Camcorder screen, select My Videos. By default, the display shows you view video clips in Thumbnail view. Thumbnail view displays miniature versions of your videos. 2. Select the video clip you want. Samsung Media Player opens and the video plays.
- Page 163 Up or Down key. • To pause or resume playback, press For details about Samsung Media Player, see page xx. Sending a video clip You can send video clips via multimedia messaging service and an infrared or a Bluetooth connection.
-
Page 164: Samsung Media Player
• If you opt to send the video clip via an infrared connection, see page xx. SAMSUNG Media Player With Samsung Media Player, you can play most common music and movie files, such as WMV, WMA, MP3, 3GP, MP4, AAC, AACT, and OGG files. - Page 165 Multimedia About DRM, licenses, and protected files Some digital media files, such as songs downloaded from online stores, are encrypted to prevent the files from being unlawfully distributed or shared. Content providers use a technology called Digital Rights Management (DRM), to encrypt the files.
- Page 166 Menu soft key and selecting Update Library. Using libraries A library is a file list provided by SAMSUNG Media Player to retrieve media files in the phone’s memory. The Library screen contains categories, such as My Music, My Videos, My TV, and My Playlists.
- Page 167 • Done: closes the Library screen and displays the player screen. Playing Media files 1. From the Samsung Media Player screen, press the Menu soft key and select Library. 2. Scroll to the library you want to play and press the Play soft key.
- Page 168 You can create a play list with your favourite media files. Creating a play list 1. From the Samsung Media Player screen, press the Menu soft key and select Library or File system. 2. Select a library or folder and find the media file you want.
- Page 169 From the player screen, press the Menu soft key and select Player Settings. • General: Allows you to set Samsung Media Player to pause playback for another program, to resume playback after a phone call, or to turn itself off after a specified time.
-
Page 170: Windows Media Player
Multimedia Windows Media player Your phone is equipped with Microsoft Windows Media Player 10. With Windows Media Player, you can play Windows Media Audio, Windows Media Video, and MP3 audio files that are stored on your phone, a memory card, or on the Web. - Page 171 Multimedia Make sure that you have Windows Media Player 10 or later versions on your desktop computer. Depending on the version of your desktop player, the procedure to copy files may vary. 1. Connect your phone to the desktop computer and start synchronisation using a USB cable.
- Page 172 Multimedia 7. Select the saving location from the right pane. 8. Click to select the quality level you want and click OK. The selected files are converted and copied to the location you selected in step 7. Playing music and video files If you have copied media files in your phone’s memory or memory card, you can play them from Media Player.
- Page 173 Multimedia • To access the next file, press the Right key. • To access the previous file, press the Left key. • To pause or resume playback, press • To move forward in a file, press and hold the Right key. •...
- Page 174 Multimedia Setting up a playlist You can add media files on the Library screen to a temporary playlist. It lists the currently playing file, as well as any files that have been queued up to play next. Creating a playlist 1.
- Page 175 Multimedia Changing the Window Media Player settings You can customise the appearance and functionality of Windows Media Player. On the player screen, press the Menu soft key and select Options. You can use the following options: • Playback: Select the options for playback. You can select the way time is displayed on the player screen, or whether or not to pause playback when you lunch another programme, and resume playback after a phone...
-
Page 176: Srs Wow Xt Settings
Multimedia SRS WOW XT Settings SRS WOW XT for Mobile is a suite of 3D audio, bass enhancement, and mono and stereo speaker technologies designed to improve the quality of mobile audio, e g cellular phone sound quality. WOW XT for Mobile provides great audio performance and eliminates many of the physical limitations of small devices, allowing even tiny speakers to deliver incredibly deep, rich bass tones and crisp, clear dialog. -
Page 177: My Items
Multimedia My Items This programme allows you to access all of the photos, sounds, and videos stored in your phone's memory. To open My Items: From the Home screen, press the Menu soft key and select More My Items. By default, the My Photos folder opens. Opening an item folder Press the Menu soft key and select Mode My Photos,... -
Page 178: Funbox
Multimedia FunBox Using FunBox, you can download Java applications, such as games and tools specifically designed for mobile phones, to your phone through the Internet. Once you have downloaded the Java applications, they are added to the FunBox main screen. To open FunBox: On the Home screen, press the Start soft key and select More... - Page 179 Multimedia 6. When the installation is finished, the application is saved in the FunBox main screen and the phone launches the application. Opening a Java application 1. On the FunBox main screen, scroll to the application you want to open from the list. 2.
-
Page 180: Extra Programmes
Extra programmes Games Your phone includes fun games, such as Jawbreaker and Solitaire in the Games application. To open Games: On the Home screen, press the Start soft key and select More More Games Jawbreaker The object of Jawbreaker is to clear out all the balls. The rule is that you may only clear out adjacent same-coloured balls. - Page 181 Extra programmes Solitaire The object of Solitaire is to use all the cards in the deck to build up the four suit stacks in ascending order, beginning with aces. Playing the game 1. On the Start screen, select Solitaire. Press the Menu soft key and select New Game.
-
Page 182: Calculator
Extra programmes Calculator The calculator allows you to perform general mathematical functions, such as addition, subtraction, multiplication, and division. To use calculator: 1. On the Home screen, press the Start soft key. 2. Select More More Accessories Calculator. 3. Enter the numbers and perform calculations by pressing the Navigation key or You can also add a decimal point by pressing To clear the last digit entered in a multi digit entry, press... -
Page 183: Voice Notes
Extra programmes Voice Notes In any programme where you can write on the screen, you can also quickly capture thoughts, reminders, and phone numbers by recording a message. In Voice Notes, you can create a recording. To open Voice Notes: From any screen, press . -
Page 184: Voice Assist
Extra programmes 3. Press the Stop soft key to stop recording. Your phone automatically saves the voice note labelled with the title and lists the notes on the All Notes screen. You can also change the title of the note by pressing the Menu soft key and selecting Rename. - Page 185 Extra programmes Voice tips • Speak clearly, naturally, and continuously. Try to avoid hesitations, such as “er” and “um”, at the beginning and in the middle of phrases. • If you are in a very noisy environment, use the headset. If you are not using the headset, address the internal microphone at the bottom of the phone at a distance of about 10-20 cm from your mouth.
- Page 186 Extra programmes : If you select the Voice Active Mode checkbox at Note Settings, on the left side of the phone is associated with Voice Assist, so that you can start Voice Assist by simply pressing When the phone prompts you with displaying “Please say a command”, say one of the commands: •...
- Page 187 Extra programmes : You can also say “Call” and then a person’s name stored Note in Contacts or on the SIM card to make a call by voice command; for example, say “Call James Bond.” This will save you a step for name dialling. 3.
- Page 188 Extra programmes Searching for contacts You can retrieve contact information for any name in Contacts or the SIM card by saying that name. Your phone displays the information. 1. On the Voice Command screen, after a voice prompt followed by a short beep, say “Name Search”. 2.
- Page 189 Extra programmes 2. Your phone recognises your command and displays a list of one more applications in the confirmation screen. Follow step 4 on page 188. : If Quick Launch is checked at Settings, this Note confirmation step will be skipped and the best recognition result will be executed immediately.
-
Page 190: Time Manager
Extra programmes Time Manager Time Manager enables you to use various clock features provided by your phone. You can use the phone as the alarm clock, world time clock, D-Day clock, and stopwatch. To open Time Manager: On the Home screen, press the Start soft key and select More More Tools... - Page 191 Extra programmes 3. Select the days when the wake-up alarm rings in the week viewer. 4. Select a melody for the alarm in the Tone field. 5. Select a time interval to resume the alarm after the alarm is stopped in the Snooze field. 6.
- Page 192 Extra programmes To set a reminder for everyday: 1. On the Alarm screen, select Daily Alarm. 2. On the AlarmSetting screen, select the time in the Alarm time field. If you want to set the time manually, select Custom time and enter the time you want. 3.
- Page 193 Extra programmes 2. Select the clock you want. 3. Press the Left or Right key to move the time zone line. To apply daylight savings to the currently selected time zone, select Summer Time. To set the displayed world clock as your Home screen image, select Display in Home Screen.
- Page 194 Extra programmes Setting a D-day clock You can set a count down clock to check how many days and hours remains or have passed for a specific day. 1. On the Time Manager screen, select D-Day. 2. Press the New soft key. 3.
-
Page 195: Document Viewer
Extra programmes Document Viewer Document Viewer is a revolutionary product for document browsing on thin-client computing platforms. It allows you to view content on your phone without any file- conversion or loss of content. Simply by using the Navigation key, you can scroll your document sideways or vertically to view larger pages on a smaller screen and zoom in or out to view intricate details or overviews. - Page 196 Extra programmes Viewing a document On the Document Viewer screen, the file directory of the phone display. The folders which contain further documents are shown in yellow. Go back to the upper level directory. 1. Select the folder containing the document you want. If you have installed a memory card, Storage Card appears to allow you to access files on the memory card.
- Page 197 Extra programmes Options in a document view You can use the following options while viewing a document. • Rotating: To rotate the screen 90 degrees clockwise, press the Menu soft key and select Page Rotate. • Zooming: To zoom in or out, spin the Navigation key, or press the Menu soft key and select Page Zoom in or Zoom out.
- Page 198 Extra programmes • : pans down. • : navigates to the last page. • : zoom in. • : fits to the width of the page. • : zooms out. Viewing History The history view shows you previously visited documents as a small thumbnail-image of the document, and the document’s name, location, and the date of your visiting.
- Page 199 Extra programmes To add the current page to the Favourites list: 1. Press the Menu soft key and select Favourites to access the Favourites list. 2. Press the Add/Delete soft key and select Add. 3. Enter the name you want and then press the OK soft key.
-
Page 200: File Manager
Extra programmes File Manager The File Manager application allows you to open an explorer window similar to a desktop Windows based system. The explorer window allows you to navigate through your phone to locate desired folders and files. You can also quickly manage, delete, copy, or edit any files and folders on your phone. - Page 201 Extra programmes 3. Scroll to the folder that you want to view. 4. Select an item, to open it. Managing files To use file management options, such as Copy, Delete, or Paste, Rename, press the Edit soft key. You can use the following options while using the File Manager application: •...
-
Page 202: Sim Manager
Extra programmes SIM Manager The SIM Manager application enables you to view the contact cards stored on the SIM card and to copy the contact(s) from the SIM card to the contact list on your phone. You can also create a new contact card in the SIM card, edit, and delete the contact card. - Page 203 Extra programmes • To view and use service numbers preset by your service provider, press the Menu soft key and select SDN. • To view the amount of the contacts, SMS messages, and CB messages stored on the SIM card, press the Menu soft key and select Memory Status.
- Page 204 Extra programmes Using the SIM Manager options On the SIM Manager screen, press the Menu soft key and select SIM Tool. The following options are available. • View: shows the selected SIM entry. • Edit: allows you to edit the selected entry. •...
-
Page 205: Task Manager
Extra programmes Task Manager Your phone is multi-tasking device, meaning that it can run more than one application at the same time. However, multi-tasking may cause hang-ups, freezing, and memory problems. To end the applications currently operating, use Task Manager. To open Task Manager: On the Home screen, press the Start soft key and select More... - Page 206 Extra programmes Checking the Storage cards You can check the memory in use for storing files in each storage folder: Storage Card, Storage, and HDD. On the Take Manager screen, press the Menu soft key and select Storage.
-
Page 207: Getting Connected
Getting connected You can use your phone to exchange information with other mobile devices as well as your desktop computer, a network, or the Internet. You have the following connection options: • Use the infrared (IR) port on your device to send and receive files between two devices. - Page 208 Getting connected • Make sure that the IR port windows are clear and free of any dirt or obstructions and that there are no obstacles between the IR port windows. • Adjust the room lighting or move to another location. Some types of lighting may interfere with transmission.
-
Page 209: Beaming With Bluetooth
Getting connected Sending data 1. Locate the item you want to send in an application, such as Calendar, Contacts, Camera, Camcorder, or File Manager. 2. Scroll to the item. 3. Press the Menu soft key and select Beam, followed by the type of item, such as Contact or Appointment. - Page 210 Getting connected Activating Bluetooth mode 1. On the Home screen, press the Start soft key. 2. Select Settings Bluetooth. 3. On the Bluetooth screen, select the operating mode you want in the Bluetooth field. You can use the following operating mode: •...
- Page 211 Getting connected Searching for and pairing with a Bluetooth device 1. On the Bluetooth screen, press the Menu soft key and select Devices. 2. To search for a new device, press the Menu soft key and select New. 3. Select a device to connect to the paired device. 4.
- Page 212 Getting connected • Delete: allows you to delete the device. • Set as Hands-free: allows you to use the connectable device as a headset. You can converse with the other person on the phone without holding the phone to your ear during a call.
- Page 213 Getting connected 4. Select the device from the list. 5. Press the Beam soft key. The item is sent to the device you selected. Using a Bluetooth stereo headset Using a Bluetooth stereo headset, you can play the audio files or converse with the person on the phone without holding the phone to your ear.
- Page 214 Getting connected To play a audio file: 1. During playing an audio file, put on an optional headset. 2. Press the Menu soft key and select Switch to headset. You can listen to the audio clip via the headset. To converse with a person: 1.
-
Page 215: Modem Link
Getting connected Modem link Using Modem Link, you can set your phone to be used as an external modem for another device or computer when connected via the active IrDA port or USB port. 1. Make sure that your phone is not connected with another device. -
Page 216: Connecting To The Internet Or Your Network
Getting connected Connecting to the Internet or your network You can use the Data Connections settings to create dial- up, Virtual Private Network (VPN), GPRS, and proxy connections so that you can connect to the Internet or your corporate network. By using a data connection, you can ®... - Page 217 Getting connected 5. Enter the requested information. • Description: Enter a name for the connection. • Connects to: Select a network. • Phone number: Enter the dial-up number you use to connect to the network. • User name: Enter your network user name. •...
- Page 218 Getting connected Deleting a dial-up connection 1. On the Dial Up Connections screen, scroll to the connection you want to delete. 2. Press the Menu soft key and select Delete. 3. Press the Yes soft key. Working with VPN connections If your company has set up a virtual private network (VPN), you can create a VPN connection to gain access to your corporate network over an Internet connection.
- Page 219 Getting connected • User name: Enter your user name for the VPN. • Password: Enter your password. • Domain: Enter the domain name, if required. • IPSec authentication: If you selected IPSec/L2TP for VPN type, select the type of authentication: Pre- Shared Key or Certificate.
- Page 220 Getting connected Working with proxy connections You can use a proxy connection to gain access to the Internet over an existing connection to your corporate network. Creating proxy connection 1. On the Home screen, press the Start soft key. 2. Select Settings More Data Connections.
- Page 221 Getting connected Editing proxy connection 1. On the Proxy Connections screen, scroll to the connection you want to edit. 2. Press the Menu soft key and select Edit. 3. Edit the connection settings. 4. When you have finished, press the Done soft key. Deleting a proxy connection 1.
- Page 222 Getting connected 3. Press the Menu soft key and select Edit Connections GPRS Connections. 4. Press the Menu soft key and select Add. 5. Enter the requested information. • Description: Enter a name for the connection. • Connects to: Select the type of network to which you will connect.
- Page 223 Getting connected 3. Change the connection settings. 4. When you have finished, press the Done soft key. Deleting a GPRS connection 1. On the GPRS Connections screen, scroll to the connection you want to delete. 2. Press the Menu soft key and select Delete. 3.
- Page 224 Getting connected Adding a URL exception 1. On the Home screen, press the Start soft key. 2. Select Settings More Data Connections. 3. Press the Menu soft key and select Work URL Exceptions. 4. Press the Menu soft key and select Add. 5.
- Page 225 Getting connected Changing the Data connection options 1. On the Data Connections screen, press the Menu soft key and select Options. The following options are available: • Redial attempts: Select the redial attempt to connect the Internet or your network after an unsuccessful connection.
-
Page 226: Troubleshooting
Troubleshooting General problems Problem Description & Solution “Invalid or Check that the SIM card has been missing SIM correctly installed. card. Emergency call only” displays “No network • The network connection has been coverage,” “Error lost. You may be in a weak signal unable to area (in a tunnel or surrounded by connect. - Page 227 Troubleshooting Problem Description & Solution The display is not In direct sunlight, you may not see the clear display clearly. Moving to a place with different lighting should solve this problem. White lines This may happen if you turn on the appear on the phone after a long period of disuse, or display...
-
Page 228: Call Problems
Troubleshooting Problem Description & Solution “PUK code” The PIN code was entered incorrectly appears three times in succession and the phone is now blocked. Enter the PUK supplied by your service provider. I forgot the lock, If you forget or lose the lock code, PIN, contact your phone dealer. - Page 229 Troubleshooting Problem Description & Solution • Is your phone switched on ( correspondent pressed for more than one second)? cannot reach me • Check if your wireless connection to your mobile service provider is switched on and the signal from the network is unobstructed.
-
Page 230: Power And Charging Problems
• If the problem persists, clean the metal contacts on the battery and the phone. • If the actions above do not clear the problem, contact a Samsung service representative. The phone Remove the battery and then replace malfunctions or it. - Page 231 Troubleshooting Problem Description & Solution The battery’s • Batteries are subject to wear and standby time is tear. Standby time may grow shorter shorter than as time passes. expected • Leaving the fully charged battery in a cold or hot place for a long period of time may reduce battery life.
-
Page 232: Application Problems
Troubleshooting Problem Description & Solution The battery level • Remove the battery from the phone seem sufficient, and reinstall it. Then turn on the but the phone phone. does not turn on • Clean the metal contacts both on the battery and on the phone. - Page 233 Troubleshooting Problem Description & Solution Browser “No valid access Insert proper browser settings. point defined. Contact your service provider for Define one in instructions. Services settings.” displays The phone is • Check if you have set up and are unable to connected to an Internet service connect to the provider.
- Page 234 Troubleshooting Problem Description & Solution Contacts No number is • Check that a number has been dialled when you stored in the contact card. recall a contact • Re-store the number, if necessary. card Infrared Data does not • Line up the infrared ports of two transfer via an devices so that they are infrared...
- Page 235 Troubleshooting Problem Description & Solution I cannot find my • Check that both have activated friends Bluetooth. Bluetooth- • Check that the distance between the enabled device two devices is not over 10 metres or that there are no walls or other obstructions between the devices.
- Page 236 Troubleshooting Problem Description & Solution I cannot listen to • Ensure that you are connected to music on the the Bluetooth stereo headset remote through the Bluetooth stereo Bluetooth stereo application. headset • Ensure that the song that you are playing is one of the supported formats.
- Page 237 If the above guidelines do not help you to solve the problem, take note of: • the model and serial numbers of your phone • your warranty details • a clear description of the problem Then contact your local dealer or Samsung after-sales service.
-
Page 238: Regulatory Agency Identification Numbers
Health and Safety Information Exposure to Radio Frequency (RF) Signals Your wireless phone is a radio transmitter and receiver. It is designed and manufactured not to exceed the emission limits for exposure to radio frequency (RF) energy set by the Federal Communications Commission (FCC) of the U.S. -
Page 239: Sar Certification Information
FCC RF exposure guidelines when used with a actual SAR level of the phone while operating can be well Samsung-supplied or approved accessory designated for this below the maximum value. This is because the phone is product or when used with and accessory that contains no... -
Page 240: European Union Notice
● Use only Samsung-approved batteries and recharge your ● Get to know your wireless phone and its features, such as battery only with Samsung-approved chargers. When a speed dial and redial. -
Page 241: Important Safety Information
● Do not engage in stressful or emotional conversations that Electronic Devices may be distracting. Make the people to whom you are Most modern electronic equipment is shielded from radio talking aware that you are driving and suspend frequency (RF) signals. However, certain electronic equipment conversations that have the potential to divert your may not be shielded against the RF signals from your wireless attention from the road. -
Page 242: Safety Precautions For Power Supply Unit
Other Medical Devices Potentially Explosive Environments Switch your phone off when in any area with a potentially If you use any other personal medical devices, consult the explosive atmosphere and obey all signs and instructions. manufacturer of your device to determine if it is adequately Sparks in such areas could cause an explosion or fire resulting shielded from external RF energy. -
Page 243: Care And Maintenance
● To make an emergency call: For vehicles equipped with an air bag, remember that an air bag inflates with great force. Do not place objects, 1. If the phone is not on, switch it on. including both installed or portable wireless equipment in the area over the air bag or in the air bag deployment 2. - Page 244 ● Do not store the phone in cold areas. When the phone FCC Compliance Information warms up to its normal operating temperature, moisture This device complies with Part 15 of FCC Rules. Operation is can form inside the phone, which may damage the phone’s subject to the following two conditions: electronic circuit boards.
-
Page 245: Microsoft End User License Agreement
Body-worn operations are restricted to Samsung-supplied, for exposure to radio frequency (RF) energy set by the approved or none Samsung designated accessories that have Federal Communications Commission of the U.S. no metal and must provide at least 1.5cm separation between Government. - Page 246 Appendix B: Guide to Safe and Responsible But with wireless phone use, driving safely means a little Wireless Phone Use more. This brochure is a call to wireless phone users everywhere to make safety their first priority when behind the Cellular Telecommunications &...
-
Page 247: Description Of Other Rights And Limitations
4. Suspend conversations during hazardous driving 9. Use your wireless phone to help others in emergencies. conditions or situations. Let the person you are speaking Your wireless phone provides you a perfect opportunity to with know you are driving; if necessary, suspend the call be a “Good Samaritan”... - Page 248 Appendix C: Consumer Update on Wireless other researchers have had difficulty in reproducing those Phones studies, or in determining the reasons for inconsistent results. U.S. Food and Drug Administration 3. What is FDA’s role concerning the safety of wireless phones? 1.
- Page 249 ● Occupational Safety and Health Administration FDA and the Cellular Telecommunications & Internet Association (CTIA) have a formal Cooperative Research and ● National Telecommunications and Information Development Agreement (CRADA) to do research on wireless Administration phone safety. FDA provides the scientific oversight, obtaining ●...
- Page 250 6. What about children using wireless phones? 8. Do wireless phone accessories that claim to shield the head from RF radiation work? The scientific evidence does not show a danger to users of wireless phones, including children and teenagers. If you Since there are no known risks from exposure to RF emissions want to take steps to lower exposure to radio frequency from wireless phones, there is no reason to believe that...
- Page 251 FDA has tested hearing aids for interference from handheld Three large epidemiology studies have been published since wireless phones and helped develop a voluntary standard December 2000. Between them, the studies investigated any sponsored by the Institute of Electrical and Electronic possible association between the use of wireless phones and Engineers (IEEE).
- Page 252 (d) malfunctions resulting from the use of Product in conjunction with accessories, products, or ancillary/peripheral equipment not furnished or approved by SAMSUNG; (e) defects or damage from improper testing, operation, maintenance, installation, or adjustment; (f) installation, maintenance, and...
- Page 253 SAMSUNG MAKES NO WARRANTY OR REPRESENTATION AND or approved by SAMSUNG for charging the battery, (ii) any of THERE ARE NO CONDITIONS, EXPRESS OR IMPLIED, the seals on the battery are broken or show evidence of...
- Page 254 WARRANTY SHALL NOT EXTEND TO ANYONE OTHER THAN warranties by SAMSUNG and should not be relied upon. THE ORIGINAL PURCHASER OF THIS PRODUCT AND STATES PURCHASER’S EXCLUSIVE REMEDY. IF ANY PORTION OF Samsung Telecommunications America, L.P.
- Page 255 8. Bluetooth...
Need help?
Do you have a question about the SGH-i300 and is the answer not in the manual?
Questions and answers