
Related Manuals for Cardio Theater xTV863


Summary of Contents for Cardio Theater xTV863
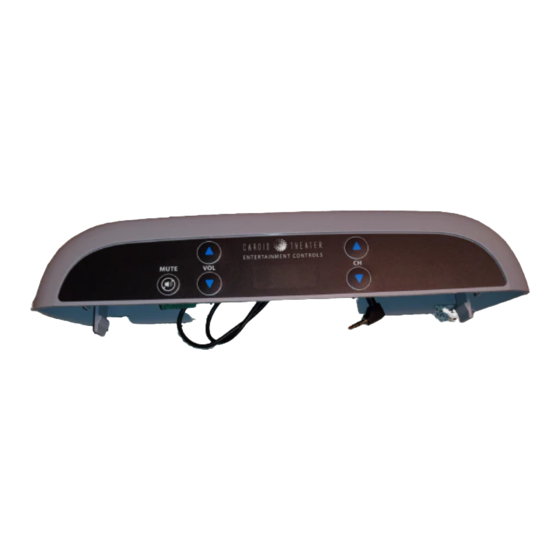
- Page 1 Cardio Theater xTV863 Receivers Installation and Maintenance Guide ™ E N T E R TA I N M E N T C O N T R O L S MUTE ®...
-
Page 3: Important Safety Instructions
Important Safety Instructions Regulatory Information Always follow basic safety precautions when using this This product is compliant to: equipment to reduce the chance of injury, fire, or damage. • 89/336/EEC Electromagnetic Compatibility Directive. • Read all instructions in this guide before installing and using •... -
Page 4: Table Of Contents
Programming Each Receiver ..........15 Regulatory Information ..............1 Automatic Programming .............15 Manually Programming a Receiver ...........16 Before You Begin ..............3 About the xTV863 Receiver ............4 Maintenance and Troubleshooting ........18 Installation Requirements .............. 4 Cleaning Receivers ..............18 Obtaining Service ................5 Checking Standalone Receivers ..........18... -
Page 5: Before You Begin
An xTV wireless system consists of one or more xTV-8T Transmitters, mute one for each TV and audio component, and a number of xTV863 Mute button allows receivers installed on exercise equipment throughout the room. you to quickly quiet... -
Page 6: About The Xtv863 Receiver
• Receiver channels are programmed during installation and will correspond to the TV and audio options available. The receiver The xTV863 receiver supports many channels of high-fidelity sound. automatically acquires the available channels from the installed Use of the receiver is intuitive; people can typically begin using the transmitters and assigns them to channel numbers, starting with receiver with little or no training. -
Page 7: Obtaining Service
Obtaining Service Do not attempt to service the Cardio Theater xTV863 Receiver, except as explained in this guide. For information about product operation or service, refer to the Cardio Theater web site at www.cardiotheater.com or contact an authorised dealer. For... -
Page 8: Install Standalone Receivers On Exercise Equipment
CSAFE power cable to power the receiver to simplify installation. If any items are missing, contact the dealer from whom you purchased the unit or contact Cardio Theater Technical Support. Required Tools Obtain these tools before assembly: • Tool to cut the wire ties •... -
Page 9: Installing The Standalone Receiver
Installing the Standalone Receiver 4. Attach the neoprene mounting pad to the desired location on the handlebar. See Figure 3. 1. Identify the equipment on which you plan to attach the receivers. You can attach receivers to almost any exercise equipment. 2. - Page 10 CSAFE power cable connected to the exercise equipment. Only exercise equipment that is Cardio Theater ready can use CSAFE power cables; you may need different power cables for different types of exercise equipment. If you have any questions about powering your receivers, contact Cardio Theater Technical Support.
-
Page 11: Install Integrated Receivers On Display Consoles
EFX or Cycle • These instructions If any items are missing, contact the dealer from which you purchased the unit or contact Cardio Theater Technical Support. Figure 5: Remove back console plate Installation and Maintenance Guide: Install Integrated Receivers on Display Consoles... - Page 12 2. Remove the entertainment option cover. See Figure 6. Tabs exist on either side of the cover. Press in on the tabs and the cover pops off. You can discard the entertainment option cover. Figure 7: Separate display console face 5.
-
Page 13: Installing The Integrated Receiver On A Treadmill
Installing the Integrated Receiver 9. Feed the audio cable through the base of the display console and attach it to the headphone jack. See Figure 8. on a Treadmill 1. Turn OFF the Precor treadmill and unplug it. The ON/OFF (I/O) switch is located on the front of the treadmill beneath the hood overhang. - Page 14 4. To remove the display console back cover, pull in on one side as 6. At the base of the display console back cover, remove the break you pull the cover down toward the floor. This should flex the away piece to allow room for the audio cable. Use a flathead cover and enable you to slide it past the fasteners on the upright screwdriver to push the piece out of the display console back support.
- Page 15 8. Hold the integrated receiver above the display console, and feed 12. Feed the audio cable through the break out in the display the stereo plug (audio cable) through the opening in the base of console cover. the display console. Let the audio cable hang loose. See Figure 15.
- Page 16 15. Use a crosshead screwdriver to reattach the display console back cover with the nine fasteners removed in step 3. 16. Attach the stereo plug to the headphone jack. Figure 18: Attach stereo plug 17. Insert the headphone jack into the base of the display console. Snap the headphone jack into place by positioning the rear tab first, and then applying pressure to the base.
-
Page 17: Programming Each Receiver
This section explains how to use the automatic programming Automatic Programming process to set up xTV863 receivers. During automatic programming, 1. Make sure all transmitters are properly installed and plugged in. the receiver acquires the available channels from the installed Important: Transmitters must not share the same channel, transmitters, and assigns them to channel numbers. -
Page 18: Manually Programming A Receiver
5. If necessary, use the Channel ▲ and ▼ buttons to select the Manually Programming a Receiver appropriate program mode. Most facilities use xTV program The receiver automatically searches the area for available channels mode -1. during automatic programming. Sometimes, however, the automatic 6. - Page 19 Table 2: Example during manual programming appropriate program mode for your site. Refer to Table 1 earlier Receiver Assigns to for a list of program modes. Most facilities use -1 Cardio Theater Transmitter Receiver Shows in Number that People Use to...
-
Page 20: Maintenance And Troubleshooting
However, you may find the troubleshooting information in Cardio Theater Technical Support. this section useful for solving the odd problem. Table 3: How to solve most problems with receivers... -
Page 21: Replacing The Headphone Jack On A Standalone Receiver
The standalone receiver is designed to make changing the Problem What to Do headphone jack a quick and easy job, one easily done at the facility. No sound on a Single receiver Make sure the display is on; the power You will need a crosshead screwdriver to replace the headphone channel cable may be disconnected. -
Page 22: Replacing The Headphone Cover On An Integrated Receiver
Replacing the Headphone Cover on an 4. Remove the headphone jack. Integrated Receiver 5. Insert a new headphone jack. Insert the two screws and tighten. 6. If needed to re-attach the receiver, insert two wire ties through When someone experiences no audio or poor audio quality (such as the holes in the mounting bracket on the back of the receiver. - Page 23 3. Slide the stereo plug on the audio cable into the new headphone jack. 4. Replace the headphone jack into place under the display console. Line up the back tab with the back slot, feed the audio cable inside the console, and then snap the two side tabs into the two side slots.
-
Page 24: Limited Warranty
Precor’s obligations under this warranty are limited as set forth below. the following: labels. 3. Repairs performed on Cardio Theater products missing a serial number or with a serial Warranty Periods and Coverage. tag that has been altered or defaced. - Page 25 Disclaimer and Release. EXCLUSION OF CONSEQUENTIAL AND INCIDENTAL The warranties provided herein are the exclusive warranties given by Precor and supersede DAMAGES. any prior, contrary or additional representations, whether oral or written. ANY IMPLIED PRECOR AND/OR ITS SUPPLIERS SHALL HAVE NO OBLIGATION OR LIABILITY, WARRANTIES, INCLUDING THE WARRANTY OF MERCHANTABILITY OR FITNESS WHETHER ARISING IN CONTRACT (INCLUDING WARRANTY), TORT (INCLUDING FOR A PARTICULAR PURPOSE THAT APPLY TO ANY PARTS DESCRIBED ABOVE...
- Page 26 Notes: Installation and Maintenance Guide: Notes...
- Page 28 Cardio Theater is a registered trademark, and Cardio Theater PVS and Cardio Theater Quick Change Headphone Jack are trademarks of Precor Incorporated. ® www.cardiotheater.com xTV863R IMG CX30402-102 A Division of Precor Incorporated NOTICE: Warranty Statement CX30037-102 20031 142nd Ave NE...
Need help?
Do you have a question about the xTV863 and is the answer not in the manual?
Questions and answers