
Related Manuals for Candela MGentleLASE


Summary of Contents for Candela MGentleLASE
- Page 1 Candela Corporation MGentleLASE Installation Procedure MGentleLASE Installation Procedure 8503-01-0821, Revision A Candela Corporation Proprietary Page 1 of 8...
- Page 2 MGentleLASE Installation Procedure Candela Corporation Page 2 of 8 Candela Corporation Proprietary 8503-01-0821, Revision A...
- Page 3 Candela Corporation MGentleLASE PLUS Installation Procedure WARNING FOLLOW THE INSTALLAT ION STEPS IN SEQUENCE TO ELIMINATE ANY POSSIBLE DAMAGE TO THE SYSTEM. Equipment Needed: • Adjustable Wrench • 2.5 Liters of Distilled Water Laser System Unpacking 1. Using the adjustable wrench, remove the front of the crate. Keep the front nearby to use as a ramp to roll the laser system from the crate.
- Page 4 5. The fluid lines within the laser must now be filled with water. To do this, turn the system on for 2 minutes. Then repeat steps 1-3 until the water level inside the reservoir remains at within ½ to 1 inch of top of reservoir. Page 4 of 8 Candela Corporation Proprietary 8503-01-0821, Revision A...
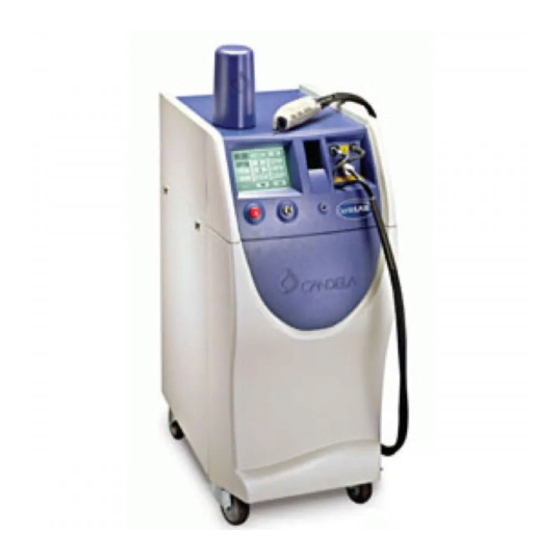
- Page 5 Candela Corporation MGentleLASE PLUS Installation Procedure Initial Cryogen Canister Installation Figure 1 Canister and Delivery System Locations Valve Calibration Control Port Receptacle Cryogen Line Receptacle Display Panel Fiberoptic Receptacle Laser Stop Switch Ready Lamp 1. Remove the DCD cryogen canister from the packaging box. Be sure to read all labels on the canister before installing into the system.
- Page 6 4. Connect the cryogen output connector to the cryogen output receptacle on the front of the laser system as follows: Using both hands, push the knurled connector on the front of the laser system away from you while gently pushing the Page 6 of 8 Candela Corporation Proprietary 8503-01-0821, Revision A...
- Page 7 Candela Corporation MGentleLASE PLUS Installation Procedure mating connector into the knurled connector until it stops. Release the knurled connector. Distance Gauge Installation Refer to figure 2 above for distance gauge location. Note The distance gauge must be removed before performing the calibration procedure.
- Page 8 Furthermore, if the system is allowed to get out of control when being moved, personal injury or physical damage could result. If it becomes necessary to relocate the GentleLASE PLUS, call Candela or the distributor for details. Failure to do so may result in damage to the system, and may void any warranty.
Need help?
Do you have a question about the MGentleLASE and is the answer not in the manual?
Questions and answers