
Subscribe to Our Youtube Channel
Related Manuals for JWA ALCOY 68425


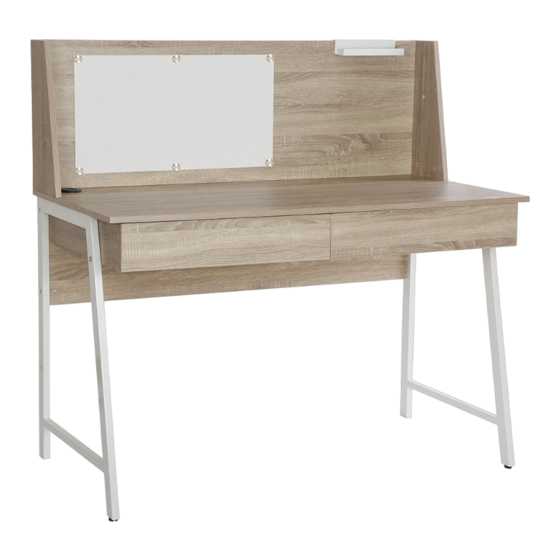
Summary of Contents for JWA ALCOY 68425
- Page 1 ASSEMBLY INSTRUCTION ALCOY DESK ITEM CODE 68425 Imported by JWA Furniture Pty Ltd, Qld, Brisbane Australia. For any assistance with assembly or for missing parts please refer to your receipt...
-
Page 2: Before You Start
PRE-ASSEMBLY PREPARATION Before you start: 1.Choose a clean, level, spacious assembly area. Avoid hard surfaces that may damage the product 2.Take care when lifting. Product should be assembled as near as possible to the point of 3.Ensure that you have all required contents for complete assembly 4.Always read the assembly instructions carefully before beginning assembly. -
Page 3: Parts List
PARTS LIST Desktop panel Left side panel Right side panel Middle panel Back panel Back panel Left side panel Right side panel Drawer left side panel Drawer right side panel Drawer left side panel Drawer right side panel Drawer back panel Drawer bottom panel Main metal frame Connection pipe... - Page 5 STEP 1: Load fitting J into the bottom of metal frame P1. STEP 2: Press the plastic clasp in the fitting E2 and disassemble E1 and E2.
- Page 6 STEP 3: Use fitting F to fix E1 on the orifice position of panel 2 and panel 3 respectively. STEP 4: Fix E1 on the front and back side of panel 4 with fitting F.
- Page 7 STEP 5: Fix panel 2, 3, 4 and panel 5 on panel 1 with fittings A and D, pay attention to the direction of the panel. STEP 6: Pass through the matching hole of panel 5 with fitting C, and fix panel 2, 3 and 4 on panel 5.
- Page 8 STEP 7: Fix the metal frame P1 on panel 1 with fitting B, and fix the metal frame P1 on panel 5 with fitting C. STEP 8: Pass through the metal frame P1 with fitting B, fix the metal pipe P2 on panel 2 and panel 3, and fix the middle part on the bottom of panel 4 with fitting C.
- Page 9 STEP 9: Connect panel 7, 8 and 6 with fitting A STEP 10: Fix the assembled panel components of 6, 7, 8 on panel with fitting A.
- Page 10 STEP 11: Use fitting F to fix metal plates G1 and P3 of accessories on the positioning guide hole of panel6, and finally cover with G2 decorative cover. STEP 12: 1) Fix panel 11 and panel 12 on panel 13 with fitting C; 2) The wood grain of panel 14 shall be faced up, and corresponding slots of panel 11 and panel 12 shall be loaded;...
- Page 11 STEP 13: Fix E2 on panel 11 and panel 12 with fitting F STEP 14: Load the assembled drawer 9 assembly and drawer 10 assembly into the corresponding position of the main body.
- Page 12 STEP 15: Load fittings H and I into corresponding parts respectively. Install a fall preventer. ASSEMBLY IS COMPLETE...
- Page 13 SAFETY BRACKETS INSTRUCTIONS 1. Attach one Mounting Plate to the wall with the Large Screws. Make sure to attach the Mounting Plate into a stud. If mounting into brick or masonry you will need to acquire wall anchors. 2. Attach the second Mounting Plate to the furniture frame with the Short Screws.
- Page 14 To protect your furniture, we suggest the following: • Avoid placing your furniture in direct sunlight. • Do not place furniture directly under windows. • Do not place sharp materials (knife, fork, etc.) directly onto your furniture as sharp material may scrape and damage the finish.
Need help?
Do you have a question about the ALCOY 68425 and is the answer not in the manual?
Questions and answers