Table of Contents
Advertisement
FLOOR STEAM CLEANER
WITH ULTRA DRY STEAM
FLOOR STEAM CLEANER
FLOOR STEAM CLEANER
WITH ULTRA DRY STEAM
WITH ULTRA DRY STEAM
Floor Steam Cleaner with Frontal Steam Jet
Floor Steam Cleaner with Frontal Steam Jet
Floor Steam Cleaner with Frontal Steam Jet
Before using this product, please read the instructions and keep it for future references
Before using this product, please read the instructions and keep it for future references
CUSTOMER SERVICE:
Before using this product, please read the instructions and keep it for future references
1800 663 866 (AUS) 0800 666 783 (NZ)
CUSTOMER SERVICE:
1800 663 866 (AUS) 0800 666 783 (NZ)
INSTRUCTION MANUAL
INSTRUCTION MANUAL
INSTRUCTION MANUAL
M2R
M2R
Model #: SC1Z1 AUS, NZ
Model #: SC1Z1 AUS, NZ
Advertisement
Table of Contents

Related Manuals for Euroflex vapour M2R


Summary of Contents for Euroflex vapour M2R
- Page 1 FLOOR STEAM CLEANER WITH ULTRA DRY STEAM FLOOR STEAM CLEANER FLOOR STEAM CLEANER WITH ULTRA DRY STEAM WITH ULTRA DRY STEAM Floor Steam Cleaner with Frontal Steam Jet Floor Steam Cleaner with Frontal Steam Jet INSTRUCTION MANUAL Floor Steam Cleaner with Frontal Steam Jet INSTRUCTION MANUAL Before using this product, please read the instructions and keep it for future references INSTRUCTION MANUAL...
-
Page 2: Safety Warning
I M P O R T A N T S A F IMPORTANT: SAVE THESE INSTRUCTIONS SAFETY WARNING • This appliance is not intended for use by persons (including children) with reduced physical, sensory, mental capabilities or lack of experience and knowledge unless they have been instructed to do so by a person responsible for their safety. - Page 3 E T Y I N S T R U C T I O N • Disconnect the appliance from the electrical outlet prior to any maintenance or cleaning operations. Always allow the appliance to completely cool down. • Do not leave the appliance unattended while it is connected to the electrical outlet.
- Page 4 I M P O R T A N T S A F ATTENTION! This appliance is equipped with a 3-prong grounded power cord. Insert only into a 3-prong grounded electrical outlet. Do not try to remove the contacts of the grounded connection. •...
-
Page 5: Correct Disposal Of This Product
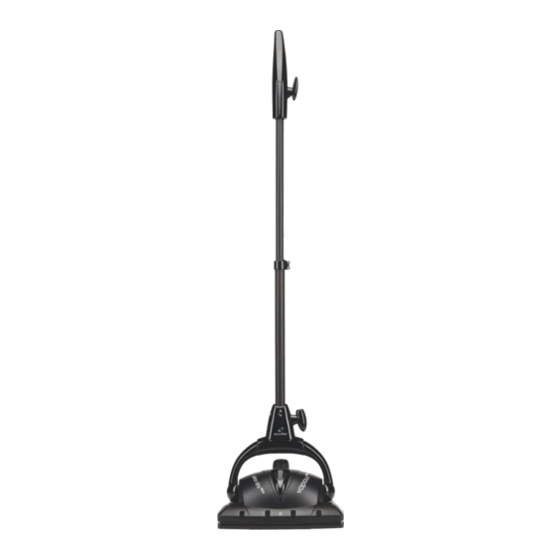
E T Y I N S T R U C T I O N CAUTIONS • Care should be taken when removing the hot Boiler Cap, to ensure it is not within children’s reach. • Extreme care should be taken when opening the Boiler Cap as it may become hot during use and escaping steam can cause scalding. - Page 6 1 - Cord Wrap 2 - Handle 3 - Metal Extension Tube 4 - Locking Clamp 5 - Filling Bottle 6 - Boiler Cap 7 - Steam Ready Indicator Light (green) 8 - Power Indicator Light (orange) 9 - Power Cord 10 - Steam Jets 11 - Carpet Microfiber Pad 12 - Microfiber Floor Pads (2)
-
Page 7: Information Labels
INFORMATION LABELS Please read the warning labels and printed instructions on the steam cleaner for proper operation. Refer to the illustration below for the location of the warning labels and printed instructions. EXTEND HANDLE COMPLETELY TO ENSURE STEAM RELEASE REMOVE THIS SCREW FOR ASSEMBLY AND USE IT TO LOCK THE HANDLE ON THE UNIT IMPORTANT... -
Page 8: Assemble Handle
Assembly of Parts & Preparation of Steamer ASSEMBLY OF PARTS & PREPARATION OF STEAM CLEANER Make sure all parts are in the box (see pg 4). Make sure all parts are in the box (see pg 6). IMPORTANT: FOLLOW THESE INSTRUCTIONS CAREFULLY! IMPORTANT: FOLLOW THESE INSTRUCTIONS CAREFULLY! A. - Page 9 B. ATTACH HANDLE ASSEMBLY TO STEAM CLEANER • Before starting, remove the self-tapping screw from the bottom of Extension Tube. • Insert the Handle Assembly into the Steam Cleaner Base. Align Arrow on ExtensionTube with Arrow on Base (as shown in Fig. A). •...
- Page 10 C. Attach Cleaning Pads to Steamer C. ATTACH MICROFIBER PAD TO STEAM CLEANER C. Attach Cleaning Pads to Steamer WARNING: WARNINGS! To prevent floor damage, ALWAYS attach either the Scrubbing Floor Pad or the Carpet Glide Accessory with Carpet Pad WARNING: Microfiber Pad or the Carpet Glider with Carpet Pad when using when using your Floor Steamer.
- Page 11 D. FILLING BOILER WITH WATER WARNINGS: • Carefully read all instructions before removing Boiler Cap. • Always unplug appliance before filling the Boiler IMPORTANT Use ordinary tap water. Demineralized or distilled water is recommended if tap water is too hard. DO NOT add detergents, perfumes, oils, or other chemical substances to the Boiler.
- Page 12 Using Your Floor Steamer Using Your Floor Steamer USING THE STEAM CLEANER Using Your Floor Steamer A. Using the Parking Pad A. Using the Parking Pad A. PARKING PAD You can use the Parking Pad if the Steamer is warm or hot. You can use the Parking Pad if the Steamer is warm or hot.
- Page 13 C. Using Steam (continued) C. USING STEAM (continued) • To emit steam from the Steam • To emit steam from the Front Jets, Nozzles, pull the trigger on pull the trigger on the handle the Handle upward. upward. *IMPORTANT* The Steam Nozzles are meant to be used in steam “bursts”...
- Page 14 • Unplug the appliance from the electrical outlet. • Place Handle in the “ON” position to release any residual steam and pressure from the Boiler. • Slowly turn Boiler Cap counterclockwise. This will allow remaining steam to slowly escape. • Make sure Steam Cleaner has cooled 5 minutes before refilling with water.
-
Page 15: Maintenance Instructions
MAINTENANCE INSTRUCTIONS We recommend you periodically clean the Steam Cleaner to prevent the accumulation of calcium, mineral deposits, and other sediment caused by the use of tap water. After every 10-15 refills, fill the Boiler three- quarters full of hot tap water, shake several times and empty out the water into a sink. -
Page 16: Maintenance
MICROFIBER PAD CARE & CLEANING Your Microfiber Pads are designed for hundreds of uses. Clean Pads regularly, either by hand (using mild soap and warm water) or in your washing machine on a delicate cycle, cool water. Never use fabric softener or bleach. -
Page 17: Troubleshooting
TROUBLESHOOTING ISSUES POSSIBLE CAUSES SOLUTIONS Steam is not coming out Improper Handle Assembly Call Customer Service to receive instructions to correct of the Steam Nozzles the problem The Hard Surface Floor Not enough pressure was Position Steam Cleaner about 2” above Pad and FIRM- Pad is not adhering to applied when attaching Pad LY press it down onto the Pad... - Page 18 Euroflex USA 5940 S Rainbow Blvd., #400 PMB 91217 Las Vegas, Nevada 89118-2507 Email: hello@euroflexproducts.com Website: euroflexproducts.com 01/2022...
Need help?
Do you have a question about the vapour M2R and is the answer not in the manual?
Questions and answers