Advertisement
Quick Links
Advertisement

Related Manuals for Lionel 153IR


Summary of Contents for Lionel 153IR
- Page 1 71-4111-250 3/15 #153IR Controller #153IR Controller Owner’s Manual Owner’s Manual...
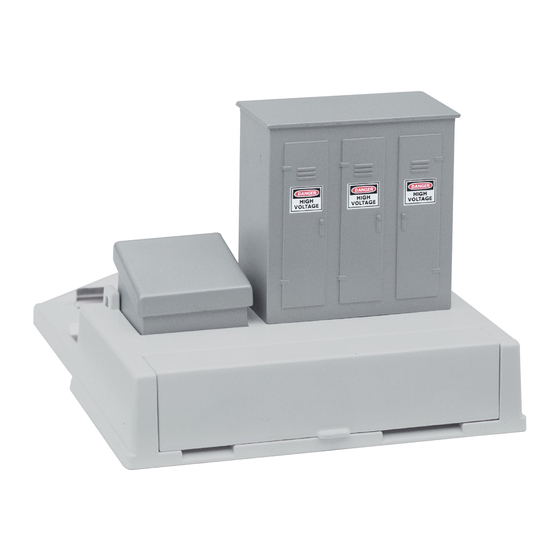
- Page 2 Lionel 153IR Controller. Place this device on any Lionel O or O-27 gauge three-rail layout to activate any track side accessory. The 153IR Controller uses an infrared beam to detect passing trains, cueing the device to activate your signals and accessories.
- Page 3 Powering the 153IR and the accessory from the track You can power the 153IR and the accessory from the track. To accomplish this use the two wires with Fastrack compatible terminals to connect the wires to the underside of any Fastrack straight or full curve section.
- Page 4 Installing and powering your 153IR Controller continued If you are using tubular track, simply cut off the slide on terminals and strip the wires back. Connect the black wire with the white tracer to a Universal Lockon (6-24213) for the center rail. Connect the solid black wire to the outside rail.
- Page 5 Installing and powering your 153IR Controller continued If you chose to power your 153IR using method 1 above, open the long hatch on the back side of the 153IR base and move the switch to the “Track Power” position. (If the switch is not in the track power position the 153IR will not function, providing it is powered from the track).
- Page 6 Figure 4. 153IR connected to a transformer Set the input voltage to the 153IR Controller to 12-14 VAC (you can increase this input voltage if the accessory you have it connected to requires more power than 12 to 14 Volts).
- Page 7 If you chose to power your 153IR using an auxilary AC power transformer, open the long hatch on the back side of the 153IR base and move the switch to the “Aux Power” position. (If the switch is not in the aux power position the 153IR will not function, providing it is powered from an accessory transformer).
- Page 8 “ACC PWR”, “ACC GND”, “NO” and “NC”. NO is “Normally Open” and is not powered until the 153IR detects a train. NC is Normally Closed and is powered until the 153IR detects a train. When the 153IR detects a train the NC output turns off and the NO output turns on.
- Page 9 Wiring accessories with your 153IR controller continued Table 1 provides the basic wiring for various accessories (lamps, sounds, animation, etc.). Some accessories feature only one animation such as a light that turns on and off. Other accessories feature two animations such as a light and some type of motion (a gateman figure for instance).
- Page 10 153IR to activate the accessory before the train arrives. For example, if your train is moving from left to right (in figure 7 below), position the 153IR to the left side of the accessory so that the train triggers the activation before the train arrives where the accessory is placed.
- Page 11 153IR. Adjusting the duration Use the “TIME” dial located under the battery box hatch on top of the 153IR base (refer to fig- ure 9) to set the length of time that the 153IR Controller remains activated. Begin by turning the “TIME”...
- Page 12 Use the “SENSITIVITY” dial if the 153IR Controller does not properly detect your locomotive and/or rolling stock. Dark colored finishes may not be detected by the 153IR without adjusting the sensitivity. To remedy this problem; you can adjust the “SENSITIVITY” dial located under the battery box.
- Page 13 Accessory wiring examples Wiring efer to the following diagrams as you wire your accessories. The section entitled accessories with your 153IR controller explains these connections. NO NC GATE 1 Black GATE 2 Figure 10. Crossing Gates (6-12714) NO NC Black Figure 11.
- Page 14 Accessory wiring examples continued NO NC BLACK GREEN (OR YELLOW) Figure 12. Automatic Crossing Gate (6-12714); Mainline Automatic Crossing Gate (6-22947); Automatic Operating Semaphore (6-12727); Railroad Crossing Flasher (6-12888); Mainline Automatic Operating Semaphore (6-22944); Automatic Crossing Gate and Signal (6-62162); Banjo Signal (6-12709), Dwarf Signal (2014;...
- Page 15 Accessory wiring examples continued NO NC SPRING CLIP FOR GREEN LAMP SPRING CLIP FOR COMMON/GROUND SPRING CLIP FOR RED LAMP Figure 14. Single Signal Bridge (6-12894); Mainline Cantilever Signal (6-22931) NO NC Figure 15. Whistle Shack (6-12737 & 6-12903 Diesel Horn Variant)
- Page 16 Accessory wiring examples continued NO NC Figure 16. Automatic Gateman (6-12713) NO NC Figure 17. Animated Maiden Rescue(6-32919)
- Page 17 Accessory wiring examples continued NO NC Transformer Blue White Yellow Black Figure 18. Mainline Auto Crossing Gate (pre-2015 Production; 6-14098)
- Page 18 Accessory wiring examples continued NO NC Yellow Black Figure 19. Mainline Auto Crossing Gate (2015 Production; 6-14098)
- Page 19 Notes...
- Page 20 (this warranty is non-transferrable) to Lionel LLC or any Lionel Authorized Service Station MUST be accompanied by the original receipt for purchase (or copy) from an Authorized Lionel Retailer*, will at the discretion of Lionel LLC, be repaired or replaced, without charge for parts or labor. In the event the defective product cannot be repaired, and a suitable replacement is not available, Lionel will offer to replace the product with a comparable model (determined by Lionel LLC), if available.
Need help?
Do you have a question about the 153IR and is the answer not in the manual?
Questions and answers