
Related Manuals for BE Ag & Industrial BE-AGF Series


Summary of Contents for BE Ag & Industrial BE-AGF Series
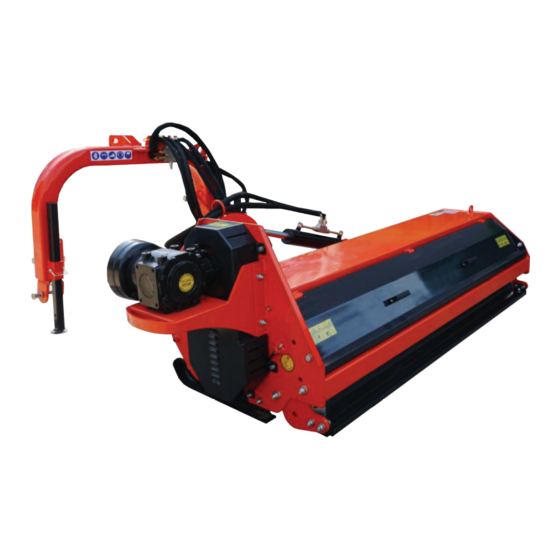
- Page 1 BE-AGFxxx Flail Mower Operations & Parts Manual For Models: • BE-AGF140 • BE-AGF200 Purchase Date Model No. Serial No. Dealer...
- Page 2 INTRODUCTION BE-AGFxxx The AG Flails are primarily designed to mow grass, weeds and light brush. The mowers are assembled for operation with 1000 RPM tractor input only (rated PTO up to 45 HP), and supplied standard with Cat. 1 lift pins for tractor attachment. The mowers can fit Cat.
-
Page 3: Safety Labels
SAFETY LABELS BE-AGFxxx The safety labels and the information on the machine, listed in the following table, must be necessarily and respected; failure to follow these warnings can cause death or severe injuries. Make sure that the labels are always present and legible, should this not be the case, contact your local dealer to replace the missing or illegible ones. - Page 4 SAFETY LABELS BE-AGFxxx 10. DANGER of crash for the legs. Keep proper distance. 11. DANGER of squashing / shearing of the hands. 12. WARNING Hot surface. Keep the proper distance. 13. WARNING Do not remove or open the protection carters until the belts are completely still.
-
Page 5: Allowed Use
SAFETY BE-AGFxxx ALLOWED USE: AG flail mowers, as described in this instruction and maintenance booklet, have been specifically designed to mow grass, weeds and light brush up to 1” diameter. Any other use jeopardizes the operator’s safety and the machine integrity. IMPROPER USE: The mower was designed to mow grass, weeds and light brush only. -
Page 6: Operator's Requirements
SAFETY BE-AGFxxx OPERATOR’S REQUIREMENTS: Physical: Good eyesight, coordination and capability of carrying out all functions required for the machine’s use. Mental: Capability of understanding and applying the established rules and safety precautions. Users must pay attention and be sensible for their own and other people’s safety. Training: Users must have read and studied this manual, its eventual enclosed graphs and schemes and its identification and danger plates. -
Page 7: General Safety Rules
SAFETY BE-AGFxxx GENERAL SAFETY RULES ALWAYS CONSIDER THE FEATURES OF THE AREA WHERE WORK IS TAKING PLACE: • When the equipment is running, it is forbidden to stand within the field of action of the shredder or of the other accessories of which it is provided with. PREPARE THE WORK: •... -
Page 8: Attachment To The Tractor
SET UP BE-AGFxxx ATTACHMENT TO THE TRACTOR Before operating the mower, carefully read this Operator’s manual, completely understand the safety instructions, and know how to operate correctly both the tractor and the PTO shaft, reading carefully the instruction manuals of the tractor and PTO shaft manufacturers. All AG flail mowers have been manufacturers to be attached to any tractor provided with hydraulic and universal 3-point hitch. - Page 9 SET UP (CONT.) BE-AGFxxx Adjust the third point so that the upper part of the frame is parallel to the ground. Lock all connection parts with the special sway chains or tie rods. It is always good to make sure that the central gearbox axis is parallel to the ground thus reducing the stresses on the power takeo and extending the working life of the equipment.
-
Page 10: Driveline Attachment
SET UP (CONT.) BE-AGFxxx DRIVELINE ATTACHMENT Before assembling the PTO Shaft, check out that its RPM and direction of rotation match those of the tractor. Moreover, read carefully the instruction manuals of the PTO shaft and the tractor manufacturers/ Before starting work, make sure all safety shields are in place. -
Page 11: Working Height Adjustment
SET UP (CONT.) BE-AGFxxx WORKING HEIGHT ADJUSTMENT The machine’s working height is determined by the position of the rear roller. Lifting the roller the cutter gets close to the soil, whereas lowering it the cutters get far from it. After a modification of the working height be sure that the cutters skim ground;... - Page 12 SET UP (CONT.) BE-AGFxxx WORKING HEIGHT ADJUSTMENT Loosen the Screw A & B that locks the support shaft and loosen the counter nut C. Loosen the screws that lock the gear box on the mounting plate D. Adjust the drive belt tension. The correct belt tension is achieved when the belt can be deflected by the belt thickness about 10mm at the center point between the pulley's.
-
Page 13: Transport And Storage
TRANSPORT & STORAGE BE-AGFxxx WORKING SPEED The working speed depends on quality, diameter and height of the material to be cut; anyway, for the e cient mower performance it must be between 2 and 5 MPH. The power takeo speed must be 1000 RPM maximum. Operate the mower at its full rated PTO speed to maintain blade speed for a clean cut. -
Page 14: Maintenance
MAINTENANCE BE-AGFxxx Maintenance is a fundamental operation to extend life and performances of any agricultural vehicle; taking care of the machine grants you not only a good work execution, but also a longer life of the whole equipment and a greater safety on the workplace. The operating times indicated in this manual have just an informative character and are refereed to normal conditions of use;... -
Page 15: Maintenance Checklist
MAINTENANCE CHECKLIST BE-AGFxxx FIRST CHECK • Check the correct tension of the driving belt. • Check that all bolts and nuts are tightened. • After the first 50 hours of work, change oil in the gearbox. EVERY 8 HOURS OF WORK •... -
Page 16: Pto Shaft Maintenance
PTO SHAFT MAINTENANCE CHECKLIST BE-AGFxxx MAINTENANCE CHECKLIST 8HRS/Daily 50HRS/Weekly Annually Lubricate PTO Shaft Lubricate Caster Wheels Lubricate Blade Spindle Check Gear Box Oil Level Clean Machine Lubricate & Clean PTO Shaft Cover PTO SHAFT MAINTENANCE The PTO shaft is designed to telescope to allow for dimensional changes as the machine goes through its operating range. -
Page 17: Parts Drawing
PARTS DRAWING BE-AGFxxx BE-AGF FRAME ASSEMBLY... -
Page 18: The Frame Assembly
THE FRAME ASSEMBLY BE-AGFxxx REF NO. SYS. CODE PART NO. DESCRIPTION 503010763 DIN985-M12 M12 Nut 506010057 GB97.1-12 12 Washer 801240019 EFGC120.013 Left Skid 501011126 GB5783-M12X30 M12x30 Bolt 809450001 EFAGF140.015J (140 Model) (L=1402) Cover 809530001 EFAGF160.015J (160 Model) (L=1602) Cover 809460001 EFAGF180.015J (180 Model) (L=1602) Cover 802480092... - Page 19 THE FRAME ASSEMBLY BE-AGFxxx REF NO. SYS. CODE PART NO. DESCRIPTION 702480123 EFAG140.107 Small Pulley 514010004 17X1300 B1300 Belt 702480122 EFAG140.106 Small Plate 501011905 GB5786-M16X50 M16x1.5x50 Bolt 503010137 GB6173-M16X1.5 M16x1.5 Bolt 508011473 GB879.1-4X25 4x22 Pin 40-1 702480118 EFAG140.101 (140 Model) Shaft for Fender 40-2 702490002 EFAG160.101...
- Page 20 THE SWAY FRAME ASSEMBLY BE-AGFxxx...
- Page 21 THE FRAME ASSEMBLY BE-AGFxxx REF NO. SYS. CODE PART NO. DESCRIPTION 802680079 EFAGF140.018 Swing Arm 506010037 GB96.1-12 12 Washer 802680008 EFAGF140.011 Brace 703140001 MFP120.00.101 Rubber Cover 800920101 EF100.00.111A D Pin 802680092 EFAGF140.021 Cylinder 510015240 JB982-16 16 Bronze Washer 702680119 EFAGF140.020A Oil Pipe 503010137 GB6173-M16X1.5...
- Page 22 THE SWAY FRAME ASSEMBLY BE-AGFxxx REF NO. SYS. CODE PART NO. DESCRIPTION 503010765 DIN985-M16 M16 Nut 506030039 GB93-16 16 Washer 702480120 EFAG140.103 Hammer 501010784 GB5782-M16X100 M16x100 Bolt GB13871-FB- 510020426 45x80x10 Oil Seal 45X80X10 511024244 GB281-1308 Bearing 1308 506060195 GB893.1-90 90 Circlip GB1387-FB- 510020445 40x90x10 Oil Seal...
- Page 23 THE SWAY FRAME ASSEMBLY BE-AGFxxx REF NO. SYS. CODE PART NO. DESCRIPTION 800920138 EF100.00.019A 702680118 EFAGF140.022A (L=2000) Oil Pipe 802710112 HM-ZYF-0 Over Loading Valve Set 702680133 EFAGF140.023J (L=3600) Oil Pipe 706590117 FV10-10/2-G3/8 3/8 Flow Valve QUICK-COUPLING- 703820055 G1/2 Connector G1/2-G 702680116 EFAGF140.023A (L=3600) Oil Pipe...