
Subscribe to Our Youtube Channel
Related Manuals for OPTIKA MICROSCOPES XZ-2


Summary of Contents for OPTIKA MICROSCOPES XZ-2
- Page 1 Ver. 3.0.0 XZ-2 OPERATION MANUAL GUIDA UTENTE MANUAL DE INSTRUCCIONES OPTIKA MICROSCOPES - ITALY www.optikamicroscopes.com - info@optikamicroscopes.com...
-
Page 2: Table Of Contents
INDEX 1.0 DESCRIPTION page 4 2.0 INTRODUCTION page 5 3.0 UNPACKING AND ASSEMBLY page 5 4.0 USING THE MICROSCOPE page 15 5.0 MAINTENANCE page 19 6.0 ELECTRICAL SPECIFICATIONS page 19 7.0 RECOVERY AND RECYCLING page 20 Page 2... - Page 3 SAFETY GUIDELINES This microscope is a scientific precision instrument designed to last for many years with a minimum of main- tenance. It is built to high optical and mechanical standards and to withstand daily use. Optika reminds you that this manual contains important information on safety and maintenance, and that it must therefore be made accessible to the instrument users.
-
Page 4: Description
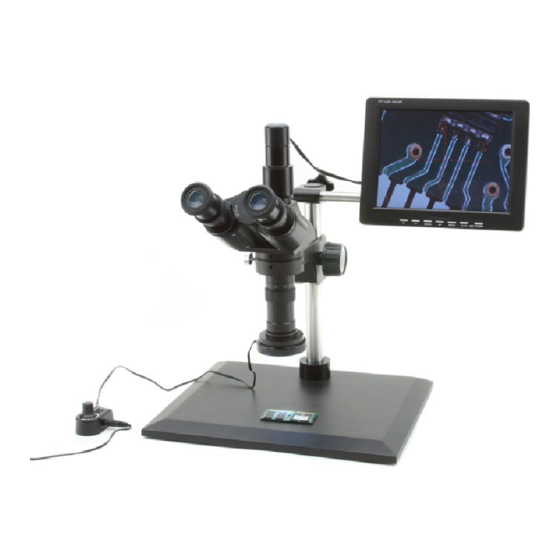
1.0 DESCRIPTION DIGITAL CAMERA EYEPIECES DIOPTRIC COMPENSATION ZOOM ADJUSTMENT RING FOCUS / TENSION KNOB LED RING ILLUMINATOR LED BRIGHTNESS CONTROL Page 4... -
Page 5: Introduction
2.0 INTRODUCTION This microscope is a scientific precision instrument designed to last for many years with a minimum of maintenance. It is built to high optical and mechanical standards and to withstand daily laboratory use. Optika reminds you that this manual contains important information on safety and maintenance, and that it must therefore be made accessible to the instrument users. - Page 6 3.0 UNPACKING AND ASSEMBLY 2 - HEAD HOLDER WITH FOCUSING MECHANISM 3 - SUPPORT ROD FOR LCD Page 6...
- Page 7 3.0 UNPACKING AND ASSEMBLY 4 - OPTICAL HEAD WITH BUILT-IN DIGITAL CAMERA 5 - 8’’ TFT LCD SCREEN Page 7...
- Page 8 3.0 UNPACKING AND ASSEMBLY 6 - EYEPIECES WF10X/18MM 7 - LED RING ILLUMINATOR WITH BRIGHTNESS CONTROL Page 8...
- Page 9 3.0 UNPACKING AND ASSEMBLY 8 - LED RING POWER SUPPLY (OUT: 12VDC 0.5A) 9 - DIGITAL CAMERA POWER SUPPLY (OUT: 5,5VDC 200mA) 10 - LCD SCREEN POWER SUPPLY (OUT: 12VDC 2,6A) Page 9...
- Page 10 3.0 UNPACKING AND ASSEMBLY Assembling the microscope Put the optical head in the head holder and then slide it on the pillar. Tighten the screw on the back at about half height of the pillar (you can move it later when you focus your sam- ple).
- Page 11 3.0 UNPACKING AND ASSEMBLY SCREWS Page 11...
- Page 12 3.0 UNPACKING AND ASSEMBLY Put the support rod with the screen on the pillar base, locking the screw. USE THIS SCREW TO ADJUST LCD INCLINATION LOCK THIS SCREW Put the LED ring illuminator at the bottom of the optical head. LOCK THIS SCREW Page 12...
- Page 13 3.0 UNPACKING AND ASSEMBLY 5. Take the cable connected to the digital camera, and plug it to the power supply (5,5V). DIGITAL CAMERA CABLE JACK FROM 5,5V POWER SUPPLY 6. Plug the other jack of the digital camera cable into the AV input on the rear of the LCD screen. Page 13...
- Page 14 Plug the jack from LED ring power supply (12Vdc 0,5A) into the brightness control. JACK FROM 12V-0.5A POWER SUPPLY Plug the jack from the LCD screen power supply (12Vdc 2,6A) into the DC12V input on the rear of the LCD screen. Now the XZ-2 is ready to be used. Page 14...
-
Page 15: Using The Microscope
4.0 USING THE MICROSCOPE Switch on the power supplies and press the POWER button on the LCD screen. Use the brightness control to adjust the LED light: - position 0: LED OFF - position I: LED ON with adjustable brightness - position II: LED ON at maximum brightness Put your sample on the base under the objective and rotate the focusing knob to bring the object into focus on the LCD screen. - Page 16 4.0 USING THE MICROSCOPE Orientation of the digital camera: in order to have the image on the LCD aligned with the object under observation, you can rotate the digital camera on the top of the optical head. Note that the image in the eyepieces is reversed compared to the LCD image. Setting the LCD screen.
- Page 17 Press buttons: ► ▲ ► MENU -> ▼ -> ▼ -> -> -> ▲ -> or ▼ ► To save press: To exit press: MENU Analog camera input settings: Press button: to select “AV” for the XZ-2 camera. Page 17...
- Page 18 4.0 USING THE MICROSCOPE Reset the image settings (all values set to 50): Press buttons: ▲ ▲ ► ► ▲ MENU -> -> -> -> -> or ▼ To save press: ► To exit press: MENU 4.10 Analog input. Connect an AV coaxial cable to TV connector on the rear, in order to see an external source.
-
Page 19: Maintenance
5.0 MAINTENANCE Always think about The following environment is required: Indoor temperature: 0-40°C, Maximum relative humidi- ty: 85 % (non condensing). Keep the microscope away from dust and shocks while in use. Turn off the light immediately after use. Use a soft lens tissue to clean the optics after use. Only if needed, use a cloth moistened with water and a mild detergent, rinsing with water and drying immediately with a lint-free cloth. -
Page 20: Recovery And Recycling
7.0 RECYCLING AND RECOVERY Art.13 Dlsg 25 july 2005 N°151. “According to directives 2002/95/EC, 2002/96/EC and 2003/108/EC relating to the reduction in the use of hazardous substances in electrical and electronic equipment and waste disposal.” The basket symbol on equipment or on its box indicates that the product at the end of its useful life should be collected separately from other waste.
Need help?
Do you have a question about the XZ-2 and is the answer not in the manual?
Questions and answers