Table of Contents
Advertisement
Quick Links
Advertisement
Table of Contents

Related Manuals for Becker mamba.4 CE LMU


Summary of Contents for Becker mamba.4 CE LMU
- Page 1 OPERATING GUIDE...
-
Page 2: Table Of Contents
Contents >>> CONTENTS Warranty Emissions and disposal Inserting and removing the battery 24-month warranty Charging the battery Overview of navigation device Inserting an SD card (optional) Safety instructions Operating controls The Navigation device Device General operation Accessories Maintenance and care Operating manual contents Device holder Battery quality declaration... - Page 3 CONTENTS >>> Switching between upper and The New destination menu Select POI categories lower case: Selecting Info box data fields Layout of the New destination menu Deleting characters 3D city view Enter address Inserting spaces The route overview button Select Point of Interest The back button Travel Guide (model dependent) The Guidance info button...
- Page 4 >>> CONTENTS Using the map display Slide show NOTICE Map zooming Settings EU Declaration of Conformity Moving the map Where am I? Disposal of the unit Map orientation Change of battery Disposal of the battery The Route overview Country information Duty to supply information Map display options Trip computer (depending on model) 94...
- Page 5 CONTENTS >>> The information and data contained in these documents are subject to change without prior notice. No part of these documents may be du- plicated or transmitted for any purpose whatsoever without express written per- mission of United Navigation GmbH. All technical information, drawings etc.
-
Page 6: Warranty
24-month warranty (battery: 6 months) thorised by the manufacturer or by the for BECKER units, beginning on the day manufacturer himself. of delivery to the final customer (buyer). This warranty does not affect or... -
Page 7: Safety Instructions
• Navigation devices from Becker could contain magnets. Do not bring them near magnetic data carriers (notebooks) or cards (EC cards, credit cards etc.). These could get damaged or be rendered unusable if brought into contact. Magnets can impair the function of cardiac pacemakers! Persons with cardiac pacemakers should not carry the device to close to their bodies. - Page 8 • Only use original BECKER accessories. This way it is ensured that all relevant provisions will be met and that health risks and damages to the product are avoided. Dispose of the used product or the battery according to the legal regulations in effect.
- Page 9 SAFETY NOTICES >>> reason, United Navigation GmbH strongly recommends to have the device installed by a technician who has experience with electrical equipment. • The user must check whether the device is suitable for the intended use and connection. • The user shall bear all risks associated with the use of the device and the installation. •...
-
Page 10: The Navigation Device
Navigation This operating manual contains the This navigation device provides you with The use of the GPS = Global Positioning description of your Becker navigation a powerful PND (Personal Navigation system eliminates the tedious process equipment. Device) for use in and on vehicles. -
Page 11: Headset
THE NAVIGATION DEVICE >>> Headset Unpacking the Navigation device Your Navigation device is equipped with Bluetooth® wireless technology. You can Note: connect headset telephone Your Navigation device is delivered in a equipped with Bluetooth® wireless stable packaging. If the packaging or its technology via Bluetooth®. -
Page 12: Overview Of Functions
>>> THE NAVIGATION DEVICE Overview of functions : standard Navigation system - : not available : optional Speed camera detector Driver warnings – Headset Trip computer Display height profile ... -
Page 13: Standard Delivery
THE NAVIGATION DEVICE >>> Standard delivery Handlebar holder (optional) Complaints In case of complaints, please consult your dealer. The equipment may be sent Device and accessories directly to United Navigation in its original packaging. Handling the packaging Keep the original packaging in a dry place, at least for the warranty period. -
Page 14: Description Of The Device
>>> THE NAVIGATION DEVICE Description of the device Cable for power supply from cigarette Note: lighter You can charge your Navigation device The navigation device consists of the This cable allows the unit to be connect- using the vehicle charge cable included basic unit and the accessories included in ed up to the car's cigarette lighter. -
Page 15: Information About The Documentation
THE NAVIGATION DEVICE >>> the vehicle using the unit bracket. Information about the Registration documentation You can register your product using our software service. We will then inform you of any new updates and other news. Quick Start Guide The Quick Start Guide is designed to Registration is performed in the "Content provide a brief introduction to operating Manager"... -
Page 16: Overview Of Navigation Device
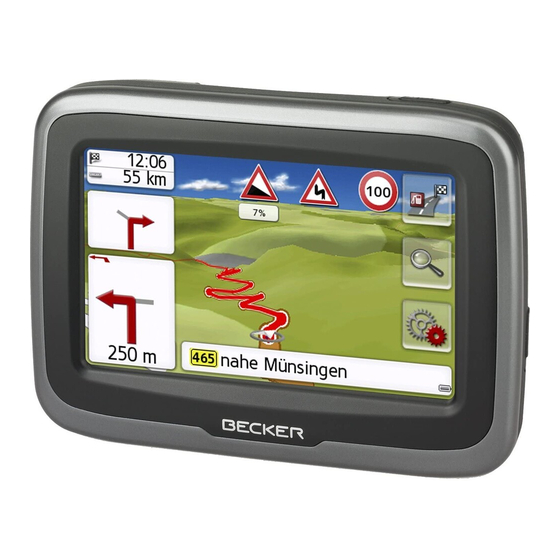
Overview of navigation device >>> OVERVIEW OF NAVIGATION DEVICE Operating controls Accessories Device holder Device Screw Plug connection Cover Main menu switch 4.3“ LCD touchscreen On/Off switch Insert for micro SD card (under bat- tery cover) Mini USB connection (under battery cover) Battery cover... - Page 17 OVERVIEW OF NAVIGATION DEVICE >>> Front of the device with control and display elements Overview of navigation device 1 Main menu switch: Without Route = Main menu / With Route = Delete stopover 2 Touchscreen with selected main menu 3 Touchscreen button Press = Activation of the corresponding button command 4 ON/OFF switch 5 Back button...
-
Page 18: Installing Navigation Device
>>> INSTALLING NAVIGATION DEVICE Installing navigation device Installing navigation device Fastening handlebar holder on the motorcycle Notice: There are two methods for fastening the United Navigation GmbH will not be lia- handlebar holder on the motorcycle: Installing handlebar holder (optional) ble for any injuries, losses, damage or 1 Fastening with bracket screw on the consequential damage caused by modi-... -
Page 19: Method 2 - Fastening On The Brake Or
INSTALLING NAVIGATION DEVICE >>> Method 2 – Fastening on the brake or clutch Mounting the device holder and connecting lever piece Notice: The standard delivery includes screws with 1/4 inch thread and M6 thread. Use the screws whose thread size match the existing screws on the brake lever or clutch lever. -
Page 20: Installing Vehicle Device Holder
>>> INSTALLING NAVIGATION DEVICE > Tighten the handle to secure the device Notice: holder. Connect the DC-DC adapter to a swit- ched positive pole in the ignition circuit. Connection diagram Do not connect the cable directly to the battery terminals to avoid discharging of the battery. -
Page 21: Connecting Vehicle Charge Cable
INSTALLING NAVIGATION DEVICE >>> Mounting the device holder and connecting Using the device holder Notice: piece Attach the device holder in such a way > Place the connecting piece onto the Inserting device into the device holder that it does not impair your vision with spherical head. -
Page 22: Removing Device From The Device Holder
>>> INSTALLING NAVIGATION DEVICE > Make sure that the device is securely Inserting and removing the bat- > Insert the battery or remove it. When placed in the holder. tery the battery is inserted, the printing on the battery must be visible. Make sure that the battery is inserted be- fore operating the device. -
Page 23: Charging The Battery
>>> Charging the battery Inserting an SD card (optional) The battery is charged by the DC-DC ad- apter or vehicle charge cable during ope- ration. The battery can also be charged using a mini USB power supply with at least 5 V/1.2 A. The charging temperature is between 0 °C und 45 °C. -
Page 24: General Operation
>>> GENERAL OPERATION General operation Maintenance and care Your mobile navigation system was • Do not store your mobile navigation designed and manufactured with great system in cold environments. During The unit is maintenance-free. care and should be treated with equal operation, when the unit warms up to For proper care, a commercially care. -
Page 25: Battery Quality Declaration
GENERAL OPERATION >>> Battery quality declaration Display quality declaration Power supply The capacity of the rechargeable battery In some cases, for technical reasons, a Note: in your mobile navigation system few discoloured dots (pixels) may be You can charge your navigation device decreases with every... -
Page 26: Using The Battery
>>> GENERAL OPERATION Using the battery Connection for the cigarette lighter described chapter “Installing navigation device” on page 19. The internal power supply is via the Note: integrated rechargeable battery. The If the cigarette lighter has recently been rechargeable battery is maintenance- used and is still hot, wait until the lighter free and does not require any particular socket has cooled down. -
Page 27: Unit Antenna
GENERAL OPERATION >>> GPS antenna Navigation device Switch on/off Switching on Press the button on the right-hand side (depending on model) of the device. Unit antenna The unit is switched on. The manufactur- With the button on the right-hand side of The GPS antenna is integrated into the er's logo appears on the touchscreen. -
Page 28: Switching Off (Depending On Model)
>>> GENERAL OPERATION > Press the button for the required Note: language. We recommend that you place the > The selection is confirmed by pressing Navigation device in sleep mode in the event of short interruptions to operation (of up to a week). This significantly reduces the switch-on time and the Navigation device finds the satellites required for navigation much... -
Page 29: Basic Information About The Touch
GENERAL OPERATION >>> Basic information about the Operation Basic information about the When you touch a button on the touch touch screen menus screen, the button in question is briefly The Navigation device is fitted with a shown outlined in red to confirm the During operations, you are assisted by touch screen. -
Page 30: Entries Made With The Entry Menu
>>> GENERAL OPERATION You can tell whether a telephone is If route guidance is already active, the Entries made with the entry menu already connected by the symbol on the current destination address and a button Some applications require entries to be button. -
Page 31: Entering Characters
GENERAL OPERATION >>> Entering characters Accepting proposals Scrolling through the lists Characters are entered by pressing the During entry, the Navigation device If you have already entered some of the keys in the central area. makes proposals in the uppermost line. letters of the selection you want, you can The proposals take into account your us- use the selection list to display all the... -
Page 32: Special Characters And Accent Marks
>>> GENERAL OPERATION The selection list appears. Other character sets Different character sets can be selected for the keyboard of the Navigation de- vice. In order to switch to the special Press the arrow keys on the characters keyboard, press the button right hand side of the screen to scroll marked with an arrow. -
Page 33: Entering Numbers
GENERAL OPERATION >>> Entering numbers Switching between upper and lower case: Deleting characters Switch to the numbers keyboard in order During free text entry, it is possible to To delete the last character, use the back to enter figures. switch between upper/lower case and key. -
Page 34: The Back Button
>>> GENERAL OPERATION The back button Content Manager Installing the Content Manager button is located on the bot- You can install the Content Manager on The Content Manager is a PC-based tom left of the device. your computer with the following steps: application containing a number of >... - Page 35 Details Execute the following actions to start the > Select details during copying. Becker Content Manager: > Click on The Content Manager is automatically > Switch the navigation device comple- Content Manager started immediately after installation.
-
Page 36: Transferring Pictures
27, before connecting the naviga- your problem in the FAQ in the Support backup copy. tion device to the computer. area Becker homepage We recommend that you give files and Note: (www.mybecker.com). directories self-explanatory names so... -
Page 37: What Is Navigation
NAVIGATION MODE >>> Navigation Mode What is navigation? Signals from at least three satellites are ¤ Safety instructions required to determine your position; The term "navigation" (lat. navigare = to • Road traffic regulations always take your height above sea level can be travel by sea) is generally understood to priority. -
Page 38: Selecting Navigation
>>> NAVIGATION MODE Selecting Navigation Note: The menu items Navigation mode is called up from the Set current position (fast main menu. New destinations can be Select from last destinations access mode) can also be used to select entered in the menu " ". -
Page 39: Smart Guess
NAVIGATION MODE >>> Last destinations list The destination list The destination list displays, line by line, The last destinations visited and saved all destinations available for fast dialling. destinations are displayed in the Last Each line of the destination list is divided destinations list and can be selected into two fields. -
Page 40: Icons Used
>>> NAVIGATION MODE Icons used Operating the last destinations list Displaying or editing a destination The following icons are used in the Any destination stored in fast access Start with existing destination destination list: mode can be displayed and edited. The existing destinations are listed in the >... -
Page 41: Personal Destinations
NAVIGATION MODE >>> Personal destinations Selecting a destination from Personal Option Meaning Using the button destinations Personal destinations The protection is re- Remove you can call up Google points of ™ moved from the desti- You can call up Google points of inter- protection ™... -
Page 42: Editing Personal Destinations
>>> NAVIGATION MODE A list of the available destinations will be Editing Personal destinations Selecting a destination from Contacts > In the list of your own destinations, displayed. ® ® You can call up Microsoft Outlook Using the buttons or the scroll press the button in front of the contacts that have been imported into... -
Page 43: My Tracks
NAVIGATION MODE >>> more than 10 contacts. If there are Furthermore, you can calculate a route fewer than 10 entries, a list of contacts to the start point or to the nearest point is displayed straight away. on the track. >... -
Page 44: My Tracks Extra Functions
>>> NAVIGATION MODE Selection Meaning Note: Show track The track is displayed on When starting off from recorded tracks, a map as a blue line it is best to set the "Fast route" option. Reverse track The direction of travel of Other routes might lead to undesirable the track is reversed, the side effects. -
Page 45: The New Destination Menu
NAVIGATION MODE >>> The New destination menu Layout of the New destination menu Select on map With the button , you can Select on map Enter address select a destination directly on the map The various steps from selecting an and start route guidance. -
Page 46: Entering The Address
>>> NAVIGATION MODE Entering the address Selecting a country Note: You can select a country from those button in the destina- Enter address If required, press the arrow keys available using the button for the country tion input menu opens the menu for en- or use the scroll wheel on of destination. -
Page 47: Selecting An Address And Starting
NAVIGATION MODE >>> Selecting an address and starting route • start the route guidance straight away. Selecting a town guidance The destination can be entered by either You can enter the exact destination ad- using the name or ZIP code. dress in the address input menu. - Page 48 >>> NAVIGATION MODE Using the town list Selecting the street Note: Once a few letters of the desired town In the menu field the street and Street If two words need to be entered you have been entered you can display a list house number can be entered separate- must separate them with the character of all the towns with the relevant letter...
- Page 49 NAVIGATION MODE >>> Using the street list Selecting the Intersection Selecting a house number Once a few letters of the desired street After entering the destination town and After entering the destination town and have been entered you can display a list street, you can enter a junction so as to street, you can enter a house number so of all the streets with the relevant letter...
- Page 50 >>> NAVIGATION MODE Displaying the route Storing a destination Note: Once the address has been entered, the In the address input menu, the Save The symbols above the progress bar address input menu allows the route to button opens a menu where a name can refer to restrictions that you may have the destination to be displayed on the be entered for the specified destination.
-
Page 51: Points Of Interest
NAVIGATION MODE >>> If the route guidance is already running Note: and a waypoint has already been entered If there is no GPS signal when the route you will be asked whether the new des- is calculated, the following will be dis- tination should replace the old destina- played: tion or the waypoint. -
Page 52: Point Of Interest In The Vicinity
>>> NAVIGATION MODE > Point of interest in the vicinity Note: > Press the button. POI nearby > You can only select points of interest in the area in question if the GPS reception is adequate for determining a position. Otherwise, the last position stored will be used. -
Page 53: Point Of Interest Near To An Address
NAVIGATION MODE >>> > Point of interest near to an address > Press POI near location The name, distance as the crow flies and will receive additional the address is displayed for each entry. information about your chosen > Select the desired point of interest. >... -
Page 54: Point Of Interest Near To Destination
>>> NAVIGATION MODE By pressing of the button next to Entering a point of interest directly > Press the the selected POI, you can display the button. POI search by name > additionally available information for the destination. Point of interest near to destination >... -
Page 55: Travel Guide (Model Dependent)
NAVIGATION MODE >>> > Press the to begin route guidance Additional point of interest information Travel Guide (model dependent) Start to the point of interest straight away. Any additional information that is provid- The Travel Guide acts in a similar fashion However, you can also display your ed for a point of interest can also be dis- to the "Enter point of interest"... -
Page 56: Selecting A Destination From The Map
>>> NAVIGATION MODE Selecting a destination from the map You can also search for points of interest in the vicinity of your chosen point using You may also select a destination directly the POI nearby button. from the displayed map. However, you can also store your chosen point in fast access mode ( Save... -
Page 57: Coordinate Entry
NAVIGATION MODE >>> > Then enter the desired values using Coordinate entry Route planning the buttons You can also enter your destination using The route planning menu allows you to The entry field at the beginning may be geographic coordinates. create and select individual routes. - Page 58 >>> NAVIGATION MODE By pressing you can now add Add stage a stage to the route. After pressing you can Rename route give the route a new name. Pressing will allow you to Delete route delete the route from the stored routes. Selecting and starting a route >...
-
Page 59: Simulation Of The Route
NAVIGATION MODE >>> Simulation of the route Creating a new route > Drücken Sie in der Routenplanung die There is a play button on the left under the map, used to start a simulation Taste Create new route of the route. If you touch the display after starting, a control bar is displayed at the top with control buttons for the simulation. -
Page 60: Editing A Route
>>> NAVIGATION MODE Editing a route Optimising a route Option Meaning > Select the route you wish to edit. If you have entered several destinations You can replace the Replace > Press the button in front of the route, selected stage with stage stage you wish to edit. -
Page 61: Navigation Settings
NAVIGATION MODE >>> Navigation settings This will take you to the navigation The Map view button settings menu. You can select whether the map is to be The navigation settings contain all the displayed in 3D or 2D mode, in a split settings that are relevant to the Configuration screen with 3D or 2D display or in arrow... -
Page 62: Auto Zoom
>>> NAVIGATION MODE The following setting options are • Street names 2D Street names 3D available in the extended settings: You can select whether the street names should be displayed ( ) or not • Auto zoom ) in 3D or 2D mode. You can select how the map changes when approaching an action point or at •... -
Page 63: Select Poi Categories
NAVIGATION MODE >>> Auto zoom Select POI categories > Press the button in the ex- You can select which POI symbols are to Auto zoom tended settings. be displayed on the map. > Press the button Select POI categories in the extended settings. You can then switch the display of entire categories on ( ) or off (... - Page 64 >>> NAVIGATION MODE Note: This setting is only available in the 3D view. Under these options, you can select dis- Touch the first field to select one of the plays for the travel without a selected possible options. route. Here you can only select between An options list appears on the right side Speed, Speed limit, Time and Height.
-
Page 65: The Route Overview Button
NAVIGATION MODE >>> The route overview button The Guidance info button > The options in this settings menu In the settings window Guidance info allow you to choose which points of select which additional interest can be displayed in the map information you would like displayed view when... -
Page 66: The Route Options Button
>>> NAVIGATION MODE The Route options button Setting Meaning Setting Meaning You can edit your driving profile in the When this function is Junction If this function is Signposts settings window. The view Route options activated, you receive activated, you will see settings made here have an effect on the additional important realistic views of the... -
Page 67: Selecting The Vehicle Profile (Depending On Model)
NAVIGATION MODE >>> Selecting the vehicle profile (depending on The window for selecting the maximum Selecting the route type > After pressing the model) speed is displayed. button, Route type This setting influences the calculation of select one of the following options. the expected time of arrival and blocks Option Meaning... -
Page 68: Avoiding Particular Types Of Road
>>> NAVIGATION MODE Winding Route Considerably more winding & longer Avoiding particular types of road Motorways, multi-lane highways and With this option a route can be selected After pressing the button you can Avoid town thoroughfares are avoided and that is specially tailored to the needs of exclude various types of road (e.g. -
Page 69: The Voice Guidance Button
NAVIGATION MODE >>> The Voice guidance button • Volume Note: You can select the standard volume for In the settings window Voice guidance Announce streets Announce voice announcements for each start of you can make settings relating to the functions are only time of arrival the Navigationsgerät, or switch off voice guidance of the Navigationsgerät. - Page 70 >>> NAVIGATION MODE Setting the Voice Setting the Volume The Warnings button In the settings window you can set With the settings window, you Voice Volume In the settings window you can Warnings the voice that will make the navigation can set the standard volume for voice select which warnings are to be announcements for the language that...
-
Page 71: Setting Driver Alerts
NAVIGATION MODE >>> • Setting Driver alerts The following signs are available in the Driver alerts (depending on the If this information is saved in the map individual categories: model) You can have signs displayed, for material and is supported by your •... - Page 72 >>> NAVIGATION MODE Setting Speed info Setting Meaning settings window allows Speed info Select the amount over Out of city to select whether speed limits are the speed limit at which displayed in parallel to the navigation. you would like to receive You can also receive an audible warning an acoustic warning about exceeding the speed limit.
- Page 73 NAVIGATION MODE >>> The Format button The Time button The Reset button In the settings window you can You can select the time zone relevant for You can reset the navigation settings to Format set the measurement units to be used your location in the settings their factory settings.
-
Page 74: Calling Up The Map Display
>>> NAVIGATION MODE The map display Structure of the map display Current road Info box (if displayed) with vehicle The structure depends on the settings The map display is used primarily for speed and position height above sea made in „Map display options“ on route guidance. -
Page 75: The Information Box
NAVIGATION MODE >>> Your current position is displayed on the If you press the Info box again, more or Note: map via the position icon. less fields are displayed. At least one follow traffic lane field and a maximum of three fields can recommendation, the next driving be displayed. -
Page 76: Guidance Info With Arrow Display
>>> NAVIGATION MODE Information is also displayed in the Guidance info with arrow display Driver warnings (depending on model) bottom left corner in the preview area. Note: follow traffic lane recommendation, the next driving manoeuvre possible without changing traffic lane. The next manoeuvre is displayed as an Next driving manoeuvre arrow, with a distance indication... -
Page 77: Map Display With Junction View
NAVIGATION MODE >>> Tunnel view Note: When your enter a longer tunnel, a three The tunnel view provides a schematic dimensional tunnel view appears. If view of the route layout of the tunnel. there is no maneuvres performed in the The whole tunnel layout, the first route next 1000m in the tunnel, the lane of the section and the vehicle position are... -
Page 78: Using The Map Display
>>> NAVIGATION MODE Using the map display Moving the map Map orientation You can move the map to any point. When a route is activated, the map view > To do this, press the map briefly. Map zooming can be oriented in different ways. The map can be zoomed into in steps by If you have selected a 2D view in the using the zoom buttons. -
Page 79: The Route Overview
NAVIGATION MODE >>> TMC events or POIs. A list of POIs and, if applicable, TMC events is displayed with the expected arrival time and distance from the current vehicle position. > Press the desired Point of Interest or TMC event. Information such as the address and the At cross-border destinations, the border You can orient the map for example in... -
Page 80: Map Display Options
>>> NAVIGATION MODE Map display options Note: Note: If there is a traffic jam announcement The scope of the displayed functions In the map display options, you can on the route, the TMC symbol depends on whether route guidance or change the settings for route guidance, appears on the button. -
Page 81: Displaying The Whole Route
Displaying the whole route Move route (model-dependent) New route (Only available when route guidance is Becker RouteMove allows you to move active.) your route with a single movement of You can have the whole route to the your finger, providing a rapid means of destination displayed on the map. -
Page 82: Selecting Alternative Routes
>>> NAVIGATION MODE description, it is displayed on the map. Selecting alternative routes You can have the different routes Blocking route sections/roads displayed by the navigation device. You can block individual route sec- > When the whole route is displayed, tions/roads. -
Page 83: Canceling Route Guidance
NAVIGATION MODE >>> Canceling route guidance Entering/deleting a stopover If you have entered the desired stopover, the route is recalculated. (Only available when route guidance is (Only available when route guidance is active.) active.) You can cancel the active route guidance. With this function, you can enter a >... -
Page 84: Blocking Route Temporarily
>>> NAVIGATION MODE Blocking route temporarily If route guidance is active, you can select Setting day/night display a road length between 200 m and 50 km. Using the option, you You can switch the Navigationsgerät Block road ahead As soon as you selected the stretch, a can block a stretch of road ahead display from day to night and vice versa. -
Page 85: Displaying Current Position
NAVIGATION MODE >>> Displaying current position (Where am I?) . In addition, You can display your current position, you have other telephone functions at make an emergency call (depending on your disposal. Also see chapter „Tele- phone Mode“ on page 88. model), select a hospital or filling station and save this position. -
Page 86: Entering The Destination
>>> Entering the destination Displaying/selecting different routes Skipping a destination You can use the Navigationsgerät to (Only available when route guidance is If a planned route with several destina- display various routes. not active.) tions is active, you may delete the cur- >... -
Page 87: Other Additional Functions
OTHER ADDITIONAL FUNCTIONS (ONLY SELECTED MODELS) >>> Other additional functions (only selected models) Display height profile Height profile for alternative routes: Yet more functions are available for al- You can display a height profile from the ternative routes. Press the Next Show route or Alternative routes view. -
Page 88: Headset Mode
>>> HEADSET MODE Headset Mode Telephone Mode Icon Meaning Display list of the availa- You can connect a headset equipped with Similarly as described in the chapter Headset Mode ble devices Bluetooth® wireless technology to your Headset Mode, a telephone can also be navigation device. -
Page 89: Starting Track Recording
TOOLS >>> > Select the desired function by pressing Tools Under Tools, the following functions are Starting track recording grouped together, depending on the one of the buttons. > In the menu you Start track recording model: can record tracks that you can either Extras •... -
Page 90: Travel Guide (Model Dependent)
>>> EXTRAS > > Select if you want to save the Travel Guide (model dependent) track. With the travel guide, you can select, for example, MARCO POLO Top-Highlights or MARCO POLO Insider Tips and start the guide destination there. See "Travel Guide (model dependent)"... -
Page 91: The Image Viewer Menu
EXTRAS >>> The image viewer menu Selecting an image Press the buttons to the left and right of the image to move to the next or In the image viewer menu, you can previous image. select images, start a slide show and call Press the centre of the image to hide the up the settings. -
Page 92: Rotating The Picture
>>> EXTRAS Enlarging the image Displaying image information Slide show > Show the image menu. > Show the image menu. In the slide show, all the pictures in the > Press the > Press the button. button. Zoom EXIF current folder level are automatically displayed sequentially. -
Page 93: Where Am I
EXTRAS >>> for some time. Country information After selecting the function, just wait The country information enables you to until screen becomes dark. display country-specific information for Afterwards, the battery can be replaced numerous countries (maximum permit- by a fully charged battery, see “Inserting ted speed, alcohol limits, etc.). -
Page 94: Trip Computer (Depending On Model)
>>> EXTRAS Trip computer (depending on Symbol Meaning model) Speed limit in built-up areas The Trip computer provides a data Speed limit outside built-up display with average speeds, maximum areas speeds, etc. and a stopwatch with the Speed limit on motorways option to record laps. - Page 95 EXTRAS >>> Total distance Travel time without breaks in the journey Travel time with breaks in the journey Press the button to reset the Reset values to zero.
-
Page 96: Settings
>>> SETTINGS Settings Selecting system settings The system settings menu Operation You can select the various settings op- You can change various basic settings Selection options tionsfrom the system settings menu. for all applications on the Navigation Select the desired menu item by press- device. -
Page 97: The Individual Menu Items
SETTINGS >>> The individual menu items Automatic on/off The Navigation device can switch Battery automatically to sleep mode when the Your Navigation device may be operated vehicle ignition is switched off. using an external power supply unit or Prerequisite for this: an integrated rechargeable battery. -
Page 98: Day/Night Display
>>> SETTINGS • Bottom icon: The function is switched Day/night display Brightness off, the Navigation device does not You can set the Navigation device display You can set the brightness of the display switch off automatically. to day, night or automatic. separately for day and night display. -
Page 99: Setting The Colour
SETTINGS >>> Setting the colour Language Scrolling You can change the colour of the icons The texts on the touch screen can be Using the buttons or the scroll and other design elements. displayed in a variety of languages. wheel, it is possible to scroll through the list in the direction of the relevant arrow. -
Page 100: Keyboard Layout
>>> SETTINGS Keyboard layout Service information Factory settings You can switch the sequence of the following button displays You can reset your Navigation device to keyboard layout by selecting the information regarding the Navigation the factory settings. corresponding key. device. The following updated data is deleted: saved destinations, saved routes, the home address, telephone data, images,... -
Page 101: Calibration (Model Dependent)
SETTINGS >>> Calibration (model dependent) If the touch screen responds incorrectly when buttons are pressed, it needs to be calibrated. Starting the calibration You can start the calibration using the following button: > Press the button. Calibration The calibration procedure will be started. You will be guided through the procedure by means of text instructions. -
Page 102: Technical Terminology
>>> TECHNICAL TERMINOLOGY Technical terminology JPG/JPEG (Greenwich Mean Time) (Global Positioning System) (Joint Photographic Experts Group) Central European Time standard GPS determines your actual geographi- The JPEG is the most common type of Standard time at 0 degree longitude (the cal position by the use of satellites. - Page 103 TECHNICAL TERMINOLOGY >>> Stylus A stylus is an input pointer which is used (Traffic Message Channel) for the operation of touch-screens, mo- Traffic announcements transmitted by bile phones or PDAs. most FM stations via RDS. Basis for The stylus consists basically of a plastic dynamic navigation.
-
Page 104: Index
index >>> INDEX Numerics Destinations GPS reception ..... 85 Entering ..... . 45 3D display . - Page 105 INDEX >>> Navigation ......37 Safety instructions ....7 Units .
-
Page 106: Model Overview And Technical Specifications
>>> MODEL OVERVIEW AND TECHNICAL SPECIFICATIONS Model overview and technical specifications : standard Navigation system - : not available : optional Weight 280 g Processor in MHz Flash memory 4 GB 8 GB SD-RAM 128 MB Li-ion battery 1150 mAh Holder for windshield ... -
Page 107: Notice
NOTICE >>> NOTICE Dear customer, In conformance with current EC guidelines, any person may operate this unit. This unit conforms to the current valid European or harmonized national regulations. This designation is your guarantee that the unit conforms to the applicable specifications concerning electromagnetic compatibility. -
Page 108: Disposal Of The Unit
>>> NOTICE Disposal of the unit Customer information on the disposal of electrical and electronic devices (private households) According to the self-proclaimed corporate principles of United Navigation GmbH, your product has been developed and manufactured from high-quality, recyclable materials and components. This symbol on the product and/or accompanying documentation means that electrical and electronic products must be disposed of separately from the houshold garbage at the end of its service life. -
Page 109: Disposal Of The Battery
NOTICE >>> Disposal of the battery Duty to supply information according to battery legislation (BattV) Batteries must not be disposed of in household waste. It is the duty of the user to return used batteries. Please only dispose of batteries via specialised dealers or at battery collection points. In this way, you make a positive contribution to environmental protection. - Page 110 - Germany...
Need help?
Do you have a question about the mamba.4 CE LMU and is the answer not in the manual?
Questions and answers