Table of Contents
Advertisement
Available languages
Available languages
Quick Links
Advertisement
Chapters
Table of Contents

Related Manuals for Chamberlain CAPXS


Summary of Contents for Chamberlain CAPXS
- Page 1 Smart Video Intercom S INSTALLATION MANUAL...
- Page 2 The location of the power disconnect should be BEFORE installing equipment. visible and clearly labeled. • The CAPXS shall be installed in accordance with the National Electrical Code and all local codes. WARNING: This product can expose you to chemicals including lead, which are known to the State of California to cause cancer or birth defects or other reproductive harm.
-
Page 3: Table Of Contents
NETWORK/MOUNTING ACCESS CONTROL INTRODUCTION INTRODUCTION ACCOUNT SETUP POWER NETWORK/MOUNTING ACCESS CONTROL CAPXS Overview ............4 Connections Overview ........... 5 Carton Inventory ............6 Tools Needed ..............6 Preparation for Installation ..........6 Dimensions ..............7 System Specifications ........... 7 INTRODUCTION... -
Page 4: Capxs Overview
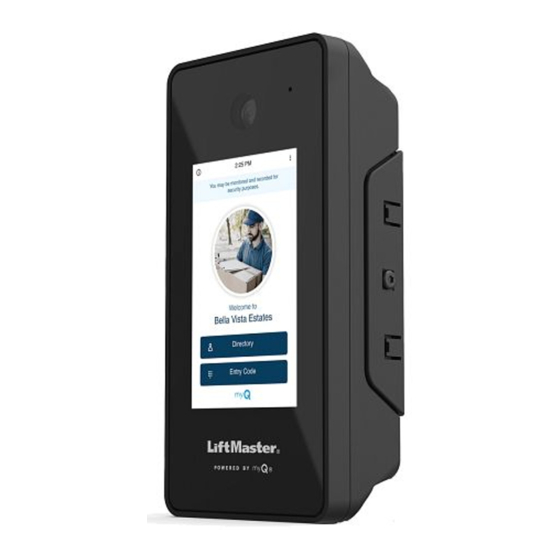
INTRODUCTION ACCOUNT SETUP POWER NETWORK/MOUNTING ACCESS CONTROL CAPXS Overview Smart Video Intercom S (Model CAPXS) is a cloud based access control solution INTRODUCTION ACCOUNT SETUP POWER NETWORK/MOUNTING ACCESS CONTROL that includes an integrated video camera enabling advanced video features. MICROPHONE... -
Page 5: Connections Overview
ACCESS CONTROL Connections Overview INTRODUCTION ACCOUNT SETUP POWER NETWORK/MOUNTING ACCESS CONTROL The CAPXS has a combination of access control inputs/outputs that work in conjunction to control one access point. 16 VDC GROUND (+) Red (–) Black INTRODUCTION ACCOUNT SETUP POWER... -
Page 6: Carton Inventory
INTRODUCTION ACCOUNT SETUP POWER NETWORK/MOUNTING ACCESS CONTROL Radio Antenna (Security+ 2.0 ® and Cable Ferrite Core Carton Inventory INTRODUCTION ACCOUNT SETUP POWER NETWORK/MOUNTING ACCESS CONTROL INTRODUCTION ACCOUNT SETUP POWER NETWORK/MOUNTING ACCESS CONTROL Power Supply Torx Screw (2) INTRODUCTION ACCOUNT SETUP POWER NETWORK/MOUNTING ACCESS CONTROL... -
Page 7: Dimensions
Compatibility 802.11b/g/n ® Wi-Fi Security CAPXS is compatible with routers using the following security protocols: WPA3 Personal and ® WPA2 Personal (AES). Wi-Fi Range Up to 250 feet (76.2 m), Open Air/Line-of-Sight to front of panel (range will vary depending on obstructions) ®... -
Page 8: Introduction Wire Specifications
* CAT 5/6 NETWORK CABLE NOTES: • For outdoor distances exceeding 140 feet (42.7 m), a UL497 compliant primary surge protector MUST be installed at the CAPXS. • Distances exceeding 328 feet (100 m) may be accommodated with additional hardware (available through third-party sources). -
Page 9: Internet Requirements
• Wi-Fi networks requiring secondary authentication are not supported (E.g. Hotels and airport Wi-Fi). INTRODUCTION ACCOUNT SETUP POWER NETWORK/MOUNTING ACCESS CONTROL • When checking signal strength in CAPXS admin mode, we recommend at least two bars, as shown on the CAPXS screen. -
Page 10: Community Account Setup
Under Device Management, select CAPXS and any other LiftMaster access control devices. b. Subscription plan is pre-selected based on selected devices. Select any add-on services and check out. c. Follow the prompts to finish adding CAPXS and any other LiftMaster acess control devices. 4. Configure the community a. -
Page 11: Install Mounting Bracket
Stainless steel hardware is recommended for mounting. NOTES: -ADA Compliance: When mounting the CAPXS at a pedestrian entrance, to meet ADA compliance, mount the top of the CAPXS screen no higher than 54 inches from the ground. INTRODUCTION ACCOUNT SETUP... -
Page 12: Introduction Connect Power
INTRODUCTION ACCOUNT SETUP POWER NETWORK/MOUNTING ACCESS CONTROL Connect Power The outlet for the CAPXS MUST be an external dedicated 120 Vac outlet. • DO NOT use ANY power supply other INTRODUCTION ACCOUNT SETUP POWER NETWORK/MOUNTING ACCESS CONTROL Refer to the table below for maximum wire run distances. This outlet should than those supplied with your CAPXS. -
Page 13: Connect Internet
Wi-Fi signal strength connection ® ® of at least -65 dBm (numbers closer to zero are stronger strength) at the CAPXS must be guaranteed to ensure an acceptable connection to the local network. -66 to -85 ≤ -86 •... -
Page 14: Setup Capxs
Once you have validated the setup, exit Admin Mode. Mounting CAPXS Insert the CAPXS in the mounting bracket until the unit snaps into place. Using screws provided, tighten the screws through the side of the mounting bracket to securely affix the CAPXS to the Mounting Bracket. -
Page 15: Access Control
JURISDICTION. Doing so Use 18-22 AWG NORMALLY CLOSED NOTE: DO NOT may cause interference with connect high voltage power the operation of panic to the CAPXS hardware. COMMON ALARM BYPASS unit. * NOTE: MAGLOCK, door strike and Power for Maglock COMMON ALARM BYPASS not evaluated by UL. -
Page 16: Gate Access (Wired)
NORMALLY CLOSED AUTHORITY HAVING NOTE: DO NOT connect high JURISDICTION. Doing so may voltage power to cause interference with the the CAPXS unit. COMMON operation of panic hardware. ALARM BYPASS Power for Maglock * NOTE: MAGLOCK and ALARM BYPASS COMMON (Not Provided) not evaluated by UL. -
Page 17: Reset Button
RESET BUTTON NOTE: It is recommended to reset the CAPXS to factory defaults by using the Factory Reset option in the Admin Mode. In the event you have forgotten the Admin Code, or the display has become unresponsive, you can manually reset the CAPXS using the Reset Button. -
Page 18: Repair Parts
K041-0353-000 Accessories ITEM PART NUMBER Reader Multi-class SE RP10 Mini Mullion LMMC-MINI CAPXS, Hood CAPXSHOOD CAPXS, Trim Kit with Postal Lock CAPXSTKPL CAPXS, Trim Kit w/o Postal Lock CAPXSTK Wiegand Keypad/Proximity Reader KPR2000* Connected Access Portal 2 Door CAP2D * KPR2000 is not UL listed to UL 294. It cannot be used as primary means of granting or denying access but only for supplemental use. -
Page 19: Configuration Sheet
Configuration Sheet Record device information and configuration settings below. CAPXS Name: NOTE: Any user of the system is subject to the terms outlined in the product EULA. Notes: DEVICE CONFIGURATION: DOOR 1 DOOR/GATE NAME: WIEGAND STATUS/SUP INPUTS EOL (Y / N) -
Page 20: Legal Disclaimers
- Consult the dealer or an experienced radio/TV technician for help. NOTICE: When mounting the CAPXS at a pedestrian entrance, to meet ADA compliance, mount the top of the CAPXS screen no higher than 54 inches from the ground. NOTE: When installing CAPXS, please refer to the local jurisdiction for any specific requirements such as physical signage that may be required. -
Page 21: Warranty
Warranty LiftMaster (“Seller”) warrants to the first purchaser of this product, for the structure in which this product is originally installed, that it is free from defect in materials and/or workmanship for a period of two years from the date of purchase. The proper operation of this product is dependent on your compliance with the instructions regarding installation, operation, maintenance and testing. - Page 22 Interphone vidéo intelligent S MANUEL D’INSTALLATION...
- Page 23 • Obtenez TOUJOURS les permis et approbations appropriés par être visible et clairement indiqué. écrit AVANT d’installer l’équipement. • Le CAPXS doit être installé conformément au Code national de l’électricité et à tous les codes locaux. WARNING: This product can expose you to chemicals including lead, which are known to the State of California to cause cancer or birth defects or other reproductive harm.
- Page 24 CONFIGURATION INTRODUCTION ALIMENTATION RÉSEAU/MONTAGE CONTRÔLE DE L’ACCÈS DU COMPTE Vue d’ensemble du CAPXS .......... 25 Vue d’ensemble des connexions ......... 26 Inventaire du carton ............ 27 Outils nécessaires ............27 Préparation de l’installation ......... 27 Dimensions ..............28 Spécifications du système ........... 28...
-
Page 25: Vue D'ensemble Du Capxs
ALIMENTATION RÉSEAU/MONTAGE CONTRÔLE DE L’ACCÈS DU COMPTE Vue d’ensemble du CAPXS CONFIGURATION L’interphone vidéo intelligent S (modèle CAPXS) est une solution de contrôle INTRODUCTION ALIMENTATION RÉSEAU/MONTAGE CONTRÔLE DE L’ACCÈS DU COMPTE d’accès basée sur cloud qui comprend une caméra vidéo intégrée permettant des fonctions vidéo avancées. -
Page 26: Vue D'ensemble Des Connexions
DU COMPTE Vue d’ensemble des connexions CONFIGURATION INTRODUCTION ALIMENTATION RÉSEAU/MONTAGE CONTRÔLE DE L’ACCÈS Le CAPXS dispose d’une combinaison d’entrées/sorties de contrôle d’accès qui fonctionnent conjointement pour contrôler DU COMPTE un point d’accès. 16 VCC TERRE (+) Rouge (-) Noir CONFIGURATION... -
Page 27: Inventaire Du Carton
CONFIGURATION INTRODUCTION ALIMENTATION RÉSEAU/MONTAGE CONTRÔLE DE L’ACCÈS Radio Antenna (Security+ 2.0 ® DU COMPTE and Cable Ferrite Core Inventaire du carton CONFIGURATION INTRODUCTION ALIMENTATION RÉSEAU/MONTAGE CONTRÔLE DE L’ACCÈS DU COMPTE CONFIGURATION INTRODUCTION ALIMENTATION RÉSEAU/MONTAGE CONTRÔLE DE L’ACCÈS Alimentation Vis Torx (2) DU COMPTE CONFIGURATION INTRODUCTION... -
Page 28: Dimensions
Compatibilité Wi-Fi 802.11b/g/n ® Sécurité Wi-Fi Le CAPXS est compatible avec les routeurs utilisant les protocoles de sécurité suivants : WPA3 personnel et ® WPA2 personnel (AES). Plage Wi-Fi Jusqu’à 250 pieds (76,2 m), en plein air/ligne de visée vers l’avant du panneau (la portée variera en fonction ®... -
Page 29: Spécifications Du Câblage
• Pour les distances extérieures dépassant 140 pi (42,7 m), un protecteur de surtension primaire conforme à la norme UL497 DOIT être installé sur le CAPXS. • Les distances supérieures à 328 pi (100 m) peuvent être prises en charge par du matériel supplémentaire (disponible auprès de... -
Page 30: Exigences Internet
DU COMPTE • Les SSID de réseaux cachés ne sont pas pris en charge. Le réseau doit pouvoir être sélectionné à partir de l’écran du CAPXS. • Les réseaux Wi-Fi nécessitant une authentification secondaire ne sont pas pris en charge (par exemple les Wi-Fi d’hôtel et d’aéroport). -
Page 31: Du Compte Alimentation Réseau/Montage Contrôle De L'accès
REMARQUE : Le service VoIP est nécessaire pour la fonction d’appel. LiftMaster s’associe exclusivement avec Phone.com pour fournir la meilleure solution intégrée pour les appels vocaux et vidéo. Les autres fournisseurs de VoIP ne sont pas compatibles avec notre CAPXS. -
Page 32: Installation Du Support De Montage
La quincaillerie en acier supplémentaire sera nécessaire. inoxydable est recommandée pour le montage. REMARQUES : -Conformité ADA : Lorsque vous installez le CAPXS pour une entrée piétonne, montez le haut de l’écran CONFIGURATION INTRODUCTION ALIMENTATION RÉSEAU/MONTAGE CONTRÔLE DE L’ACCÈS... -
Page 33: Connexion De L'alimentation
CONFIGURATION INTRODUCTION ALIMENTATION RÉSEAU/MONTAGE CONTRÔLE DE L’ACCÈS DU COMPTE Connectez l’alimentation La prise du CAPXS DOIT être une prise externe dédiée de 120 Vca. CONFIGURATION • N’utilisez PAS d’alimentation électrique INTRODUCTION ALIMENTATION RÉSEAU/MONTAGE CONTRÔLE DE L’ACCÈS Consultez le tableau ci-dessous pour connaître les distances maximales de DU COMPTE autre que celle fournie avec votre CAPXS. -
Page 34: Connexion D'internet
-65 dBm (les chiffres plus proches de zéro correspondent à une puissance plus forte) au niveau du CAPXS doit être garantie pour assurer une connexion acceptable au réseau local. • Les SSID de réseaux cachés ne sont pas pris en charge. Le réseau doit pouvoir être sélectionné à partir de l’écran du CAPXS. ≤ -86 •... -
Page 35: Configuration Du Capxs
Admin. Montage du CAPXS Insérez le CAPXS dans le support de montage jusqu’à ce que l’unité se mette en place. À l’aide des vis fournies, serrez les vis à travers le côté du support de montage pour fixer solidement le CAPXS au support de... -
Page 36: Accès De Porte
CONTOURNEMENT COMMUN haute tension DE L'ALARME * REMARQUE : SERRURE MAGNÉTIQUE, à l'unité CAPXS. gâche de porte et CONTOURNEMENT DE Alimentation de la serrure L’ALARME non évalués par UL. COMMUN magnétique (non fournie). ** REMARQUE : Pour plus d'information Pour alimentation CC : N’utilisez PAS l'alimentation... -
Page 37: Accès De Portail (Câblé)
PAS avec le fonctionnement du une alimentation matériel de panique. CONTOURNEMENT haute tension à COMMUN l'unité CAPXS. DE L'ALARME * REMARQUE : SERRURE MAGNÉTIQUE, gâche Alimentation pour serrure de porte et CONTOURNEMENT DE L’ALARME COMMUN magnétique (non fournie). non évalués par UL. -
Page 38: Bouton De Réinitialisation
CAPXS à l’aide du bouton de réinitialisation. Pour réinitialiser manuellement le CAPXS : Lorsque le CAPXS est sous tension, appuyez sur le bouton de réinitialisation et maintenez-le enfoncé pendant 3 secondes. Le CAPXS va redémarrer et restaurer les paramètres d’usine par défaut. -
Page 39: Pièces Détachées
ARTICLE NUMÉRO DE PIÈCE Lecteur multi-classe SE RP10 Mini Mullion LMMC-MINI CAPXS, capuchon CAPXSHOOD CAPXS, Kit de garniture avec serrure postale CAPXSTKPL CAPXS, kit de garniture sans serrure postale CAPXSTK Clavier/lecteur de proximité Wiegand KPR2000* Portail d’accès connecté à 2 portes CAP2D * Le KPR2000 n’est pas homologué... -
Page 40: Fiche De Configuration
Fiche de configuration Enregistrez les données de l’appareil et les paramètres de configuration ci-dessous. Nom de CAPXS : REMARQUE : Tout utilisateur du système est soumis aux conditions décrites dans l’accord de licence de l’utilisateur final (EULA) du produit. Remarques : CONFIGURATION DU DISPOSITIF : PORTE 1... -
Page 41: Avis De Non Responsabilité
- Consultez le revendeur ou un technicien radio/TV expérimenté pour obtenir de l’aide. AVIS : Lorsque vous installez le CAPXS pour une entrée piétonne, montez le haut de l’écran CAPXS à une hauteur maximale de 54 pouces du sol afin de respecter la conformité ADA. -
Page 42: Garantie
Garantie LiftMaster (le « Vendeur ») garantit au premier acheteur de ce produit, pour la structure dans laquelle ce produit est installé à l’origine, qu’il est exempt de défauts de matériaux et/ou de fabrication pendant une période de deux ans à compter de la date d’achat. Le bon fonctionnement de ce produit dépend du respect des instructions en ce qui a trait l’installation, le fonctionnement, l’entretien et les tests. - Page 43 Intercomunicador de video inteligente S MANUAL DE INSTALACIÓN...
- Page 44 ANTES de instalar el equipo. la alimentación debe estar visible y bien etiquetada. • El CAPXS se instalará de acuerdo con el Código Eléctrico Nacional y todos los códigos locales. WARNING: This product can expose you to chemicals including lead, which are known to the State of California to cause cancer or birth defects or other reproductive harm.
- Page 45 CONFIGURACIÓN INTRODUCCIÓN ALIMENTACIÓN RED/MONTAJE CONTROL DE ACCESO DE LA CUENTA Vista general de CAPXS..........46 Vista general de las conexiones ........47 Inventario en caja ............48 Herramientas necesarias ..........48 Preparación para la instalación ........48 Dimensiones ............... 49 Especificaciones del sistema ........
-
Page 46: Configuración
ALIMENTACIÓN RED/MONTAJE CONTROL DE ACCESO DE LA CUENTA Vista general de CAPXS CONFIGURACIÓN El intercomunicador de video inteligente S (modelo CAPXS) es una solución de INTRODUCCIÓN ALIMENTACIÓN RED/MONTAJE CONTROL DE ACCESO DE LA CUENTA control de acceso basada en la nube que incluye una cámara de vídeo integrada que permite funciones de vídeo avanzadas. -
Page 47: Vista General De Las Conexiones
Vista general de las conexiones CONFIGURACIÓN INTRODUCCIÓN ALIMENTACIÓN RED/MONTAJE CONTROL DE ACCESO El CAPXS tiene una combinación de entradas/salidas de control de acceso que funcionan conjuntamente para controlar un DE LA CUENTA punto de acceso. CONEXIÓN 16 VCC A TIERRA... -
Page 48: Inventario En Caja
CONFIGURACIÓN INTRODUCCIÓN ALIMENTACIÓN RED/MONTAJE CONTROL DE ACCESO Radio Antenna (Security+ 2.0 ® DE LA CUENTA and Cable Ferrite Core Inventario en la caja CONFIGURACIÓN INTRODUCCIÓN ALIMENTACIÓN RED/MONTAJE CONTROL DE ACCESO DE LA CUENTA CONFIGURACIÓN ALIMENTACIÓN INTRODUCCIÓN RED/MONTAJE CONTROL DE ACCESO Fuente de alimentación Tornillo Torx (2) DE LA CUENTA... -
Page 49: Dimensiones
Compatibilidad Wi-Fi 802.11b/g/n ® Seguridad Wi-Fi CAPXS es compatible con los enrutadores que utilizan los siguientes protocolos de seguridad: WPA3 ® Personal y WPA2 Personal (AES). Alcance Wi-Fi Hasta 250 pies (76.2 m), al aire libre/línea de visión a la parte delantera del panel (el alcance variará en ®... -
Page 50: Especificaciones Del Cable
• El funcionamiento del sistema no se verá afectado si cualquier otro equipo desarrolla un cortocircuito en la línea eléctrica. * NOTAS DEL CABLE DE RED CAT 5/6: • Para distancias exteriores que superen los 140 pies (42.7 m), DEBE instalarse en el CAPXS un protector primario contra sobretensiones que cumpla con la norma UL497. -
Page 51: Requisitos De Internet
• Las redes Wi-Fi que requieran una autenticación secundaria no son compatibles (por ejemplo, Wi-Fi de hoteles y aeropuertos). • Cuando se verifica la intensidad de la señal en el modo de administración del CAPXS, se recomiendan al menos dos barras, como se muestra... -
Page 52: Configuración De La Cuenta Alimentación
El plan de suscripción se preselecciona en función de los dispositivos seleccionados. Seleccione los servicios complementarios y realice el pago. c. Siga las indicaciones para terminar de agregar el CAPXS y cualquier otro dispositivo de control de acceso de LiftMaster. 4. Configure la comunidad. -
Page 53: Instalar Soportes De Montaje
6 adecuado para el montaje en caja. Se sellado adicional. recomienda el uso de herrajes de acero inoxidable para el montaje. NOTAS: -Cumplimiento de la ADA: Cuando monte el CAPXS en una entrada peatonal, para cumplir con la ADA, CONFIGURACIÓN INTRODUCCIÓN ALIMENTACIÓN... -
Page 54: Conectar La Alimentación
Mientras empuja hacia abajo la pestaña naranja del conector de entrada • DESCONECTE la fuente de alimentación de alimentación del CAPXS en la tarjeta de control, inserte el cable del tomacorriente de 120 VCA antes de pelado en la entrada de polaridad respectiva. -
Page 55: Conectar Internet
, debe garantizarse una conexión continua de intensidad de ® -66 to -85 ≤ -86 señal Wi-Fi de al menos -65 DBM (los números más cercanos a cero son de mayor intensidad) en el CAPXS para asegurar una ® POSSIBLE POOR conexión aceptable a la red local. -
Page 56: Configurar Capxs
Montaje del CAPXS Introduzca el CAPXS en el soporte de montaje hasta que la unidad encaje en su lugar. Con los tornillos suministrados, apriete los tornillos a través del lateral del soporte de montaje para fijar firmemente el CAPXS al soporte... -
Page 57: Acceso A La Puerta
DERIVACIÓN NEUTRO unidad CAPXS. DE ALARMA * NOTA: UL no evaluó la TRABA MAGNÉTICA, la cerradura de puerta y la DERIVACIÓN DE ALARMA. Alimentación para la traba NEUTRO magnética (no se suministra) -
Page 58: Acceso A La Compuerta (Cableado)
Hacerlo puede provocar NOTA: NO conecte interferencias en el funcionamiento la alimentación de alta tensión a la del herraje antipánico. unidad CAPXS. DERIVACIÓN NEUTRO DE ALARMA * NOTA: UL no evaluó la TRABA MAGNÉTICA, la cerradura de puerta y la Alimentación para... -
Page 59: Botón Reset (Reiniciar)
BOTÓN RESET (REINICIAR) NOTA: Se recomienda restablecer los valores de fábrica del CAPXS mediante la opción de restablecimiento de fábrica en el modo de administración. Si olvidó el código de administración o la pantalla no responde, puede reiniciar manualmente el CAPXS con el botón Reset (Reiniciar). -
Page 60: Piezas De Repuesto
ARTÍCULO NÚMERO DE PIEZA Lector multiclase SE RP10 Mini Mullion LMMC-MINI CAPXS, Campana CAPXSHOOD CAPXS, Kit embellecedor con traba postal CAPXSTKPL CAPXS, Kit embellecedor sin traba postal CAPXSTK Teclado numérico/lector de proximidad Wiegand KPR2000* Portal de acceso conectado de 2 puertas CAP2D * El KPR2000 no está... -
Page 61: Ficha De Configuración
Ficha de configuración Registre la información del dispositivo y los ajustes de configuración a continuación. Nombre del CAPXS: NOTE: Cualquier usuario del sistema está sujeto a los términos descritos en el EULA del producto. Notas: CONFIGURACIÓN DEL DISPOSITIVO: PUERTA 1... -
Page 62: Avisos Legales
- Consultar al vendedor o a un técnico de radio/TV con experiencia para que lo ayude. AVISO: Cuando monte el CAPXS en una entrada peatonal, para cumplir con la ADA, monte la parte superior de la pantalla CAPXS a una altura no superior a 54 pulgadas del suelo. -
Page 63: Garantía
Garantía LiftMaster (“Vendedor”) garantiza al primer comprador de este producto, para la estructura en la que se instala originalmente este producto, que está libre de defectos en los materiales o en la mano de obra durante un período de dos años a partir de la fecha de compra. El funcionamiento correcto de este producto depende del cumplimiento de las instrucciones relativas a la instalación, el funcionamiento, el mantenimiento y las pruebas. - Page 64 Wi-Fi is a registered trademark of Wi-Fi Alliance ® ® Wi-Fi est une marque déposée de Wi-Fi Alliance ® ® Wi-Fi es una marca comercial registrada de Wi-Fi Alliance ® ® © 2022 LiftMaster All rights reserved. Tous droits réservés. 114-5547-000 Rev A Todos los derechos reservados.
Need help?
Do you have a question about the CAPXS and is the answer not in the manual?
Questions and answers