Advertisement
Installing the Chassis
•
•
•
•
•
•
•
Installation Options with Rack-Mount Kits
The rack-mount kit enables you to install the switch into racks of varying depths. You can position the switch
with easy access to either the port connections or the fan and power supply modules.
You can install the switch using the following rack-mount options:
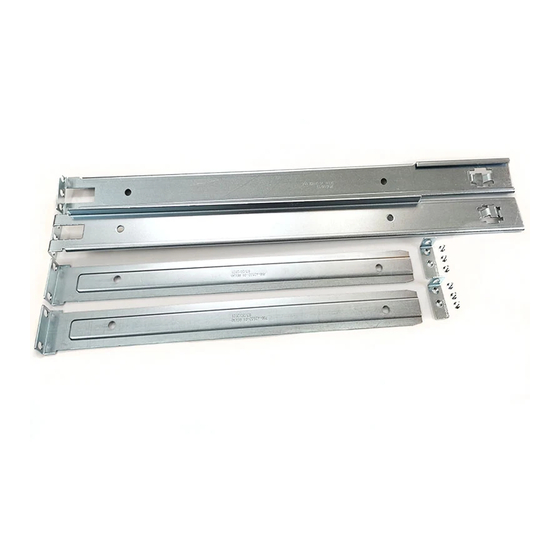
• Rack-mount kit (NXK-ACC-KIT2-2RU) which you can order from Cisco.
• Rack-mount kit (N9K-C9300-RMK) which you can order from Cisco.
The rack or cabinet that you use must meet the requirements listed the in
and Racks
Note
Install a Rack
Before you install the switch, you must install a standard four-post, 19-inch EIA data center rack (or a cabinet
that contains such a rack) that meets the requirements listed in
Installation Options with Rack-Mount Kits, on page 1
Install a Rack, on page 1
Unpacking and Inspecting a New Switch, on page 2
Installing the Chassis in a Four-Post Rack, on page 3
Grounding the Chassis, on page 10
Starting the Switch, on page 12
For four post racks.
For four post racks.
section.
You are responsible for verifying that your rack and rack-mount hardware comply with the guidelines that
are described in this doc.
General Requirements for Cabinets
Overview of
Racks.
Installing the Chassis
1
Advertisement

Subscribe to Our Youtube Channel
Related Manuals for Cisco NXK-ACC-KIT2-2RU


Summary of Contents for Cisco NXK-ACC-KIT2-2RU
-
Page 1: Table Of Contents
You can install the switch using the following rack-mount options: • Rack-mount kit (NXK-ACC-KIT2-2RU) which you can order from Cisco. For four post racks. • Rack-mount kit (N9K-C9300-RMK) which you can order from Cisco. -
Page 2: Unpacking And Inspecting A New Switch
Installing the Chassis Unpacking and Inspecting a New Switch Step 1 Bolt the rack to the concrete subfloor before moving the chassis onto it. Warning Statement 1048 Rack Stabilization The rack stabilizing mechanism must be in place, or the rack must be bolted to the floor before installation or servicing. -
Page 3: Planning How To Position The Chassis In The Rack
Installing the Chassis Planning How to Position the Chassis in the Rack • fan modules (all fan and power supply modules must have the same airflow direction) • Switch accessory kit Step 2 Check the contents of the box for damage. Step 3 If you notice any discrepancies or damage, send the following information to your customer service representative by email:... - Page 4 Installing the Chassis Installing the Switch using the NXK-ACC-KIT2-2RU Rack-Mount Kit Installing the Switch using the NXK-ACC-KIT2-2RU Rack-Mount Kit To install the switch, you must attach inner rails to the chassis, attach the outer rails to the rack, slide the switch onto the outer rails, and secure the switch to the rack with the retainer screws.
- Page 5 Installing the Chassis Installing the Switch using the NXK-ACC-KIT2-2RU Rack-Mount Kit Step 3 Fasten the two outer rails to the front posts of the rack by pushing the latch into place, as shown in the following illustration: Installing the Chassis...
- Page 6 Installing the Chassis Installing the Switch using the NXK-ACC-KIT2-2RU Rack-Mount Kit Step 4 Install the two outer rails to the back posts of the rack by extending them into place, as shown in the following illustration: Installing the Chassis...
- Page 7 Installing the Chassis Installing the Switch using the NXK-ACC-KIT2-2RU Rack-Mount Kit Step 5 Fasten the two outer rails to the back posts of the rack by pushing the latch into place, as shown in the following illustration: Installing the Chassis...
- Page 8 Installing the Chassis Installing the Switch using the NXK-ACC-KIT2-2RU Rack-Mount Kit Step 6 If installing from the front of the rack, slide the chassis into the rack by aligning the inner rails into the outer rails, and sliding the chassis back until the front panel is flush with the front of the rack. Then secure the retainer screws on the...
- Page 9 Installing the Chassis Installing the Switch using the NXK-ACC-KIT2-2RU Rack-Mount Kit Step 7 If installing from the back of the rack, slide the chassis into the rack by aligning the inner rails into the outer rails, and sliding the chassis forward until the front panel is flush with the front of the rack. Then slide the retainer screws out to...
-
Page 10: Grounding The Chassis
Installing the Chassis Grounding the Chassis Grounding the Chassis The switch chassis is automatically grounded when you properly install the switch in a grounded rack with metal-to-metal connections between the switch and rack. Note An electrical conducting path shall exist between the product chassis and the metal surface of the enclosure or rack in which it is mounted or to a grounding conductor. - Page 11 Installing the Chassis Grounding the Chassis You can also ground the chassis, which is required if the rack is not grounded, by attaching a customer-supplied grounding cable. Attach the cable to the chassis grounding pad and the facility ground. Warning Statement 1024 Ground Conductor This equipment must be grounded.
-
Page 12: Starting The Switch
Installing the Chassis Starting the Switch Step 3 Secure the grounding lug to the chassis grounding pad with two M4 screws, see the previous figure. Tighten the screws to 11 to 15 in-lb (1.24 to 1.69 N·m) of torque. Step 4 Prepare the other end of the grounding wire and connect it to the facility ground. - Page 13 A setup utility automatically launches the first time that you access the switch and guides you through the basic configuration. For instructions on how to configure the switch and check module connectivity, see the appropriate Cisco Nexus 9000 Series configuration guide.
- Page 14 Installing the Chassis Starting the Switch Installing the Chassis...
Need help?
Do you have a question about the NXK-ACC-KIT2-2RU and is the answer not in the manual?
Questions and answers