
Related Manuals for Silvercrest KH 2296


Summary of Contents for Silvercrest KH 2296
- Page 1 KITCHEN RADIO KH 2296 Kitchen Radio Operating instructions KOMPERNASS GMBH BURGSTRASSE 21 · D - 44867 BOCHUM www.kompernass.com ID-Nr.: KH2296-07/09-V3...
-
Page 3: Table Of Contents
INDEX Intended Use Items supplied Technical data Safety instructions The appliance components Fixing the kitchen radio beneath a wall cabinet Setting up the kitchen radio Setting up the appliance Radio operation Cleaning Disposal CE Conformity Importer Warranty & Service Read the operating instructions carefully before using the appliance for the first time and preserve this booklet for later reference. -
Page 4: Intended Use
This Kitchen Radio is not intended for utilisation in commercial or industrial applications. The warranty does not provide compensation for damage caused by improper use of the appliance! Items supplied 1 Kitchen radio KH 2296 1 Mounting plate 4 Screws 1 Operating manual Technical data... -
Page 5: Safety Instructions
Safety instructions • This appliance is not intended for use by individuals (including children) with restricted physical, physiological or intellectual abilities or deficiencies in experience and/or knowledge unless they are supervised by a person responsible for their safety or receive from this person instruction in how the appliance is to be used. - Page 6 • You are not permitted to open the appliance housing or repair the appliance. If the housing is opened, you run the risk of receiving a potentially fatal electric shock and the warranty lapses. • Protect the appliance against drip and spray water. Do not place any water-filled vessels (e.g.
- Page 7 Notice regarding separation from mains-power The POWER switch does not completely disconnect the appliance from the power network. Additionally, the appliance consumes power when in standby-mode. To completely separate the appliance from mains power, the power plug MUST be removed from the mains power socket.
-
Page 8: The Appliance Components
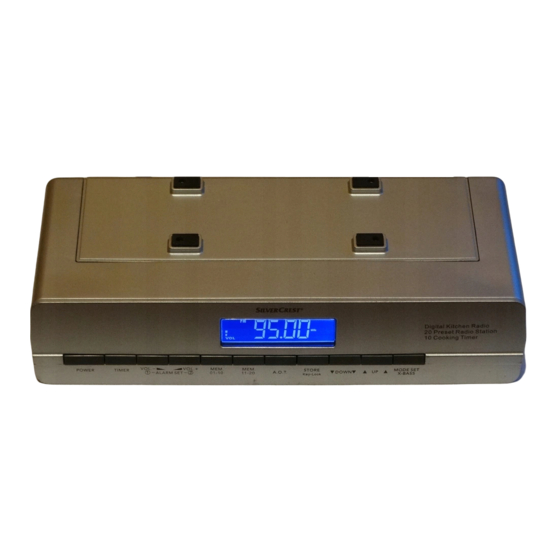
The appliance components q Mounting plate/Baseplate w Power cable e Wire aerial r Display t POWER y TIMER u VOL. — ALARM SET q i VOL. + ALARM SET w o Battery compartment a MEM. 01-10 s MEM. 11-20 d A.O.T. f STORE/Key-Lock DOWN j MODE SET/X-BASS - switches the display options,... -
Page 9: Setting Up The Kitchen Radio
Disassembly • To disassemble the kitchen radio, press the two retaining levers at the rear of the appliance downwards. Then pull the radio out to the front and remove it. • Unscrew the screws and remove the assembly plate. Setting up the kitchen radio Do not set the kitchen radio up without the mounting plate q. -
Page 10: Providing Mains Power
Providing mains power • Insert the plug into a mains power socket. The display is illuminated, the time begins to run but the radio is switched off (Automatic mode). Setting the time If a subsequent button is not pressed within 15 seconds, the kitchen radio switches back into automatic mode (the currently set time is displayed). -
Page 11: Kitchen Timer
Press the button MODE SET - X-BASS j once again to complete the programmings. Kitchen timer 1. Press the button TIMER y. 2. Using the buttons UP/DOWN h/g, set the desired time interval (a time span between 1 minute and 23:59 h is possible). - Page 12 5. Press the button STORE/Key Lock f once more. The time period is now saved. To display the time once again, press the button MODE SET/X-BASS j. 6. To recall the saved kitchen timer intervals, in automatic modus press the button TIMER y and then, correspond- ingly frequently, the button MEM.
-
Page 13: Radio Operation
5. If you hold the button A.O.T. d pressed down for 2 seconds, you can also, through repeated brief pressing of the A.O.T. d button, select a specific weekday (e.g. only WED). The selected setting is indicated in the display r. 6. -
Page 14: Programming Stations
2. Press and hold the button DOWN g for two seconds: the kitchen radio searches for the station with the next lowest frequency. Repeat these steps until you have found a radio station to your liking. Programming stations You can save 20 radio stations in the appliance. 1. -
Page 15: Cleaning
X-Bass Should you wish to have an amplified reproduction of the lower frequencies, press the button MODE SET/X-BASS j when in radio modus. Press this button once again to deactivate the function. Lock function You can lock the kitchen radio so that settings cannot be al- tered by unauthorised people or children. -
Page 16: Disposal
Disposal Do not dispose of the appliance in your normal domestic waste. This product is subject to the provisions of European Directive 2002/96/EC. Disposing of the appliance • Arrange for the product, or parts of it, to be disposed of by a professional disposal company or by your communal waste facility. -
Page 17: Warranty & Service
Warranty & Service You receive a 3-year warranty for this appliance as of the purchase date. Should you, in spite of our high quality standards, have grounds for complaint please contact our Service Hotline. In the event that processing of your complaint is not possible by telephone here you will receive •... - Page 18 - 16 -...
Need help?
Do you have a question about the KH 2296 and is the answer not in the manual?
Questions and answers