Mamava Solo Assembly Instructions Manual
Hide thumbs
Also See for Solo:
- Assembly manual (29 pages) ,
- Manual (5 pages) ,
- Assembly instructions manual (15 pages)

Related Manuals for Mamava Solo


Summary of Contents for Mamava Solo
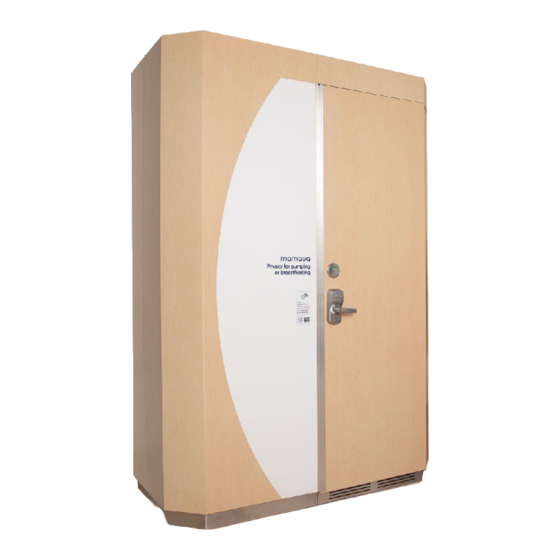
- Page 1 Solo Assembly Instructions People required: 2 Average time required: 2 hours For replacement parts, questions or concerns, contact: 802.347.2111 service@mamava.com Version: SOLO V1.1 02/25/2022 Page 1...
- Page 2 Page 2...
- Page 3 Table of Contents Floor leveling and placement (Page 5) Wiring: Roof Pans (Page 10) Step 1..Step 23..Step 2..Step 24..Step 3..Step 25..Step 4..Wiring: Beauty Panel (Page 11) Bench and Bench Posts (Page 6) Step 26..Step 5..
- Page 4 PARTS LIST GENERAL DIMENSIONS PART NUMBER DESCRIPTION (INCHES) SOLO-A100 FLOOR PAN 60 X 34 X 5 SOLO-A104 BENCH POST 14 X 3 X 7 F209 SOLO-C100 BEAUTY PANEL 31 X 11 X 4 SOLO-D100 FRONT LEFT WALL PANEL 30 X 17 X 84...
- Page 5 FLOOR LEVELING AND PLACEMENT 1. Place provided Level in desired location. Ensure that there are no gaps between the bottom of the level and the floor that are greater than 1/8", and that the site is level (the indicating bubble on the level should be between the center marks).
- Page 6 BENCH AND BENCH POSTS 5. Slide Bench Posts into Bench Post Brackets, fasten as shown. (4) M8 X 1.25 X 25mm screws **Note: Bench Posts are universal and can go into either Bench Post Bracket. BENCH E100 6. Place Bench onto Bench Post Brackets by aligning Bench Flange Screws (Detail A) with the teardrop holes (Detail B) in the Bench Posts.
- Page 7 LEFT WALL PANELS 8. Set Front Left Wall Panel onto notched flange BACK LEFT WALL PANEL in Floor Pan. Wall Panels should slide onto the D200 FRONT LEFT WALL PANEL Floor Pan. If not, check alignment and try again. D100 9.
- Page 8 BACK RIGHT WALL PANEL 14. Set Back Right Wall Panel onto notched flange in Floor Pan. 15. Rotolock back panels together using provided allen key. 16. Place Rotolock Caps over visible holes. 17. Fasten Back Right Wall Panel to Floor Pan. (2) M8 X 1.25 X 40mm screws BACK RIGHT WALL PANEL BACK LEFT WALL PANEL...
- Page 9 HEADER AND ROOF PANS 18. Pop Header Brackets into Wall Panel Bracket Slots by pushing MIDDLE ROOF PAN F301 downward on Header (Detail D). You may need to pull the Wall Panel and Header together. Rotolock Header to Front Left Wall Panel and Back Right Wall Panel with provided allen key.
- Page 10 WIRING: ROOF PANS PCD POWER CORD 23. Connect Roof Pan Wire Harness to Front Left Wall Panel Wire. 24. Connect Roof Pan Wire Harness to Back Right Wall Panel Wire. BACK RIGHT 25. Plug PCD Power Cord into PCD WALL PANEL WIRE and flip up antennas.
- Page 11 WIRING: BEAUTY PANEL 26. Remove Wire Grommet Cover from back of unit and run GFCI Wire into unit through Back Left Wall Panel. 27. Connect GFCI wire to Beauty Panel Junction Box and replace Wire Grommet Cover. 28. Connect PCD Power Cord to Beauty Panel Junction Box.
- Page 12 ROOF AND PERF PANS AND SHELF 32. Fasten Roof Pans to top of Wall Panels, as shown in Detail E. (8) #8 X 3/4" Pan-head screws 33. Drop both Perf Pans into roof opening, carefully guiding the PCD antennas through the holes in the Perf Pans. 34.
- Page 13 DOOR 36. Hang Door as shown, ensuring door is open enough to clear the Header. 37. Connect door closer arms. Ensure the door latches but doesn't slam. Adjust tension and speed screws if needed. 38. Attach both door handles to door by snapping them into the exposed handle holes.
- Page 14 LEVELING **Tighten all screws highlighted in red. 40. Level the unit by adjusting the leveling bolts until the door latches and the deadbolt turns smoothly. (4) Leveling Bolts - 9/16" Socket Head 41. Tighten the screws that attach the Bench Posts to BENCH E100 the Wall Panels.
- Page 15 By signing the below, certifies the understanding and satisfaction with the pod(s) installation. Any installation changes and/or requests submitted to Mamava post installation may be subject to service fees. Mamava.com...
Need help?
Do you have a question about the Solo and is the answer not in the manual?
Questions and answers