Advertisement
Table of Contents
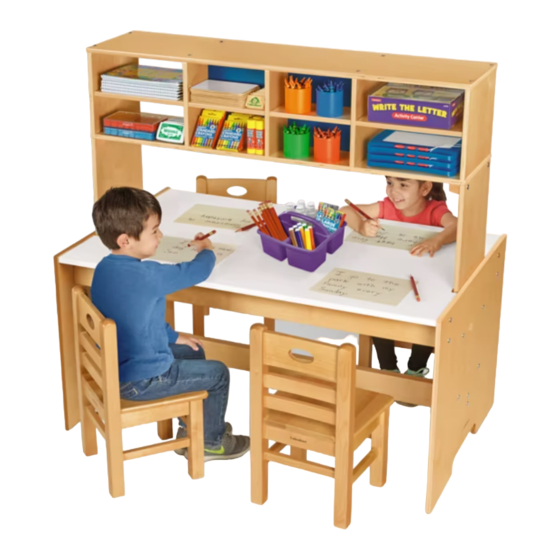
Lakeshore Writing Center
With room for students on both sides and plenty of storage space, your new writing center is sure to become
a favorite spot for young writers! Assembly is easy—we've provided all of the tools and hardware you'll
need. Check the pieces against the illustrations to make sure you can identify them. Then, find another adult
to help you and follow the directions below.
hutch walls (2)
hutch
Assembly Instructions
1. Attach one side panel to the desktop. Insert 4 barrel nuts into the holes in the desktop, making sure the
holes line up as shown in the inset. Then, insert 4 long bolts into the holes in the desk sides. Use the Allen
wrench to tighten each bolt securely.
2. Attach the center beam to the same side panel in the same manner, using 2 barrel nuts and 2 long bolts.
© 2006 Lakeshore
(800) 428-4414
www.lakeshorelearning.com
Components
desk sides (2)
This product contains hardware that, before
assembly, can pose a choking hazar d to children
under the age of 3 years. Care should be taken
when unpacking and assembling thi
center beam
desktop
Adult assembly required.
s product.
Hardware
long bolts ( 1 2)
short screws ( 1 2)
barrel nuts ( 1 2)
Allen wrench
(continued on back)
JJ639
Printed in Taiwan
Advertisement
Table of Contents

Subscribe to Our Youtube Channel
Related Manuals for Lakeshore Writing Center


Summary of Contents for Lakeshore Writing Center
- Page 1 Lakeshore Writing Center With room for students on both sides and plenty of storage space, your new writing center is sure to become a favorite spot for young writers! Assembly is easy—we’ve provided all of the tools and hardware you’ll need.
- Page 2 (The screws should go through the holes in the hutch wall and into the predrilled holes in the blocks on the bottom of the hutch.) That’s all there is to it! Place the Writing Center in your classroom, and let the writing begin!
Need help?
Do you have a question about the Writing Center and is the answer not in the manual?
Questions and answers