Table of Contents
Advertisement
Quick Links
Advertisement
Table of Contents

Related Manuals for Spedal CL796 Series


Summary of Contents for Spedal CL796 Series
- Page 1 USER MANUAL Smart Multimedia Dashcam CL796 Series 017C2128-EN...
-
Page 2: Table Of Contents
CONTENT 1. DISCLAIMER AND SAFETY GUIDELINES 1.1 Disclaimer 1.2 Safety Guidelines 2. ACCESSORIES AND INTERFACES 2.1 In the box 2.2 Product Diagram 2.3 Installation Guideline 2.4 Interfaces Introduction 3. FUNCTIONS AND SETTINGS 3.1 General Settings 3.2 CarPlay / Android Auto and their settings 3.3 Recorder and its settings 3.4 FM and its settings 3.5 Playback and its settings... -
Page 3: Disclaimer And Safety Guidelines
If the manual is updated, revised or terminated, we will not notify you personally. Please visit the official website of Spedal for the latest product information. Spedal is a trademark of Shenzhen Xinzhuang Goodo Technology Co. Ltd. and its affiliates. -
Page 4: Safety Guidelines
1.2 Safety Guidelines Warnings ● Please use the original cable and power cords only; ● Do not exceed the rated voltage when using the device; ● Do not install or operate the device with wet hands; ● Do not install the device in places of high temperature, humidity; ●... -
Page 5: Accessories And Interfaces
Wire B is for pickups and Wire C is for trucks. Please use the SPEDAL original cable and accessories only. Gifts and accessories are not covered by the warranty. The content of this product package is subject to change without notice, the actual... -
Page 6: Product Diagram
2.2 Product Diagram Screw hole for suction bracket Microphone Screen Sticking bracket Left side Right side 3.5mm Port TF Card Slot Power AV-IN Port Button Power Port... -
Page 7: Installation Guideline
2.3 Installation Guideline The device is in the storage state when it leaves the factory. Please follow the steps below to prepare for installation: 1. Take the device and its accessories out of the box or plastic bag; 2. Tear off the protective film on the screen and lens of the device; 3. - Page 8 Suction Bracket Installation 1. Aim the screw of the suction bracket into the screw hole on the device; 2. Rotate the suction bracket clockwise to tighten the screw; 3. Select a proper position (such as the center of the front windshield), attach the suction mound to the glass and press the lock piece to squeeze the air out of the suction cup;...
- Page 9 Dashcam Installation 1. Insert the plug of the In-Car Charger into the cigarette lighter socket of the car; 2. Insert the Mini-USB plug of the In-Car Charger into the USB slot of the device; 3. Fix the device on the dash board by using the sticking bracket. You might use the suction bracket to replace the sticking bracket and fix the device on the front windshield.
-
Page 10: Interfaces Introduction
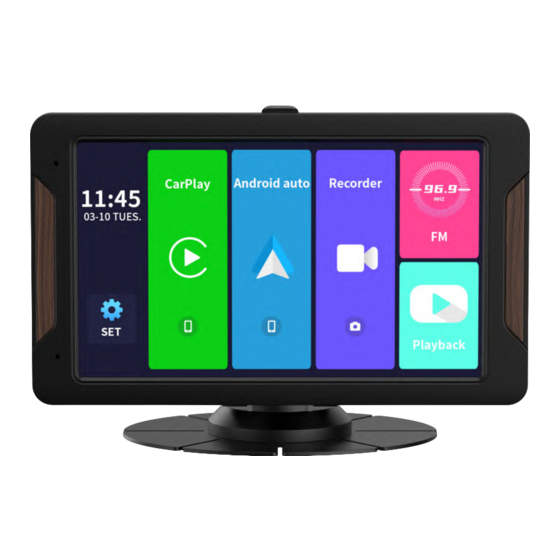
2.4 Interfaces Introduction Main Interface When you connect the device to the vehicle via the in-vehicle charging cable, the device powers on after the vehicle starts. If you want to connect the device to the power in any other way, press and hold the power button to turn it on. The screen after turning on the device is as follows. -
Page 11: Functions And Settings
3. FUNCTIONS AND SETTINGS 3.1 General Settings Click “Settings” on the main interface to enter “General Settings”. Screen Saver 12:00 Clock Settings 08-08 Sun. Resolution Video Duration Protect Level Click to return to the main interface. Scroll to see all subcategories. Subcategory Option Introduction... - Page 12 Subcategory Option Introduction Keyboard Off / On Default is On. Feedback sound of clicking. clicks Volume 0-10 Default is 5. Volume of the device. English, Deutsch, Français, Italiano, Español, Language System language. 简体中⽂, 繁体中 ⽂, ⽇本語 Firmware View the firmware version. Version Flicker 50Hz / 60Hz...
-
Page 13: Carplay / Android Auto And Their Settings
3.2 CarPlay / Android Auto and their settings CarPlay or Android Auto will allow you to connect your mobile phone to the dashcam wirelessly and to manipulate your mobile phone Apps from the dashcam. Please make sure in advance that your iPhone is above iOS 9 or your Android cellphone is above Android 11. -
Page 14: Recorder And Its Settings
3.3 Recorder and its settings Click “Recorder” on the main interface to enter the dashcam interface. Video Duration Lock File Status Sound Status Settings - Time 1080P 2020-05-16 07:03:21 00:00:00 Settings - Resolution Switch Front and Rear Camera Settings Lock File Return Take Photo Shoot Video... -
Page 15: Fm And Its Settings
3.4 FM and its settings Before using this function, please ensure at first that your mobile phone has been connected to the dashcam through CarPlay or Android Auto(refer to 3.2 CarPlay / Android Auto and its settings) and screen and sound synchronization have begun properly. FM transmitter technology allows you to launch specific FM frequency (please make sure that this frequency is not occupied by any radio or broadcast) from the dashcam. -
Page 16: Playback And Its Settings
3.5 Playback and its settings Playback Interface File Thumbnail. Click to Expand Current Page / Total Pages Selected File in Red 01/13 FILE200516-083422-000103F.TS Return FILE200516-083321-000102F.TS Unlocked Videos FILE200516-083221-000101F.TS FILE200516-083121-000100F.TS Locked Videos FILE200516-083021-000099F.TS FILE200516-082920-000098F.TS Photos FILE200516-082820-000097F.TS Switch Front / Rear Videos FILE200516-082720-000096F.TS Unselected Files in Black Expanded File... -
Page 17: Appendix
-30℃ ~75℃ 4.2 Warranty Thank you for purchasing the Spedal multifunctional dashcam. This unique product owns the CarPlay and Android Auto functions to bring extraordinary experience to your journey. Customers enjoy a one-year warranty and after-sales service from the date of purchase.
Need help?
Do you have a question about the CL796 Series and is the answer not in the manual?
Questions and answers