Advertisement
Advertisement
Table of Contents

Subscribe to Our Youtube Channel
Related Manuals for Most Fanmig J5 MOST


Summary of Contents for Most Fanmig J5 MOST
- Page 1 User manual for MIG/MAG semi-automatic welding machine Fanmig J5 MOST Attention! A copy of this manual should be located in the place of device use and should always remain available to the operator. User Manual Original manual rev. 1.1 of 16.12.2019...
-
Page 2: Table Of Contents
Thank you for purchasing a semi-automatic welding machine Fanmig by MOST. We do believe that this product will meet your requirements. In order to ensure the correct use, all the safety and operating instructions should be read before operating this device. - Page 3 When connected to electrical network the device must not be covered (for example, with paper or cloth), - minimize the amount of dirt and dust that can get into the device, Original manual User Manual Fanmig J5 MOST rev. 1.1 of 16.12.2019...
-
Page 4: Maintenance
In the event of noticing any damage, the welder should stop working, disconnect the device from power supply and report it to direct supervisor or appropriate service - technical support of RYWAL-RHC. Original manual User Manual Fanmig J5 MOST rev. 1.1 of 16.12.2019... -
Page 5: Technical Description And Operating Conditions
TIG DC method with ignited by rubbing the tip of the LiftTIG tungsten electrode. The device is protected against overheating by a thermal sensor. Made in accordance with EN 60974-1 standard. Original manual User Manual Fanmig J5 MOST rev. 1.1 of 16.12.2019... -
Page 6: Technical Data
56 01 062634 0.8-1.0 Roll 51 13 007833 (as standard) 0.6-0.8 Roll 51 13 007801 K300 spool adapter 50 00 001103 WUS HD MOST welding cart 50 03 003942 MOST Welding pliers 57 00 004707 Original manual User Manual Fanmig J5 MOST rev. -
Page 7: Device Construction
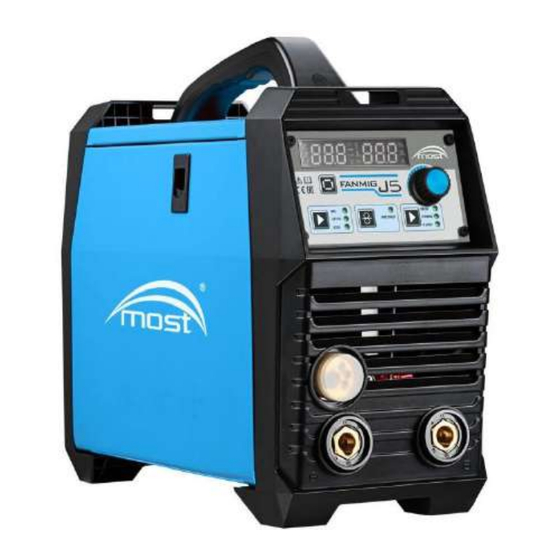
Power cord with plug Gas connection Control panel Euro socket for MIG/MAG welding torch Socket (+) Socket (-) Wire feeder with spool holder (internal) Figure 1: Fanmig J5 MOST construction Original manual User Manual Fanmig J5 MOST rev. 1.1 of 16.12.2019... -
Page 8: Fanmig J5 Control Panel
6. Fanmig J5 control panel Figure 2: Fanmig J5 MOST Control Panel 6.1 Display Shows parameter values, function symbols and units. Settings are made using the button (2) and knob (4). 6.2 Additional function switch for MIG/MAG method (2): When pressed, it switches between: •... - Page 9 Welding will continue until the button is pressed again (4-stroke). Attention: A description of the control panel functions is also located on a sticker inside the wire feeder. Original manual User Manual Fanmig J5 MOST rev. 1.1 of 16.12.2019...
-
Page 10: Mig/Mag Welding Technique
It is possible to use trolleys to transport the device together with the cylinder and accessories, e.g. WUS HD MOST cat. no. 50 03 003942. Having the cylinder placed and gas hose connected to the back of welding device, unscrew the cylinder valve and set pressure level with the reducer. - Page 11 When welding with self-shielding flux wire it may be necessary to change the polarization - see wire manufacturer's recommendations. The way to change the polarity of the wire by placing the wires is shown in the feeder sticker: Original manual User Manual -11- Fanmig J5 MOST rev. 1.1 of 16.12.2019...
- Page 12 Connect the ground cable to the 6 (+) socket on the front of the device. The ground clamp should be securely attached to the workpiece, preferably as close as possible to the welding point. Original manual User Manual -12- Fanmig J5 MOST rev. 1.1 of 16.12.2019...
-
Page 13: Mma Welding (Coated Electrode)
Connect the plug of the electrode holder to socket 6 (+) on the device. Some coated electrodes require reverse polarity - see instructions on the electrode pack. Figure 6: Preparation of Fanmig device for MMA welding (coated electrode). Original manual User Manual -13- Fanmig J5 MOST rev. 1.1 of 16.12.2019... - Page 14 Contact technical support Too much spatter during welding Too high wire feeding speed Lower the speed Too high welding current Lower welding current Welded workpiece dirty Clean the welded workpiece Original manual User Manual -14- Fanmig J5 MOST rev. 1.1 of 16.12.2019...
- Page 15 • Too high welding current Cracks present after welding Adjust the welding current to the • Soiled material electrode diameter. • Moisted cover Table 3: Faults during MMA welding. Original manual User Manual -15- Fanmig J5 MOST rev. 1.1 of 16.12.2019...
- Page 16 1. Poor sharpening or blunt tungsten Sharpen the electrode with a sharpener electrode WAG 40 MOST. Adjust the electrode type 2. Tungsten electrode diameter too small and diameter to the task. Do not allow 3. Poor electrode guidance during welding...
- Page 17 11. Fanmig J5 Wiring diagram Original manual User Manual -17- Fanmig J5 MOST rev. 1.1 of 16.12.2019...
-
Page 18: Eu Declaration Of Conformity
3. This declaration of conformity is issued under the sole responsibility of the manufacturer. 4. Object of the declaration Semi-Automatic Welding Machine Fanmig J5 MOST. 5. The subject matter of this declaration mentioned above is in conformity with the relevant requirements of EU harmonization legislation:... -
Page 19: Recycling
Equipment), after decommissioning, the device must be recycled by a specialized company. Do not dispose of worn-out welding equipment with domestic waste! The devices are subject to constant changes and improvements. We reserve the right to make changes. End. Original manual User Manual -19- Fanmig J5 MOST rev. 1.1 of 16.12.2019...
Need help?
Do you have a question about the Fanmig J5 MOST and is the answer not in the manual?
Questions and answers