Table of Contents
Advertisement
Available languages
Available languages
Quick Links
MODELS #11068 & #11069 6SE & 8SE
Q U I C K S E T - U P G U I D E
ENGLISH
Telescope
Setup
3
Remove the leg brace locking knob.
6
Bubble Level
To check that the tripod is level, place the bubble
level on top of it. Carefully readjust the height of
each leg as needed and then re-check using the
level. Remove the level when you are done.
1
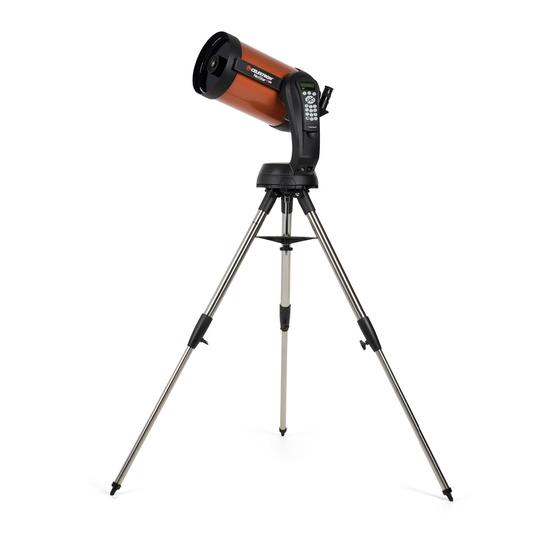
Ensure that all parts of your NexStar 6SE or
8SE telscope are present: fork arm, optical tube,
tripod, accessory tray, computerized hand control,
25mm eyepiece, StarPointer red dot fi nderscope,
star diagonal, bubble level.
4
Slide the accessory tray onto the threaded rod
so that each arm of the tray braces against each
tripod leg. Replace and tighten the leg brace
locking knob to secure the tray in place.
7
Set the base of the telescope on the tripod
head so that the hole in the center of the mount
base aligns with the positioning pin on top of
the tripod. Rotate the telescope mount so the
3 rubber feet align with the 3 recesses on the
tripod mounting plate.
2
Spread the tripod's legs out and place the tripod
on the ground.
5
Locking Knob
To extend each tripod leg to the desired height,
loosen the locking knob, pull the leg section out,
and re-tighten the knob.
8
Tighten the captive mounting bolts under the
tripod head to secure the mount to the tripod.
Advertisement
Table of Contents

Subscribe to Our Youtube Channel
Related Manuals for Celestron NexStar SE


Summary of Contents for Celestron NexStar SE
- Page 1 MODELS #11068 & #11069 6SE & 8SE Q U I C K S E T - U P G U I D E ENGLISH Telescope Setup Ensure that all parts of your NexStar 6SE or Spread the tripod’s legs out and place the tripod 8SE telscope are present: fork arm, optical tube, on the ground.
- Page 2 To adjust the balance or remove the tube from Slide the StarPointer red dot finderscope onto Remove the cap on the rear of the telescope. the base, simply loosen the quick-release clamp mounting bracket. Tighten the screws on side of Insert the silver barrel of the star diagonal into the knob and slide the tube back towards the rear the finderscope StarPointer to secure it in place.
- Page 3 Before you can begin using your NexStar 6SE or The first time you turn on the scope, you will need The display reads “NexStar SE Ready. ” Press 8SE, you must set up your computerized hand to select the language. Press the number button ENTER to begin the alignment procedure.
-
Page 4: Solar Warning
Please note that changes or modifications not expressly approved by the party responsible for compliance could void the user’s authority to operate the equipment. © 2021 Celestron • All rights reserved celestron.com/pages/technical-support Product design and specifications are subject to change without prior notification. - Page 5 MODÈLES #11068 & #11069 6SE & 8SE G U I D E D E C O N F I G U R A T I O N R A P I D E FRANÇAIS Réglage du Télescope Votre NexStar 6SE ou 8SE est livré avec : un Assemblez le trépied en écartant les pieds bras de fourche avec tube optique, trépied, jusqu’à...
-
Page 6: Orienter Le Télescope
Pour régler l’équilibre ou retirer le tube de Faites glisser le chercheur à point rouge Retirez le capuchon de l’arrière du télescope. la base, desserrez simplement le bouton de StarPointer sur le support de montage et serrez Insérez le barillet argenté du renvoi coudé dans serrage rapide et faites glisser le tube vers la les vis situées sur le côté... - Page 7 Avant de pouvoir commencer à utiliser votre La première fois que vous allumez le télescope, L’écran affiche « NexStar SE Ready ». Appuyez NexStar 6SE ou 8SE, vous devez configurer votre vous devrez sélectionner la langue d’affichage. sur le bouton ENTRER pour commencer la commande électronique et suivre la procédure...
-
Page 8: Avertissement Sur Le Soleil
• Branchez l’équipement dans une prise sur un circuit différent de celui auquel le récepteur est connecté. Voyez le site Web de Celestron pour obtenir des informations • Consultez le revendeur ou un technicien radio / TV expérimenté pour obtenir de l’aide. - Page 9 MODELL NR.11068 / NR.11069 6SE / 8SE S C H N E L L S T A R T A N L E I T U N G DEUTSCH Teleskop einrichten Im Lieferumfang Ihres NexStar 6SE oder 8SE Bauen Sie das Stativ zusammen, indem Sie die sind enthalten: Gabelarm mit optischem Tubus;...
- Page 10 Um den Tubus zu justieren oder von dem Schieben Sie das StarPointer-Sucherfernrohr Entfernen Sie die Kappe auf der Rückseite des Sockel zu entfernen, lösen Sie einfach den auf die Montagehalterung und ziehen Sie Teleskops. Führen Sie die verchromte Steckhülse Schnellspann-Klemmknopf und schieben Sie die Schrauben an der Seite des StarPointer- des Star-Zenitspiegels wie oben dargestellt in den Tubus zurück in Richtung der hinteren Zelle...
- Page 11 Ausrichten des 25-mm Okular Sucherfernrohrs Fokussierknöpfe Das Sucherfernrohr ist eines der wichtigsten WÄHLEN SIE EIN ZIEL ZENTRIEREN SIE DAS ZIEL IM OKULAR Teile Ihres Teleskops. Es hilft Ihnen, Objekte Nehmen Teleskop tagsüber Schauen Sie mit Ihrem Okular bei niedrigerer zu suchen und im Okular zu zentrieren. Wenn nach draußen und suchen Sie ein leicht Vergrößerungsleistung durch...
- Page 12 + Den Händler oder einen erfahrenen Radio- und Fernsehtechniker um Hilfe bitten. © 2021 Celestron • Alle Rechte • vorbehalten • Dieses Produkt wurde für den Gebrauch durch Personen von 14 Jahren oder älter entworfen und bestimmt. celestron.com/pages/technical-support Produktdesign und technische Daten können ohne vorherige Ankündigung geändert werden.
-
Page 13: Guida Rapida
N. 11068 / N. 11069 6SE / 8SE G U I D A R A P I D A ITALIANO Confi gurazione telescopio Il NexStar 6SE o 8SE include: braccio a forcella Montare il treppiede allargando completamente con tubo ottico; treppiede; vassoio porta- le gambe verso l’esterno e sistemare il treppiede accessori;... -
Page 14: Spostamento Del Telescopio
Per regolare l’equilibrio o rimuovere il tubo dalla Fare scorrere il cercatore a puntino rosso Rimuovere il tappo dalla parte posteriore del base, allentare semplicemente la manopola del StarPointer sulla staffa di montaggio e serrare telescopio. Inserire il barilotto argentato del fermo a rilascio rapido e fare scorrere il tubo le viti poste a lato del cercatore StarPointer diagonale stellare nel visual back come mostrato... - Page 15 Prima di iniziare a utilizzare il NexStar 6SE o La prima volta che si accende il telescopio Lo schermo mostra “NexStar SE Ready” occorre selezionare la lingua dello schermo. 8SE, occorre configurare il comando manuale (NexStar SE pronto). Premere ENTER (INVIO)
-
Page 16: Avvertenza Solare
+ Riorientare o riposizionare l’antenna di ricezione. + Aumentare la distanza tra l’apparecchiatura e il ricevitore. Per informazioni dettagliate, consultare il sito Web di Celestron + Collegare l’apparecchiatura a una presa su un circuito diverso da quello a cui è collegato il ricevitore. -
Page 17: G U Í A D E I N S T A L A C I Ó N R Á P I D A
#11068 & #11069 6SE & 8SE G U Í A D E I N S T A L A C I Ó N R Á P I D A ESPAÑOL Instalación del telescopio Su NexStar 6SE u 8SE incluye: brazo de horquilla Monte el trípode separando las patas hasta que con tubo óptico;... - Page 18 Para ajustar el equilibrio o sacar el tubo de la Deslice el localizador de punto rojo StarPointer Saque la tapa de la parte posterior del telescopio. base, afloje el mando de la fijación de liberación en el soporte de montaje y apriete los tornillos Introduzca el cañón plateado de la diagonal rápida y deslice el tubo hacia la célula posterior ubicados en el lateral del localizador StarPointer...
- Page 19 Antes de poder comenzar a usar su NexStar 6SE u La primera vez que encienda el telescopio La pantalla mostrará “NexStar SE preparado”. 8SE debe instalar su mando manual informatizado deberá seleccionar el idioma mostrado. Pulse el Pulse ENTER para iniciar el procedimiento de y usar el procedimiento de alineación SkyAlign.
-
Page 20: Aviso Solar
+ Conectar el equipo a una toma de corriente o circuito distinto de aquél al que esté conectado el receptor. Consulte el sitio web de Celestron para obtener información + Consultar al vendedor o a un técnico experimentado de radio/TV para obtener ayuda.
Need help?
Do you have a question about the NexStar SE and is the answer not in the manual?
Questions and answers