Celestron NexStar 8i Instruction Manual
Celestron nexstar 8i: instruction manual
Hide thumbs
Also See for NexStar 8i:
- Addendum (5 pages) ,
- User manual (241 pages) ,
- Communication protocol manual (8 pages)

Related Manuals for Celestron NexStar 8i


Summary of Contents for Celestron NexStar 8i
- Page 1 ® • • • • • • • •...
-
Page 2: Table Of Contents
OPTIONAL COMPUTERIZED HAND CONTROL ................17 Hand Control Operation ........................18 Alignment Procedures..........................19 Auto-Align................................19 Two-Star Alignment ............................20 Quick-Align ................................21 GPS Alignment (with Optional CN 16 Accessory).....................21 EQ Alignments ..............................22 Re-Alignment ..............................23 Object Catalog ............................23 Finding Planets ............................24 Tour Mode..............................24 Direction Buttons ...........................25 Rate Button.............................25... - Page 3 OPTIONAL ACCESSORIES ......................51 APPENDIX A – TECHNICAL SPECIFICATIONS................55 APPENDIX B – GLOSSARY OF TERMS ..................57 APPENDIX C –LONGITUDES AND LATITUDES ................60 APPENDIX D – RS-232 CONNECTION (for Computerized Hand Control) ........65 APPENDIX E – TIME ZONE MAPS ....................66 SKY MAPS ............................68...
-
Page 4: Introduction
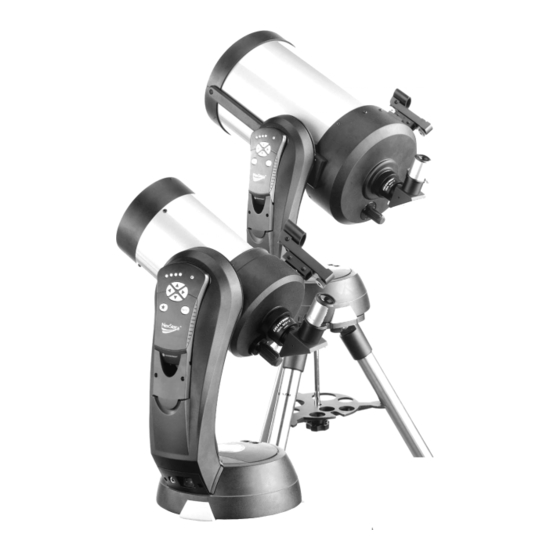
At a touch of a button, you can move your telescope across the sky in a matter of seconds and track objects remotely as the Earth rotates beneath them. The NexStar-i is fully upgradeable and can be equipped with the optional NexStar Hand Control with a database of over 40,000 objects (see the Computerized Hand Control section of this manual) for fully automated operation. - Page 5 Figure 1-A - The NexStar i-Series Optical Tube Battery Compartment Star Pointer Finderscope ON/OFF Switch / 12v power Eyepiece Fork Arm Star Diagonal Electronic Hand Control Focuser Knob Schmidt Corrector Plate (not shown)
- Page 6 B) Remove the front lens cover from the end of the telescope. C) Attach the Star Pointer and turn it on by rotating the dial on the side. (For more information on attaching the Remove the NexStar from its packaging and place accessories, see the Assembly section of the base on a sturdy, level surface.
- Page 7 Rotate the focuser knob until the object in the eyepiece comes to a sharp, bright focus. Use the arrow direction buttons to move the telescope and point it at a bright object such as the Moon. Press the RATE button to change the motor speed for fine centering.
-
Page 8: Assembling The Nexstar
Start by removing the telescope from its shipping carton and setting the round base on a flat table or surface. It is best to carry the telescope by holding it from the lower portion of the fork arm and from the bottom of the base. -
Page 9: The Hand Control
To return the hand control into the fork arm, lower the hand control into the cradle so that the opening in the back of the hand control slides over the clip inside the fork arm. -
Page 10: The Star Pointer Finderscope
The Star Pointer is the quickest and easiest way to point your telescope exactly at a desired object in the sky. It's like having a laser pointer that you can shine directly onto the night sky. The Star Pointer is a zero magnification pointing tool that uses a coated glass window to superimpose the image of a small red dot onto the night sky. - Page 11 With both eyes open, look through the glass window at the alignment star. If the Star Pointer is perfectly aligned, you will see the red LED dot overlap the alignment star. If the Star Pointer is not aligned, take notice of where the red dot is relative to the bright star.
-
Page 12: Hand Control
NexStar allows you to remotely move your telescope to desired objects quickly and accurately. At a touch of a button, you can slew your telescope across the sky in a matter of second and track objects remotely as the Earth rotates beneath them. The NexStar is fully upgradeable and can be equipped with the optional NexStar Computerized Hand Control with a database of over 40,000 objects (see the computerized Hand Control section of this manual). -
Page 13: Rate Button
6º per second *When used in the equatorial tracking modes, track rate 1 is equal to 1.5x sidereal, and 2x when using the double button. The hand control has a "double button" feature that allows you to instantly speed up the motors without having to choose a speed rate. -
Page 14: Utility Features
Alt-Az Tracking – The NexStar gives you the ability to adjust the tracking speed in both altitude (up and down) and azimuth (side to side) to allow you to track an object as it moves across the sky. Once a celestial object is centered in the field of view of the eyepiece, notice which direction the object appears to drift in the eyepiece. - Page 15 How to Set Alt-Az Tracking In order for an Alt-Az telescope to accurately track objects in the sky, it must be able to speed up and slow down the altitude and azimuth motors in order to keep up with the way the stars naturally travel in an arc across the sky.
- Page 16 Each time you use the double button the track rate will increase by 1x sidereal. Example, if you wish to track a star in the south that is at 70° altitude (see table for Altitude 70°), instead of pressing the azimuth button 11 times you could use the double button twice and then press the single button 3 times.
-
Page 17: Optional Computerized Hand Control
With automatic slewing to over 40,000 objects, and common sense menu descriptions, even a beginner can master its variety of features in just a few observing sessions. Below is a brief description of the individual components of the computerized hand controller: Liquid Crystal Display (LCD) Window: Has a dual-line, 16 character display screen that is backlit for comfortable viewing of telescope information and scrolling text. -
Page 18: Hand Control Operation
10. Scroll Keys: Used to scroll up and down within any of the menu lists. A double-arrow will appear on the right side of the LCD when there are sub-menus below the displayed menu. Using these keys will scroll through those sub-menus. -
Page 19: Alignment Procedures
Once this information is received, NexStar will prompt you to move the telescope in altitude to line up the two index marks on the fork arm. The final step is to rotate the telescope so that the tube is pointing towards the north. -
Page 20: Two-Star Alignment
Star Pointer finderscope. Once finished slewing, the display will ask you to use the arrow buttons to align the selected star with the red dot in the center of the Star Pointer. If for some reason the chosen star is not visible (perhaps behind a tree or building) you can press UNDO to select and slew to a different star. -
Page 21: Quick-Align
NexStar the information needed to track objects in altazimuth in any part of the sky. Quick-Align is not meant to be used to accurately locate small or faint deep-sky objects or to track objects accurately for photography. -
Page 22: Eq Alignments
Power on the NexStar by flipping the switch located on the bottom portion of the drive base, to the "on" position. Once turned on the hand control display will say NexStar Ready. Press ENTER to choose GPS Align or use the UP/Down scroll keys (10) to select a different mode of alignment. Pressing the ALIGN key will bypass the other alignment options and the scrolling text and automatically begins GPS Align. -
Page 23: Re-Alignment
The display will then ask you which alignment star you want to replace. Use the UP and Down scroll keys to select the alignment star to be replaced. It is usually best to replace the star closest to the new object. -
Page 24: Finding Planets
Hint When scrolling through a long list of objects, holding down either the Up or Down key will allow you to scroll through the catalog at a rapid speed. Pressing any of the other catalog keys (M, CALD, NGC, or STAR) will display a blinking cursor below the name of the catalog chosen. -
Page 25: Direction Buttons
(i.e. pressing the Up arrow button will move the star up in the field of view of the eyepiece). However, if any of the slower slew rates (rate 6 and below) are used to center an object in the finderscope, you may need to press the opposite directional button to make the telescope move in the correct direction. -
Page 26: Tracking Rate
Local sidereal time (LST) is useful for knowing the right ascension of celestial objects that are located on the meridian at that time. If you are using the optional CN16 GPS module, View Time-Site will always display the current information downloaded from the GPS receiver. -
Page 27: Get Ra/Dec
To replace the contents of any of the user defined objects, simply save a new object using one of the existing identification numbers; NexStar will replace the previous user defined object with the current one. Get RA/DEC - Displays the right ascension and declination for the current position of the telescope. -
Page 28: Goto Approach
“Cordwrap On” from the Scope Setup menu, you will be asked to move your telescope opposite to the no-cross line. The no-cross line is a user definable line that the NexStar will not pass in order to slew to an object;... -
Page 29: Wedge Align
For more information on using Wedge Align, see the Astronomy Basics section of the manual. Light Control – This feature allows you to turn off both the red key pad light and LCD display for daytime use to conserve power and to help preserve your night vision. - Page 30 SAVE LAND OBJ ENTER DATE - MM/DD/YY GOTO LAND OBJ ENTER LONG/LAT GET RA-DEC GOTO RA-DEC POINT TUBE NORTH & INDEX NexStar Menu Tree: The following figure is a menu tree showing the sub-menus associated with the primary command functions...
-
Page 31: Computerized Hand Control Quick Setup
Tahoe 19.2 Direction Buttons a) Use the Up and Down scroll buttons to get to the AutoAlign menu and press ENTER. b) Input the necessary date and time information as instructed by the Up and Down hand control. (See Hand Control section for complete Scroll Buttons instruction on entering data). - Page 32 Catalog Keys Object List Press the TOUR button on the hand control. The hand control will display the first object that is currently TOUR visible. Press INFO to read information about the object Button displayed. Press the DOWN scroll key to display the next object.
-
Page 33: Telescope Basics
A telescope is an instrument that collects and focuses light. The nature of the optical design determines how the light is focused. Some telescopes, known as refractors, use lenses. Other telescopes, known as reflectors, use mirrors. The Schmidt-Cassegrain optical system (or Schmidt-Cass for short) uses a combination of mirrors and lenses and is referred to as a compound or catadioptric telescope. -
Page 34: Focusing
Although the power is variable, each instrument under average skies has a limit to the highest useful magnification. The general rule is that 60 power can be used for every inch of aperture. For example, the NexStar is 8" in diameter. -
Page 35: General Observing Hints
Never look through window glass. Glass found in household windows is optically imperfect, and as a result, may vary in thickness from one part of a window to the next. This inconsistency can and will affect the ability to focus your telescope. -
Page 36: Astronomy Basics
Each line of longitude is one hour apart from the next. Since the Earth rotates once every 24 hours, there are 24 lines total. As a result, the R.A. -
Page 37: Motion Of The Stars
You will never see the stars complete one circle because the sunlight during the day washes out the starlight. However, part of this circular motion of stars in this region of the sky can be seen by setting up a camera on a tripod and opening the shutter for a couple hours. -
Page 38: Polar Alignment (With Optional Wedge)
The result is that objects observed through the telescope appear stationary (i.e., they will not drift out of the field of view). If not using the clock drive, all objects in the sky (day or night) will slowly drift out of the field. -
Page 39: Finding The North Celestial Pole
Figure 7-4 The two stars in the front of the bowl of the Big Dipper point to Polaris which is less than one degree from the true (north) celestial pole. Cassiopeia, the “W” shaped constellation, is on the opposite side of the pole from the Big Dipper. -
Page 40: Celestial Observing
With your telescope set up, you are ready to use it for observing. This section covers visual observing hints for both solar system and deep sky objects as well as general observing conditions which will affect your ability to observe. -
Page 41: Observing Deep Sky Objects
For safe solar viewing, use a solar filter that reduces the intensity of the Sun's light, making it safe to view. With a filter you can see sunspots as they move across the solar disk and faculae, which are bright patches seen near the Sun's edge. - Page 42 The size of the air parcels compared to your aperture determines the "seeing" quality. Under good seeing conditions, fine detail is visible on the brighter planets like Jupiter and Mars, and stars are pinpoint images. Under poor seeing conditions, images are blurred and stars appear as blobs.
-
Page 43: Celestial Photography
After looking at the night sky for a while you may want to try photographing it. Several forms of celestial photography are possible with your telescope, including short exposure prime focus, eyepiece projection, long exposure deep sky, terrestrial and even CCD imaging. Each of these is discussed in moderate detail with enough information to get you started. -
Page 44: Eyepiece Projection
Advance the film and you're ready for your next shot. Keep in mind that the card should be held a few inches in front of the telescope,... -
Page 45: Long Exposure Prime Focus Photography
It is easier if you use two people for this process; one to release the camera shutter and one to hold the card. Here's the process for making the exposure. Find and center the desired target in the viewfinder of your camera. - Page 46 Find a suitable guide star in the telescope field. This can be the most time consuming process. 10. Open the shutter using a cable release. 11. Monitor your guide star for the duration of the exposure using the buttons on the hand controller to make the needed corrections.
-
Page 47: Terrestrial Photography
Due to the relative small size of the CCD chip, the field of view when imaging will be less than the field of view of a film camera. Using Celestron's optional f/6.3 Reducer/Corrector accessory in conjunction with a CCD camera (or film camera) -
Page 48: Telescope Maintenance
If dust has built up on the corrector plate, remove it with a brush (made of camel’s hair) or a can of pressurized air. Spray at an angle to the lens for approximately two to four seconds. Then, use an optical cleaning solution and white tissue paper to remove any remaining debris. - Page 49 While looking through the eyepiece, use an Allen wrench to turn the collimation screw you located in step 2 and 3. Usually a tenth of a turn is enough to notice a change in collimation. If the star image moves out of the field of view in the direction that the central shadow is skewed, than you are turning the collimation screw the wrong way.
- Page 50 If seeing (i.e., air steadiness) is turbulent, collimation is difficult to judge. Wait until a better night if it is turbulent or aim to a steadier part of the sky. A steadier part of the sky is judged by steady versus twinkling stars.
-
Page 51: Optional Accessories
It’s designed so your telescope can be packed with the standard finderscope in place, a convenience you’ll be sure to appreciate. The case is lined with die cut foam for custom fitting. It features large handles and is equipped with wheels, for easy transportation. Weight: 17 lbs. (31.5"x 21.75"x 11.5"). - Page 52 1-1/4" oculars. Available individually are: #12 deep yellow, #21 orange, #25 red, #58 green, #80A light blue, #96 neutral density - 25%T, #96 neutral density - 13%T, and polarizing. These and other filters are also sold in sets.
- Page 53 (#93722) - Celestron Sky Maps are the ideal teaching guide for learning the night sky. You wouldn’t set off on a road trip without a road map, and you don’t need to try to navigate the night sky without a map either. Even if you already know your way around the major constellations, these maps can help you locate all kinds of fascinating objects.
- Page 54 A stable tripod is a must for serious astronomical observing and photography. This steel field tripod folds down to a compact 8"x28". It is equipped with a built-on 20 - 90 degree wedge tilt plate for quick equatorial use and astrophotography. It has a metal center brace and accessory tray for added stability.
-
Page 55: Appendix A - Technical Specifications
Optional Computerized Hand Control Specifications Hand Control Double line, 16 character Liquid Crystal Display 19 fiber optic backlit LED buttons Slew speeds Nine slew speeds: 6º /sec, 3º /sec, 1.5º/sec, 128x, 64x, 16x, 8x, 2x, 1x Software Precision 24bit, 0.08 arcsec calculations Ports... - Page 56 Database 40,000+ objects 400 user defined programmable objects. Enhanced information on over 200 objects Complete Revised NGC Catalog 7,840 Complete Messier Catalog Complete IC Catalog 5,386 Complete Caldwell Solar System objects Abell Galaxies 2,712 Famous Asterisms Selected CCD Imaging Objects...
-
Page 57: Appendix B - Glossary Of Terms
The apparent magnitude that a star would have if it were observed from a standard distance of 10 parsecs, or 32.6 light-years. The absolute magnitude of the Sun is 4.8. at a distance of 10 parsecs, it would just be visible on Earth on a clear moonless night away from surface light. - Page 58 Parsec The distance at which a star would show parallax of one second of arc. It is equal to 3.26 light-years, 206,265 astronomical units, or 30,8000,000,000,000 km. (Apart from the Sun, no star lies within one parsec of us.)
- Page 59 The point on the Celestial Sphere directly above the observer. Zodiac The zodiac is the portion of the Celestial Sphere that lies within 8 deg on either side of the Ecliptic. The apparent paths of the Sun, the Moon, and the planets, with the exception of some portions of the path of Pluto, lie within this band.
-
Page 60: Appendix C -Longitudes And Latitudes
Muscle Shoal 37.2 El Monte Visalia 19.2 COLORADO Selma 59.4 20.4 El Toro 43.8 40.2 Troy 52.2 Eureka 16.8 19.8 Air Force A 31.2 Tuscaloosa 37.2 13.8 Fort Hunter 19.2 Akron 13.2 10.2 ALASKA Fort Ord 46.2 40.8 Alamosa 52.2 Anchorage 13.2... - Page 61 Sanford 46.8 Peoria 40.8 40.2 New Iberia 52.8 Sarasota Quincy 55.8 New Orleans 58.8 Tallahassee 22.2 22.8 Rockford S Marsh Isl 58.8 Tampa Intl 31.8 58.2 Salem 57.6 37.8 Shreveport 31.2 Titusville 31.2 Scott AFB Slidel 49.2 Tyndall AFB 34.8 Springfield 40.2...
- Page 62 MINNESOTA Alliance Socorro Albert Lea 22.2 40.8 Beatrice 19.2 Taos 34.2 25.2 Alexandria 22.8 52.2 Broken Bow 25.8 Truth Or Con 16.2 13.8 Bemidji Muni 55.8 Burwell 46.8 Tucumcari 10.8 Brainerd-Crw Chadron 49.8 White Sands 37.8 Detroit Laks 52.8 49.2...
- Page 63 13.2 Cape Blanco 22.8 Dyersburg Roosevelt 37.8 Cascade 52.8 40.8 Jackson 55.2 Saint George Corvallis 16.8 Knoxville 58.8 49.2 Salt Lake Ct 58.2 46.8 Eugene 13.2 Memphis Intl Tooele 10.2 Hillsboro 31.8 Monteagle 30.6 Vernal 31.2 Klamath Fall 43.8 Nashville 40.8...
- Page 64 PROVINCE LONGITUDE LATITUDE CITY COUNTRY LONGITUDE LATITUDE Calgary Alberta Glasgow Scotland 15 w 50 n Churchill Newfoundland Guatemala City Guatemala 31 w 37 n Coppermine Northwest Terr. Guayaquil Ecuador 56 w 10 s Edmonton Alberta Hamburg Germany 33 n Frederickton...
-
Page 65: Appendix D - Rs-232 Connection (For Computerized Hand Control)
RS-232 cable (#93920). Once connected, the NexStar can be controlled using popular astronomy software programs. Communication Protocol: NexStar-i communicates at 9600 bits/sec, No parity and a stop bit. All angles are communicated with 16 bit angle and communicated using ASCII hexadecimal. Description... -
Page 66: Appendix E - Time Zone Maps
– –... - Page 74 This warranty shall be void and of no force of effect in the event a covered product has been modified in design or function, or subjected to abuse, misuse, mishandling or unauthorized repair. Further, product malfunction or deterioration due to normal wear is not covered by this warranty.
- Page 75 Celestron 2835 Columbia Street Torrance, CA 90503 Tel. (310) 328-9560 Fax. (310) 212-5835 Web site at http//www.celestron.com Copyright 2003 Celestron All rights reserved. (Products or instructions may change without notice or obligation.) Item # 11033-INST 05-03 $10.00...
Need help?
Do you have a question about the NexStar 8i and is the answer not in the manual?
Questions and answers