Sign In
Upload
Download
Table of Contents
Contents
Add to my manuals
Delete from my manuals
Share
URL of this page:
HTML Link:
Bookmark this page
Add
Manual will be automatically added to "My Manuals"
Print this page
×
Bookmark added
×
Added to my manuals
Manuals
Brands
Advantech Manuals
Industrial Equipment
MIC-770 V2
User manual
Advantech MIC-770 V2 User Manual
Compact fanless system with 10th gen intel xeon/core i cpu socket (lga 1200)
Hide thumbs
1
2
3
4
5
6
7
8
9
10
Table Of Contents
11
12
13
14
15
16
17
18
19
20
21
22
23
24
25
26
27
28
29
30
31
32
33
34
35
36
37
38
39
40
41
42
43
44
45
46
47
48
49
50
51
52
53
54
55
56
57
58
59
60
61
62
63
64
65
66
67
68
69
70
71
72
73
74
75
76
77
78
79
80
81
82
83
84
85
86
87
88
89
90
91
92
93
94
95
96
97
98
99
100
101
102
103
104
105
106
107
108
109
110
page
of
110
Go
/
110
Contents
Table of Contents
Bookmarks
Table of Contents
Table of Contents
Chapter 1 General Introduction
Introduction
Product Features
General
Display
Ethernet
Susi Api
WISE-Ibmc Out-Of-Band Power Management
Chipset
Functional Specification
Mechanical Specifications
Dimensions
Weight
Power Requirements
System Power
RTC Battery
Environment Specification
Operating Temperature
System Safety Certification Test Temperature
Relative Humidity
Storage Temperature
Vibration During Operation
Shock During Operation
Chapter 2 H/W Installation
Introduction
Jumper & Slide Switch
Jumper Description
Jumper List
Connectors
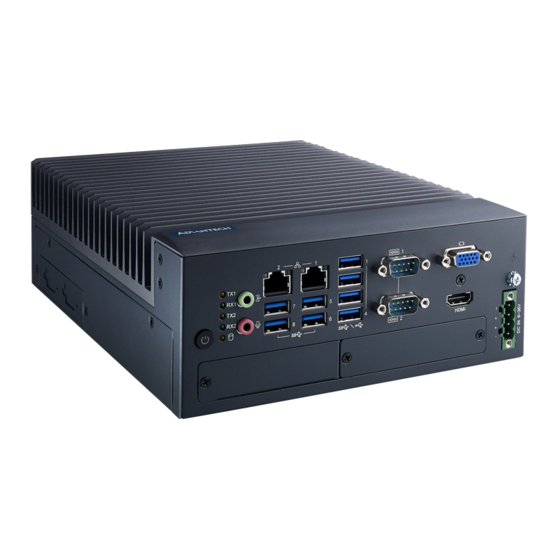
MIC-770 V2 External I/O Connectors
Installation
HDD Installation
Security
Boot
Save & Exit
Chapter 4 Software Installation
Before You Begin
Introduction
Windows Driver Setup
Chapter 5 Integrated Graphic Device Setup
Introduction
Windows Driver Setup
Intel® ME
Introduction
Installation
Chapter 7 LAN Configuration
Introduction
Features
Installation
Windows Driver Setup
Chapter 8 SATA RAID Setup
Introduction
SATA RAID Driver and Utility Setup
Chapter 9 HD Audio
Introduction
Installation
Appendix A Programming the Watchdog Timer
Programming the Watchdog Timer
Watchdog Timer Overview
Example Program
Appendix B Programming the GPIO
Advertisement
Quick Links
Download this manual
User Manual
MIC-770 V2
Compact Fanless System with
®
®
10th Gen Intel
Xeon
/Core™ i
CPU Socket (LGA 1200)
Table of
Contents
Previous
Page
Next
Page
1
2
3
4
5
Advertisement
Table of Contents
Need help?
Do you have a question about the MIC-770 V2 and is the answer not in the manual?
Ask a question
Questions and answers
Related Manuals for Advantech MIC-770 V2
Industrial Equipment Advantech MIC-770W-20A1 User Manual
Compact fanless system with 10th gen intel xeon/core i cpu socket (lga 1200) (110 pages)
Industrial Equipment Advantech MIC-770H-20A1 User Manual
Compact fanless system with 10th gen intel xeon/core i cpu socket (lga 1200) (110 pages)
Industrial Equipment Advantech VariSifter VS1000 Operation/Setup Manual
(46 pages)
Industrial Equipment Advantech PCI Series User Manual
Industrial serial communication cards (62 pages)
Industrial Equipment Advantech iDAQ-731 User Manual
Digital i/o and relay industrial daq modules (54 pages)
Industrial Equipment Advantech ICR-3232 Hardware Manual
Industrial cellular router (41 pages)
This manual is also suitable for:
Mic-770w-20a1
Mic-770h-20a1
Lga 1200
Table of Contents
Print
Rename the bookmark
Delete bookmark?
Delete from my manuals?
Login
Sign In
OR
Sign in with Facebook
Sign in with Google
Upload manual
Upload from disk
Upload from URL


Need help?
Do you have a question about the MIC-770 V2 and is the answer not in the manual?
Questions and answers