Advertisement
Table of Contents
THANK YOU FOR BUYING A RYOBI PORTABLE PLANER.
Your new planer has been engineered and manufactured to Ryobi's high standards for dependability, ease of operation,
and operator safety. Properly cared for, it will give you years of rugged, trouble-free performance.
CAUTION: Carefully read through this entire operator's manual before using your new planer.
Pay close attention to the Rules for Safe Operation, Warnings, and Cautions. If you use your tool properly and only for
what it is intended, you will enjoy years of safe, reliable service.
Please fill out and return the Warranty Registration Card so we can be of future service to you.
Thank you again for buying Ryobi tools.
SAVE THIS MANUAL FOR FUTURE REFERENCE
OPERATOR'S MANUAL
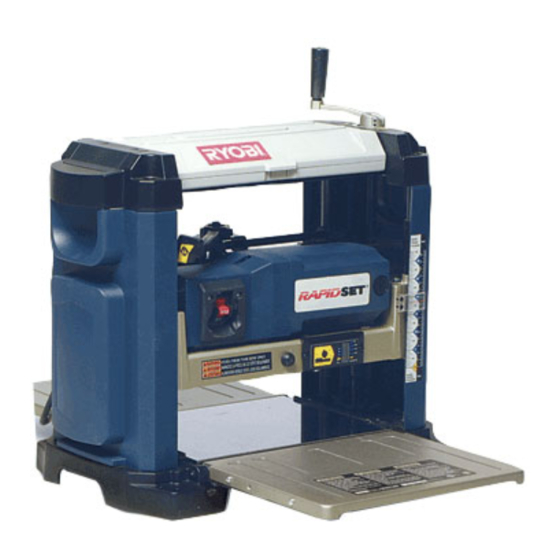
13 in. (330 mm) Portable Planer
Model AP1300
Advertisement
Table of Contents

Related Manuals for Ryobi AP1300


Summary of Contents for Ryobi AP1300
- Page 1 THANK YOU FOR BUYING A RYOBI PORTABLE PLANER. Your new planer has been engineered and manufactured to Ryobi's high standards for dependability, ease of operation, and operator safety. Properly cared for, it will give you years of rugged, trouble-free performance.
-
Page 2: Table Of Contents
Your portable planer has many features for making cutting operations more pleasant and enjoyable. Safety, performance, and dependability have been given top priority in the design of this planer making it easy to maintain and operate. PRODUCT SPECIFICATIONS Feed Rate... -
Page 3: Rules For Safe Operation
Use extension cords with an electrical rating not less than the planer's electrical rating. Always disconnect the extension cord from the outlet before disconnecting the product from the extension cord. - Page 4 SAVE THESE INSTRUCTIONS I DO NOT attempt to turn cutter-head with hands. I WHEN SERVICING, use only identical Ryobi replace- ment parts. Use of any other parts may create a hazard or cause product damage. I NEVER USE THIS TOOL IN AN EXPLOSIVE ATMO- SPHERE.
- Page 5 Servicing requires extreme care and knowledge and should be performed only by a qualified service technician. For service we suggest you return the tool to your nearest RYOBI AUTHORIZED SERVICE CENTER for repair. When servicing, use only identical Ryobi replacement parts. SAFETY AND INTERNATIONAL SYMBOLS This operator’s manual describes safety and international symbols and pictographs that may appear on this product.
-
Page 6: I Electrical
Fig. ELECTRICAL ELECTRICAL CONNECTION Your Ryobi Portable Planer is powered by a precision built electric motor. It should be connected to a power supply that is 120 volts, 60 Hz. If the machine does not operate when plugged into an outlet, double check the power supply. -
Page 7: I Unpacking And Loose Parts
I Remove all loose parts from the carton. I Separate and check with the list of loose parts. See Figure 2. I Remove the packing materials from around your planer. UNPACKING I Carefully lift the tool from the carton and place it on a level work surface. -
Page 8: I Features
Page 8 1-3/41-1/21-1/41/40 H GAGETHICKNESS SCALETABLEEXTENSION KNOW YOUR PORTABLE PLANERSee R R C... -
Page 9: I Assembly
CLAMPING PLANER TO WORKBENCH See Figure 5. If the planer is to be used as a portable tool, it is recom- mended you fasten it permanently to a mounting board that can easily be clamped to a workbench or other stable surface. -
Page 10: I Adjustments
WARNING: Failure to unplug your planer could result in accidental starting causing possible serious personal injury. I Place a straight edge or level across both the planer table and table extensions. I If adjustment is necessary, lift table extensions and loosen lock nuts. - Page 11 Page 11 ADJUSTMENTS Fig. 9 See Figure 8.Located on the right front of the planer, the thickness scale...
- Page 12 CUTTER BLADE SIDEWAYS ADJUSTMENT See Figures 10 and 11. During the use of your planer, tiny nicks may appear on the cutter blades. This is a result of picking up sand or other particles on the workpiece and then running the workpiece through the planer.
-
Page 13: I Operation
Lower the cutter head assembly to approximately 1 in. (25 mm) above the planer table surface. Without putting any load on the planer, test the motor by turning the planer on and allowing it to reach full speed. If the planer sounds exces-... - Page 14 DEPTH The depth gage indicates the amount of wood being removed tioned under the depth gage on the front of the planer. Never Your planer has a replane feature using preset markers plane material at a set measurement of 1/4 in. (68mm).
-
Page 15: I Maintenance
WARNING: When servicing, use only identical Ryobi replacement parts. Use of any other part may create a hazard or cause product damage. GENERAL Avoid using solvents when cleaning plastic parts. Most plastics are susceptible to damage from various types of commercial solvents and may be damaged by their use. - Page 16 If operation is dusty, also wear a dust mask. WARNING: To ensure safety and reliability, all repairs should be performed by a qualified service technician at a Ryobi Authorized Service Center to avoid risk of personal injury. BRUSH...
-
Page 17: I Troubleshooting
4. Check for adequate power supply, check cord and plug for damage, check condition of motor brushes 1. Adjust elevation screws 2. Have service performed by Ryobi Authorized Service Center 3. Have service performed by Ryobi Authorized Service Center 1. Adjust depth scale 2. -
Page 18: I Parts Ordering/Service
Ryobi Authorized Service Center. Be sure to provide all pertinent facts when you call or visit. Please call 1-800-525-2579 for your nearest Ryobi Authorized Service Center. You can also check our web site at www.ryobitools.com for a complete list of Authorized Service Centers.
Need help?
Do you have a question about the AP1300 and is the answer not in the manual?
Questions and answers