Table of Contents
Advertisement
Advertisement
Table of Contents

Related Manuals for Ryobi RAP1500G


Summary of Contents for Ryobi RAP1500G
- Page 1 RAP1500G THICKNESS PLANER WITH ANTI-KICKBACK OPERATOR’S MANUAL...
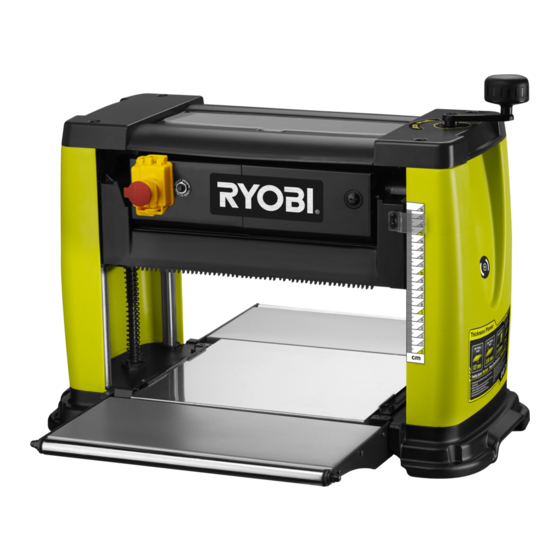
- Page 2 DESCRIPTION 1. Top guard 2. Cutterhead height adjustment crank handle 3. Depth of cut scale 4. Power switch 5. Overload switch 6. Table extension 7. Base lock screws 8. Feet 9. Elevation knob lock screw 10. Push stick 11. Blade setting gauge 12.
- Page 3 Fig. 1 Fig. 3 Fig. 2 4 mm 5 mm Fig. 4...
- Page 4 50.8 2-Ø9 Ø9 Ø15 Mounting Planer hole base m8 screw hole Fig. 6 Fig. 5 Fig. 7 Fig. 8 Fig. 9 Fig. 10 Fig. 11 Fig. 12...
- Page 5 Fig. 14 Fig. 13 34 mm 20 mm 5 mm 33 mm 135º 33 mm 100 mm 3 mm 120º Fig. 16 15 mm 70 mm 30 mm 100 mm Fig. 15 Fig. 17 ø 50mm ø 50mm Fig. 18 Fig.
- Page 6 Important! It is essential that you read the instructions in this manual before operating this machine. Subject to technical modifications.
-
Page 7: General Power Tool Safety Warnings
both hands to operate the tool. GENERAL POWER TOOL SAFETY WARNINGS ■ Do not overreach. Keep proper footing and balance at all times. WARNING ■ Maintain tools with care. Keep tools sharp and clean When using electric tools, basic safety precautions for better and safer performance. -
Page 8: Planer Safety Warnings
avoid accidental starting. ■ Make sure the workpiece is free of nails, screws, stones and other foreign objects which could damage ■ Never use in an explosive atmosphere. Normal the blades. sparking of the motor could ignite fumes. ■ Make sure the blades are attached correctly as ■... -
Page 9: Specifications
■ Choose two pieces of wood according to the sizes SPECIFICATIONS shown in the figure. Mount the planer onto the wood surface. Product Specifications ■ Use the four base lock screws (supplied) to mount the Input 220-240 V , 50 Hz planer base onto the wood. -
Page 10: Making The Cutterhead And Work Table Parallel
■ The thickness of timber running through the planer is "SETTING THE BLADE HEIGHT". The blade height controlled by the distance you adjust the cutting blade must be reset every time the blades are taken out for from the table. any reason. -
Page 11: Environmental Protection
per the following procedures. screws. ■ Remove the height adjustment crank handle and ■ The bearings on the cutterhead are factory lubricated both top and side covers by removing allen screws to and sealed. They require no further attention. expose the height adjustment lock nuts. PERIODIC MAINTENANCE ■... -
Page 12: Troubleshooting
TROUBLESHOOTING PROBLEM POSSIBLE CAUSE SOLUTION Grain is fuzzy. 1. Planing wood with high moisture 1. Dry the wood. content. 2. Blades are dull. 2. Sharpen the blades. Grain is torn. 1. The cut is too heavy. 1. Review proper depth of cut. 2. - Page 13 Techtronic Industries (Australia) Pty. Ltd. Level 1, 660 Doncaster Road Doncaster, VIC 3108, Australia Techtronic Industries New Zealand Ltd. 18-26 Amelia Earhart Avenue Mangere, Auckland 2022, New Zealand...
Need help?
Do you have a question about the RAP1500G and is the answer not in the manual?
Questions and answers