Table of Contents
Advertisement
Quick Links
Advertisement
Table of Contents

Related Manuals for Life Fitness SMARTconnect


Summary of Contents for Life Fitness SMARTconnect
- Page 1 SMARTconnect™ Service Manual Service Manual REV : February 21, 2022...
- Page 3 Latin America and Caribbean* Spain Hong Kong Life Fitness, LLC Life Fitness IBERIA Life Fitness Asia Pacific LTD 10601 W Belmont Ave C/Frederic Mompou 5,1º1ª 32/F, Global Trade Square Franklin Park, IL 60131 U.S.A. 08960 Sant Just Desvern Barcelona...
-
Page 4: Table Of Contents
© Copyright , Life Fitness, LLC. All Rights Reserved. Life Fitness, Hammer Strength, Cybex, ICG and SCIFIT are registered trademarks of Life Fitness, LLC and its affiliated companies and subsidiaries. Disclaimer: Images and specifications are current as of the date of publication and are subject to change. -
Page 5: Safety Instructions
1. Safety Safety Instructions Read all instructions before use. CAUTION: Any changes or modifications to this equipment could void the product warranty. WARNING: Health-related injuries may result from incorrect or excessive use of exercise equipment. Life Fitness Family of Brands STRONGLY recommends seeing a physician for a complete medical exam before undertaking an exercise program, particularly if the user has a family history of high blood pressure or heart disease, is over the age of 45, smokes, has high cholesterol, is obese, or has not exercised regularly in the past year. -
Page 6: Disposing Of
Condition 6.0+ 5.5-6.0 Good 5.0-5.5 4.5-5.0 3.8-4.5 Critical <3.8 Cutoff Recommended Replacement Batteries Use table for Life Fitness recommended replacement batteries. Manufacturer Model Number Model Name Service Life @10Ω Relative Rating Load Room Temp (hr) QU1300 Quantum with Good Duralock... -
Page 7: Introduction
Life Fitness, Hammer Strength, and ICG. • http://www.lifefitness.com/parts service parts ordering for Life Fitness, Cybex, SCIFIT, Hammer Strength, and ICG products along with warranty parts ordering and technician requests. • https://lfworld.lifefitness.com easy to find Knowledge Base articles with answers to frequently asked questions and product support documentation for Life Fitness, Cybex, SCIFIT, Hammer Strength, and ICG. -
Page 8: Maintenance Procedures
3. Maintenance Procedures Maintenance Schedule Item Weekly Monthly Biannually Batteries Inspect Console Display Clean Hardware Inspect Approved and Compatible Cleaners Two preferred cleaners have been approved by reliability experts: PureGreen 24 and Gym Wipes. Both cleaners will safely and effectively remove dirt, grime and sweat from equipment. PureGreen 24 and the Antibacterial Force formula of Gym Wipes are both disinfectants that are effective against MRSA and H1N1. -
Page 9: Theory Of Operation
Theory of Operation Overview SMARTconnect ™ allows exercisers to interact with Insignia Series selectorized strength equipment for an approachable, digitally-forward experience. SMARTconnect provides personalized guidance and insights for exercisers and a cordless, frictionless experience for operators. Page 7 of 55... -
Page 10: Installation Process
15 foot (5 meters) radius. b. If a WASP is mounted on a column, SMARTconnect units on the other side of the column should be covered by a second WASP. WASP coverage radius decreases if the signal needs to go through a wall or column. If WASP's are mounted on a column in the center of a strength area, then there should be one WASP on either side of the column to ensure proper coverage (pending size/layout of strength area). - Page 11 2. Plug each WASP into a PoE or hybrid port on the PoE network switch. If distance to network switch is less than 100 feet (30 meters), use PoE+. Item Description Ethernet Port 3. Verify that WASP Ethernet LEDs are operating as expected (G1, G3, G4 are green, G2 dependent on facility). Verify that WASP Status LEDs are operating as expected (left LED (orange) should consistently flash.
-
Page 12: Verify Wifi Setup
(~5 digits) are not configured). If the WASP Title shows a MAC address, it likely not properly configured. Verify WIFI Setup The Life Fitness SMARTconnect system must have the WIFI Network Credentials set up with a specific SSID and password in order for LFconnect to communicate with the WIFI network. The SMARTconnect system has the WIFI... -
Page 13: Machine Verification
8. If the machine is not verified successfully, click 'Calibrate' and begin calibrating. Machine Calibration Complete the machine calibration process for those new SMARTconnect units that are not properly verified, or any retrofit units installed in the facility. 1. Select the machine to be calibrated (either using 'Calibration' tile on home screen, or directly from Machine Verification in step 6. -
Page 14: Post-Installation
Using an appropriate tool (i.e. cell-phone SIM release tool, paperclip), gently press the 'Config Enable' button located on the downward (weight stack facing) face of the Guide Rod Retainer/SMARTconnect Sensor Housing. You should get a slight confirming feel when the button is pressed properly. -
Page 15: Getting Connected Guide
10 Mbps. This does not vary based on numbers of units installed. Power Requirements • SMARTconnect Insignia Units: These run on battery power (4 D batteries) and do not require power from the facility. • SMARTsync: This will require facility power via the relevant cord (see table), purchased by customer. -
Page 16: Network Setup
Network Setup Network and Equipment Setup with Internet Page 14 of 55... -
Page 17: Wasp Setup And Wasp Calculator
Network and Equipment Setup without Internet WASP Setup and Coverage WASPs will need to positioned at the highest accessible point and where they can provide effective coverage of the strength area. Good Coverage Bad Coverage WASP Coverage Distance: Between 10 feet (3 meters) and 30 feet (9 meters) above ground is best. When outside this range, WASP range begins to decline. - Page 18 WASP Calculator Please refer to the WASP Calculator to determine the number of WASPs necessary, given are of strength area, height of WASPs and WASP position. WASPs Needed: Description Metric Qty. Imperial Qty. WASPs Needed for All Rooms/Areas Room/Area 1 Description Metric Qty.
-
Page 19: Pre-Installation
1. SMARTconnect Site Survey competed? 2. LFwireless SSID added to facility network? Or have separate SSID details been provided by LF? 3. All SMARTconnect units and facility hardware ordered? 4. Additional WASPs ordered as necessary? 5. WASP access points wired with PoE cables? (May vary based on region) 6. -
Page 20: Calibrate Console Introduction
Calibrate Console Introduction This instruction sheet describes how to calibrate the SMARTconnect ™ console using the cable actuator tool: Contents: • 3/8" Drill or 1/2" Drill • 5/16" Socket or 8 mm Socket • 3/8” Drive socket extension • Cable Actuator (part number: 1018587-0001) WARNING: Moving Rotary Parts Do not use cable actuator tool with long hair or loose fitting clothing. -
Page 21: Calibration Points
Calibration Points (pounds) Use below table to determine the three calibration points for each Insignia model, per weight stack option; Base [P], Light [C] or Heavy [X]. 1st Calibration 2nd Calibration 3rd Calibration Point Point Point Model Description P, C and X P &... -
Page 22: Calibration Points
Calibration Points (kilograms) Use below table to determine the three calibration points for each Insignia model, per weight stack option; Base [P], Light [C] or Heavy [X]. 1st Calibration 2nd Calibration 3rd Calibration Point Point Point Model Description P, C and X P &... -
Page 23: Calibrate Console
Calibrate Console Calibrate Lynx Console: 1. Insert weight stack pin into bottom plate of the weight stack. Item Description Qty. Weight Stack Weight Stack Pin 2. Assemble cable actuator. Item Description Qty. Cable Actuator Tool 5/16" or 8mm Socket Drive socket extension Drill Page 21 of 55... - Page 24 3. Loosen drill until cable actuator is fully open. Item Description Qty. Cable Actuator Tool 3/8" Drive Drill 4. Excluding the Insignia Pectoral Fly (PEC), Fly (FLY) and Glute (GL), insert the cable actuator/drill between the front shrouds and position the cable above the weight stack into the cable actuator. Item Description Qty.
- Page 25 5. Tighten drill so fully pinned weight stack lifts from base of unit. Item Description Qty. Cable Actuator/Drill Cable NOTE: Limit lifts to 1/4" (6.35mm) in height. 6. With the weight stack still fully pinned, raise and lower weight stack two additional times, 3 total. Item Description Qty.
- Page 26 7. Pin first calibration point: refer to Calibration Points table. Item Description Qty. Weight Stack Weight Stack Pin 8. Using the cable actuator tool/drill, raise first calibration point. Item Description Qty. 1st Calibration Point Weight Stack Pin Page 24 of 55...
- Page 27 9. Download the LF Assist app and log in into account. 10. From the Home screen, go to Calibrations and select the desired unit for calibration. Page 25 of 55...
- Page 28 11. Follow the Calibration Setup steps from the LF Assist app. 12. Calibration Saved prompt will appear if setup successfully complete. Page 26 of 55...
- Page 29 13. If unsuccessful, a Fault prompt will appear displaying the error and resolution. 14. If problem persists, go to the Troubleshoot section. Page 27 of 55...
-
Page 30: User Experience Introduction
8. User Experience Introduction Using the SMARTconnect ™ console: Contents: • Login • No Login • Login with No Prescribed Workout • Login with Prescribed Workout • Service Icons • Software Update • No Movement Timeout Times • Definitions Console Display:... -
Page 31: Login
Login Log into LFconnect with your SMARTconnect ™ console: 1. Hold devise next to console display or scan QR code to log into system. Item Description User Log In 2. Identification light will turn solid green within 2 seconds if user successfully recognized. - Page 32 3. Personal workout data will appear within 3 seconds after user ID light turns green. Item Description Qty. Console Display 4. If any errors occur, the user identification light will flash green and "ERR" will appear. Item Description Qty. User Identification Light Error Code Page 30 of 55...
-
Page 33: No Login
No Login Using SMARTconnect ™ console without Logging into LFconnect: 1. Once movement detected, display shows current weight and counts repetitions. Item Description Console Display NOTE: User ID will not light if user undetected. 2. When movement stops: After 3 seconds, system resets while display remains. After 10 seconds, all displays go blank and system goes into sleep mode. -
Page 34: Login With No Work
Login with No Work Out Logging into LFconnect with no Prescribed Work Out: 1. Logged in but no prescribed work out: User ID lights solid green. Seat position displays profile's setting. If no profile, displays user size seat recommendation based on user's profile height. If no user's profile height, display will read "-". -
Page 35: Login With Work
3. When movement stops: User ID lights solid green. Seat position goes blank. Current weight is displayed. Repetitions displays total. Item Description Console Display NOTE: After 3 seconds, system resets and will log off user. After 10 seconds, display goes blank. Login with Work Out Logging into LFconnect with no Prescribed Work Out: 1. - Page 36 2. When movement detected: User ID lights solid green. Seat position displays profile's setting. If no profile, displays user size seat recommendation based on user's profile height. Until weight is determined, display will flash "- - -.-". The "-" should appear to move from left to right across the screen. Repetitions count up. Item Description Console Display...
-
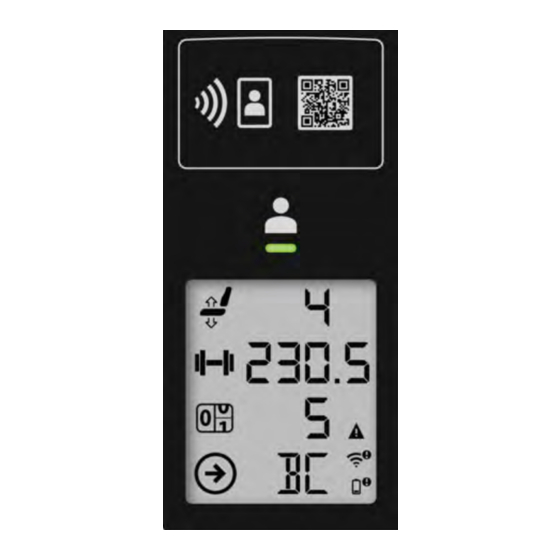
Page 37: Service Icons
Service Icons SMARTconnect ™ console service icons: Individual service icons (System Fault, WIFI and Low Battery) appear if system malfunctions occur during log in or movement. Icons turn off as display goes blank. Item Description Console Display Software Update Automatically turns on when Software Update starts: User ID light turns off. -
Page 38: Times
No Movement Timeout Times Amount of time for each machine to timeout due to no movement, if logged in. Model Description Time (seconds) IS-AB Abdominal IS-ADC Assist Dip/Chin IS-BC Biceps Curl IS-BCD Biceps Curl Dependent IS-BE Back Extension IS-CE Calf Extension IS-CP Chest Press IS-FLY... -
Page 39: No Movement Timeout Definitions
Definitions Relative terms and meanings: Workout Much like a traditional workout card, each Workout Plan should list: • Exercises to be performed (Chest Press) • Number of sets to be performed of the exercise • Number of repetitions for each individual set (Set 1 = 10 reps, Set 2 = 8 reps, Set 3 = 6 reps) •... -
Page 40: How To's
9. How To's Knowledge Base Knowledge Base for more detailed information. List of Procedures Procedures: • Battery Replacement • Battery Door Replacement (TBD) • Cable Replacement (TBD) • Display Replacement (TBD) • Load Pin Replacement (TBD) • Phone Holder Replacement Page 38 of 55... -
Page 41: Battery Replacement
Battery Replacement Tools Required: • Phillips screwdriver Time: 5 minutes Battery Replacement 1. Cautiously loosen battery door screw as battery pack will no longer be supported once screw is loosened. Item Description Battery Door Screw 2. Swing open battery door and remove battery pack. Item Description Battery Door... - Page 42 3. Insert replacement batteries into the battery housing in their proper orientation. Item Description Battery Housing D Battery 4. Insert battery pack into console and close battery door. (See Step 2) 5. Tighten battery door screw to 8-10 ft-lbs (10.8-13.5 Nm). (See Step 1) Page 40 of 55...
-
Page 43: Phone Holder Replacement
Phone Holder Replacement Tools Required: • Flat head screwdriver • Hammer • Phillips screwdriver Time: 5 minutes Phone Holder Replacement 1. Remove hardware and phone holder. Item Description Phone Holder (left) Screw, 8 x 3/4 2. If unit is equipped with grommets, remove grommets from frame and replace grommets by inserting until flush with frame. - Page 44 3. Replace phone holder with hardware and carefully tighten. Item Description Phone Holder (left) Screw, 8 x 3/4 NOTE: Tighten to 8-10 ft-lbs (10.8-13.5 Nm) Page 42 of 55...
-
Page 45: Troubleshooting
10. Troubleshooting Troubleshooting Mechanical Fault Problem Cause Solution No Movement Timeout Times in User Inaccurate readings on display Possible load cell sensor issue Experience section Fails to measure load, or read no load on the display. Examples: Weight reads constant value at all weight Load sensor wire broken and/or Visually inspect load sensor wire at magnetic plates... - Page 46 Display Fault Problem Cause Solution Actuate the weight / move weldment arm, then check display battery Possibility of tag not supported (ie. Frequency, Size) Login wake won't work Tag should be almost touching the displays ½” or less, capacitive proximity operation. RFID is on at a low Battery, display voltage state where the LED will turn green to indicate board, RFID,...
- Page 47 Fault Problem Cause Solution Smartsync front LED does not First power cycle the unit. If still no power check power illuminate blue supply to isolate failure. Note: Shapesync should be in a when attempting network closet to power up Rear ethernet Shapesync Gateway - SMARTSync port LEDs are not illuminating...
-
Page 48: Online References
Life Fitness, Hammer Strength, and ICG. • http://www.lifefitness.com/parts service parts ordering for Life Fitness, Cybex, SCIFIT, Hammer Strength, and ICG products along with warranty parts ordering and technician requests. • https://lfworld.lifefitness.com easy to find Knowledge Base articles with answers to frequently asked questions and product support documentation for Life Fitness, Cybex, SCIFIT, Hammer Strength, and ICG. -
Page 49: Electrical Components
Electrical Components SMARTconnect ™ electrical components: Item Description Qty. Load Pin Form C Reed Switch (Single-Pole Double-Throw) 1/2 on FLY/PEC Form A Reed Switch (Single-Pole Single-Throw) Power Cable RFID Cable Display Cable Sensor Board Cable Page 47 of 55... - Page 50 Item Description Qty. Battery Pack D Cell Battery Console Assembly Sensor Board Assembly RFID Module Display Board Reset Switch Antenna Module (On-Board) Sensor Board Test Switch RJ45, 8 POS Magnet Pulley 1/2 on FLY/PEC Antenna Module (On-Wire) Lidar Lidar Reflector WIFI Antenna 24GHz Magnet Assembly 1 on P-Stack/2 on C&X Stack...
- Page 51 Form C Reed Switch (Single-Pole Double-Throw) Position Normally Closed Common Normally Open Form A Reed Switch (Single-Pole Single-Throw) Item Description Sensor 1 Leads Sensor 2 Leads Page 49 of 55...
- Page 52 Power Cable Signal Name Color Black RFID Cable Signal Name Color RFID-Rx Brown RFID-Tx Yellow Black Page 50 of 55...
- Page 53 Display Cable Left Cable End: Signal Name Color VAUX Orange #RESET White #INT Green SL-Tx Yellow SL-Rx Blue VBAT Black Right Cable End - Row 1: Signal Name Color SL-Tx Yellow SL-Rx Blue VBAT Black Right Cable End - Row 2: Signal Name Color VAUX...
- Page 54 Sensor Board Cable Left Cable End - Row 1: Signal Name Color SL-Tx Yellow SL-Rx Blue VBAT Black Left Cable End - Row 2: Signal Name Color VAUX ORANGE #RESET WHITE #INT GREEN Right Cable End: Signal Name Color VAUX Orange #RESET White...
-
Page 55: 12. Glossary
SMARTsync A customized mini-computer, proprietary to Life Fitness, that acts as a receiver and processor for SMARTconnect data. It is a required part of the SMARTconnect system to ensure that data is flowing to and from your SMARTconnect equipment. WASP Wireless ASP - An application provider that hosts wireless applications over the Internet. -
Page 56: 13. Warranty
Who Pays Transportation and Insurance For Service If the Product or any covered part must be returned to a service facility for repairs, We, Life Fitness Family of Brands, will pay all transportation and insurance charges for the first year. You are responsible for transportation and insurance charge after the first year. -
Page 57: Effects Of State Laws
Changes in Warranty Not Authorized No one is authorized to change, modify or extend the terms of this limited warranty. Effects of State Laws This warranty gives you specific legal rights, and you may have other rights which vary from state to state and country by country.
Need help?
Do you have a question about the SMARTconnect and is the answer not in the manual?
Questions and answers