
Related Manuals for Sure Electronics WONDOM ICP3


Summary of Contents for Sure Electronics WONDOM ICP3
- Page 1 WONDOM ICP3 User Guide IN-CIRCUIT PROGRAMMER WITH BLE BLUETOOTH FOR APP CONTROL - ICP3 By Sure Electronics Co., Ltd.
- Page 2 Overview WONDOM ICP3 is an in-circuit programmer integrated with Bluetooth BLE designed for customer programming and user interface control of WONDOM products. On-board self-boot EEPROM is included in ICP3 for operating the board independently of the Analog Devices, Inc., SigmaStudio™ software.
-
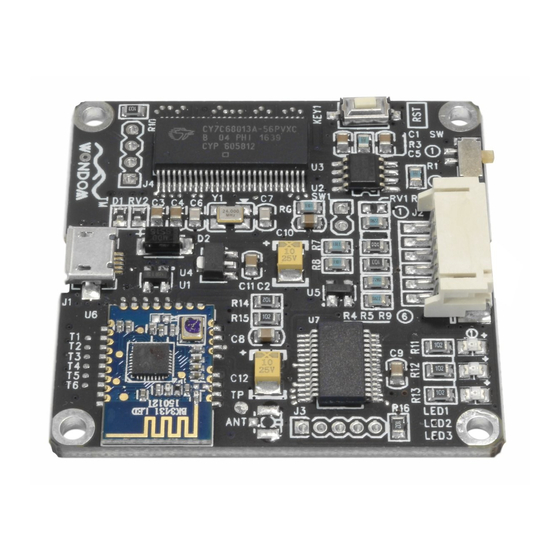
Page 3: Interface Definition
In this document, we will mainly give instructions on the following applications: How to achieve programming of APM2 / JAB3 with WONDOM ICP3 How to realize APP control of APM2 / JAB3 with WONDOM ICP3 KEY1 For switch between programming and... -
Page 4: Software Download
Software Download PROGRAMMING Miumax V2.0 Android Analog Devices, Inc. SigmaStudio™ WONDOM ‘Miumax’ Note: It is suggested to use browser to scan the QR code for Android phones. For iOS phones, customers can go to APP Store and search “Miumax” for download directly. -
Page 5: Video Tutorial
How to achieve programming of APM2/JAB3 with WONDOM ICP3? ICP3 WONDOM IN-CIRCUIT PROGRAMMER WITH BLE VIDEO TUTORIAL > BLUETOOTH FOR APP CONTROL - ICP3... - Page 6 Checklist Before starting, please make sure you have the following items on hand. Analog Devices, Inc. SigmaStudio™ WONDOM Products with ADAU1701 DSP WONDOM ICP3 with a 6-pin cable Accessories Speakers Cables Phone …...
-
Page 7: Quick Start
Quick Start To quickly get started with the programming of WONDOM APM2 or JAB3 via ICP3, do the following steps: 1) Install the SigmaStuido software 2) Connect ICP3 to computer 3) Connect audio cables 4) Power up the audio system 5) Connect ICP3 with target products 6) Program Click... -
Page 8: How To Program
How to program Be sure to follow these connection steps. POWERING UP THE BOARD SETTING UP THE ICP3 CONNECTING ICP3 WITH TARGET PRODUCTS INSTALLING SIGMASTUDIO SOFTWARE PROGRAMMING CONNECTING THE AUDIO CABLES... - Page 9 Installing Sigmastudio software Download the installation package for SigmaStudio software in the Analog.com. Download address is as follows. Click the EXE file and finish installation according to the prompts. https://www.analog.com/en/design-center/evaluation-hardware-and- software/software/ss_sigst_02.html#software-overview...
-
Page 10: Setting Up The Hardware
Setting up the hardware 1. Set the SW of ICP3 at (PROGRAM)* and connect the ICP3 to the computer with a USB cable. Do not connect ICP3 with target products (APM2/JAB3) now. 2. Select “USBi” from the list on the left and drag it to the blank area on the right. -
Page 11: Connecting Audio Cables
Connecting Audio Cables Build an audio system with your target products. As for the connections, please kindly refer to the datasheet or connection guide of each product. Model Document APM2 AA-AP23122 ADAU1701 Kernel Board JAB3 Audio Amplifier Boards Integrated with ADAU1701 DSP JAB3+ Audio Amplifier Boards Integrated with ADAU1701 DSP &... - Page 12 Powering up After connection is done, please power up the target products and feed music to your audio system. Power up APM2 with DC5V. APM3 will be powered up by APM2. Make sure the SW1 of APM2 is set at ① (RUN). (Skip this step when programming other products with ADAU1701 DSP) Connect ICP3 with APM3 through 6-pin cable.
- Page 13 Programming Now, you can write program in the schematic design zone. It’s suggested to modify program based on the demo program we provide to you. Click HERE to get the basic guide of SigmaStudio programming. Schematic Schematic Design Toolbox Drag desired algorithm here and Algorithms complete the logic connection &...
- Page 14 Programming – Demo Program Here are the demo programs for the products. You can download them for reference. It’s highly suggested to make modification based on the demo program. Products Demo Program Document you may need APM2 APM2_SigmaStudio.dspproj Download JAB3 - Mono JAB3_SigmaStudio_MONO.dspproj Download JAB3 - Stereo...
- Page 15 Online Debug If you want to see the actual effect when programming, you can online debug your program. Please pay attention to the state on the bottom right of SigmaStudio. If it shows “Design Mode”, you need to click the following two icons to turn it to “Active: Downloaded”...
- Page 16 Program Write If you want the program to run offline, you need to write the program into ADAU1701 DSP. Make sure the state on the bottom right is “Active: Downloaded”, then go to Hardware Configuration page, do as follows. Select “Write Latest Compilation to E2PBOM” to download the program (see figure 4), then you will see a window, choose the “I2C”...
- Page 17 Original Firmware If you want to restore to factory settings, you can download original firmware from the following table. Products Original Firmware Products Original Firmware JAB4 Download APM2 Download JAB5 Download JAB3 - Mono Download JAB3 - Stereo Download JAB3+ - Mono Download JAB3+ - Stereo Download...
- Page 18 Original Firmware Restore 1. Right click the “E2Prom” (see Figure 6) and click ‘Read/Write Window’. You will see the following interface (Figure 7). Figure 6 Figure 7 2. Click ‘Click here to browse for file’ and select firmware file (Figure 8). Then click ‘Display File’ like Figure 9. Figure 8 Figure 9...
- Page 19 Original Firmware Restore 3. Click ‘Write Display to E2prom’ then click ‘OK’ of the prompt box (Figure 10). Figure 10...
-
Page 20: Troubleshooting
TROUBLE SHOOTING TROUBLE HOW TO SOLVE ➢ Make sure the Micro USB cable is of good quality and supports data communication ➢ Make sure ICP3 is not connected to controlled device (APM2) when ICP3 cannot be recognized by PC connected to PC ➢... -
Page 21: App Control
How to realize APP Control of APM2/JAB3 with WONDOM ICP3? Miumax ICP3 WONDOM IN-CIRCUIT PROGRAMMER WITH BLE BLUETOOTH FOR APP CONTROL - ICP3 VIDEO TUTORIAL >... - Page 22 Checklist Before starting, please make sure you have the following items on hand. “Miumax” V2.0 APP WONDOM APM2+Extension Kit (APM3)/JAB3 Android WONDOM ICP3 with a 6-pin cable Accessories Speakers Cables Phone …...
- Page 23 As for the original firmware, please click HERE to download. As for how to restore the program, please kindly refer to our video guide on YouTube – “How to use WONDOM ICP3 to program ADAU1701 with SigmaStudio and realize APP control”.
- Page 24 Factory Settings Programs for APP CONTROL Products File Version Download APM2_APPCtrl_V1.0.Hex V1.0 (For Miumax V1.0) Download APM2 APM2_APPCtrl_V2.0.Hex V2.0 (For Miumax V2.0) Download JAB3_APPCtrl_MONO_E2Prom_V1.0.Hex V1.0 (For Miumax V1.0) Download JAB3 - Mono JAB3_APPCtrl_MONO_E2Prom_V2.0.Hex V2.0 (For Miumax V2.0) Download JAB3_APPCtrl_STEREO_E2Prom_V1.0.Hex V1.0 (For Miumax V1.0) Download JAB3 - Stereo JAB3_APPCtrl_STEREO_E2Prom_V2.0.Hex...
- Page 25 CONTENTS CONNECT ICP3 AND POWER UP APPLICATION NOTES TROUBLE SHOOTING BUILD AN AUDIO SYSTEM WITH APP CONTROL APM2/JAB3...
-
Page 26: Audio System
Audio System WONDOM provides two solution for DSP, - APM2 + Extension Kit (APM3) + Amplifier - JAB3, an audio amplifier with ADAU1701 integrated APM2+ Amplifier Speakers Audio Source JAB3 Speakers Audio Source APM3 19VDC Power Supply 5VDC Power Power Supply Supply Build an audio system with WONDOM APM2 Build an audio system with WONDOM JAB3... - Page 27 Connect ICP3 1. Connect ICP3 to the APM2/JAB3 through the programming port with a 6-pin cable. Pin to Pin Programming Port of DSP/JAB3 Note: When ICP3 is connected to APM2/JAB3 pin to pin, it will be powered by APM2/JAB3 directly. No extra power supply is needed.
- Page 28 Connect ICP3 2. Set SW of ICP3 at (REMOTE) before running “Miumax” APP. 3. Make sure the Bluetooth of your device is on and click “Miumax” APP and they will pair automatically within several seconds. When the connection succeeds, you can see the prompt box. 4.
- Page 29 APP Control Please adjust the parameters slightly according to the specifications of your speakers.
-
Page 30: Application Notes
Application Notes Power-off Memory Function of ICP3 Switch to hardware control Power-off Memory Function is integrated in ICP3 When customers want to switch to hardware for APP control, which means the last setting of control (potentiometers on board integrated with your APP control will be saved in ICP3 and it will be DSP) from APP control mode, please do as follows. -
Page 31: Points Of Attention
POINTS OF ATTENTION Connection Please make sure the Bluetooth of your device is on and the SW of ICP3 is set at (REMOTE) before clicking APP. Adjustment The adjustment through APP control is irreversible. Please pay attention to the limitation of your devices in case of permanent damage. Control Switch Setting of SW on ICP3 Setting of SW1 on APM2... - Page 32 TROUBLE SHOOTING TROUBLE HOW TO SOLVE ➢ Make sure the Bluetooth of your phone is on ➢ Check the connection according to the steps APP connection failure ➢ Make sure The SW on ICP3 is set at (REMOTE) ➢ The SW on ICP3 is set at (REMOTE) ➢...
Need help?
Do you have a question about the WONDOM ICP3 and is the answer not in the manual?
Questions and answers