Table of Contents
Advertisement
Available languages
Available languages
Quick Links
Advertisement
Chapters
Table of Contents

Related Manuals for Klarstein HOT SPOT CRYSTAL FLOW


Summary of Contents for Klarstein HOT SPOT CRYSTAL FLOW
- Page 1 HOT SPOT CRYSTAL FLOW Badheizer mit Handtuchhalterung Bathroom Heater with Towel Rack Radiateur de salle de bain avec porte-serviette Toallero calefactor para baño Stufa da bagno con scaldasalviette 10035036 www.klarstein.com...
-
Page 3: Table Of Contents
Sehr geehrter Kunde, wir gratulieren Ihnen zum Erwerb Ihres Gerätes. Lesen Sie die folgenden Hinweise sorgfältig durch und befolgen Sie diese, um möglichen Schäden vorzubeugen. Für Schäden, die durch Missachtung der Hinweise und unsachgemäßen Gebrauch entstehen, übernehmen wir keine Haftung. Scannen Sie den QR-Code, um Zugriff auf die aktuellste Bedienungsanleitung und weitere Informationen rund um das Produkt zu erhalten. -
Page 4: Sicherheitshinweise
SICHERHEITSHINWEISE • Lesen Sie alle Anweisungen, bevor Sie dieses Gerät benutzen. • Lassen Sie das Gerät nicht unbeaufsichtigt, wenn es in Betrieb ist. • Diese Heizung wird während der Benutzung heiß. Berühren Sie nicht die heißen Oberfl ächen. VORSICHT Verbrennungsgefahr! Einige Teile dieses Produktes können sehr heiß... - Page 5 Hinweis: Um eine Überhitzung zu vermeiden, darf die Heizung nicht abgedeckt werden. Benutzen Sie das Gerät nicht zum Trocknen von Kleidung. • Halten Sie Kinder und Haustiere vom Gerät fern. • Kinder ab 8 Jahren, psychisch, sensorisch und körperlich eingeschränkte Menschen dürfen das Gerät nur benutzen, wenn sie vorher von einer für sie verantwortlichen Aufsichtsperson ausführlich mit den Funktionen und den Sicherheitsvorkehrungen...
- Page 6 • Versuchen Sie nicht, elektrische oder mechanische Funktionen an diesem Gerät zu reparieren oder einzustellen. Das Gerät enthält keine vom Benutzer zu wartenden Teile. Nur eine qualifizierte Elektrofachkraft sollte Wartungs- oder Reparaturarbeiten durchführen. • Wenn das Netzkabel beschädigt ist, muss es vom Hersteller, seinem Kundendienst oder ähnlich qualifizierten Personen ausgetauscht werden, um eine Gefährdung zu vermeiden.Fassen Sie...
- Page 7 • Um einen möglichen Brand zu vermeiden, dürfen die Lüftungsschlitze nicht blockiert werden. • Die Heizung hat heiße und funkenbildende Teile im Inneren. Verwenden Sie sie nicht in Bereichen, in denen Benzin, Farbe, explosive und/oder brennbare Flüssigkeiten verwendet oder gelagert werden.
- Page 8 • Verwenden Sie dieses Heizgerät nicht mit einer programmierbaren Steckdose, einer Zeitschaltuhr, einer separaten Fernbedienung oder einem anderen Gerät, welches das Heizgerät automatisch einschaltet, da eine Brandgefahr besteht, wenn das Heizgerät abgedeckt oder falsch positioniert ist. • Trennvorrichtungen mit allpoliger Kontakttrennung müssen gemäß...
-
Page 9: Installation
INSTALLATION Hinweise WARNUNG Verletzungsgefahr! Um eine Gefahr für sehr kleine Kinder zu vermeiden, muss diese Heizung so installiert werden, dass sich das unterste Heizelement mindestens 600 mm über dem Boden befi ndet. • Dieses Heizgerät muss von einer qualifi zierten Person, d. h. einem qualifi zierten Elektriker, installiert werden. - Page 10 3. Stecken Sie bitte einen Dübel pro Loch in die Wand und schlagen Sie ihn mit einem Hammer ein, bis die Dübel nicht mehr aus der Wand ragen. 4. Befestigen Sie die Wandhalterung mit zwei ST4X35 Schrauben in den oberen Löchern.
- Page 11 5. Befestigen Sie die beiden Z-Halterungen mit zwei M4x8Schrauben an der Rückseite des Heizgeräts. 6. Schieben Sie den kleineren Handtuchhalter in die im Lieferumfang enthaltenen Klammern und schrauben Sie diese mit vier M4x16 Schrauben fest. Befestigen Sie den größeren Handtuchhalter auf die gleiche Art und Weise mit vier M4x16 Schrauben (überspringen Sie diesen Schritt, falls Sie keine Handtuchhalter.
- Page 12 Für den folgenden Installationsschritt werden zwei Personen benötigt: Hängen Sie das Gerät an die Wandhalterung und befestigen Sie dieses auf der rechten und linken Seite mit jeweils zwei M4x10 Schrauben. 8. Fixieren Sie die Z-Halterungen mit zwei ST4x35 Schrauben an der Wand. Die Schrauben sollten in die zuvor gebohrten niedrigeren Löcher passen.
- Page 13 9. Wischen Sie die Oberfläche des Geräts mit einem weichen Tuch ab. Das Gerät ist betriebsbereit..
-
Page 14: Geräteübersicht
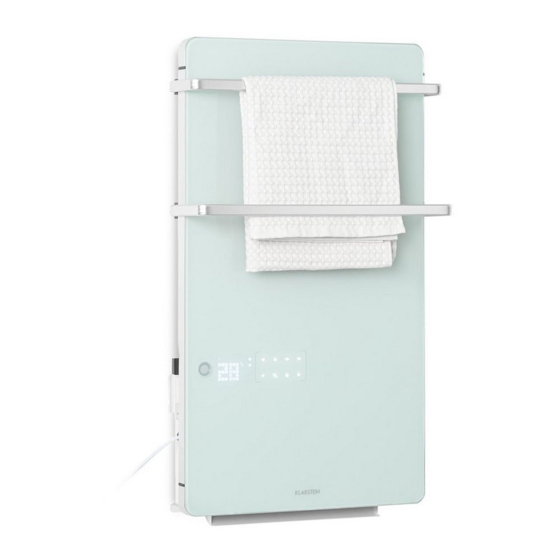
GERÄTEÜBERSICHT Handtuchhalter und vertikaler Schieber Handtuchhalter Display Spiegelpanel berührungs- empfindliche Tasten Bedienkasten... -
Page 15: Bedienung
BEDIENUNG Bedienfeld 1. Anzeige: Heizbetrieb 2. Anzeige: PTC Heizstufe 3. Taste: Ein/ Standby 4. Taste: PTC Heizstufe 5. Taste: Heizbetrieb/Offenes-Fenster-Detektor 6. Taste: Timer-Einstellung Anzeige: Anti-Frost-Funktion 8. Anzeige: Offenes-Fenster-Detektor 9. Taste: Programmwahl 10. Taste: Moduswahl 1 1. Taste: Wert erhöhen 12. Taste: Wert verringern... - Page 16 Stecken Sie zum Einschalten zunächst den Netzstecker des Geräts in eine 220 – 240 V~ 50 Hz Steckdose. Drücken Sie anschließend den Ein-/Ausschalter (0/I) unten am Gerät. Ein kurzer Piepton ist nun zu hören. Das Displayleuchtet für 10 Sekunden auf. Berühren Sie einmal die Taste , um die Heizfunktion zu aktivieren.
- Page 17 1. PTC hohe Heizleistung (1800 W): Berühren Sie zum Einschalten des Geräts die Taste . Das Symbol leuchtet auf. Das Gerät läuft nun mit hoher Heizleistung. Drücken Sie einmal die Taste um die Leistung auf 1 100 W zu senken. Es leuchtet dann nur noch ein Symbol auf.
- Page 18 Betriebsmodus Wochen- Modus tage Antifrost Komfort Antifrost Komfort Antifrost Komfort Antifrost 00:00- 24:00 00:00- 06:30- 08:30- 17:00- 22:30- 06:30 08:30 17:00 22:30 24:00 00:00- 07:30- 10:00- 12:00- 14:00- 17:00- 22:30- 07:30 10:00 12:00 14:00 17:00 22:30 24:00 00:00- 06:00- 17:00- 06:00 17:00 24:00...
- Page 19 anstatt ∧ oder ∨ zu drücken, um für den Beispiel 2: Berühren Sie direkt die Taste entsprechenden Tag die Antifrostfunktion zu aktivieren. Hinweis Jeder Schritt muss innerhalb von zwei Minuten abgeschlossen werden. Das Gerät verlässt sonst den Einstellungsmodus und kehrt zum Anfangsbildschirm zurück. Antifrostfunktion: Das Gerät hält die Raumtemperatur automatisch auf über 5 °C um Frost vorzubeugen 24-Stundentimer –...
-
Page 20: Reinigung Und Pflege
Gerät auf Werkseinstellung zurücksetzen Berühren Sie zweimal kurz die Tasten MODE und gleichzeitig. Das Gerät wird dann auf Werkseinstellung zurückgesetzt. REINIGUNG UND PFLEGE Filterreinigung • Der Filter des Geräts wird bei der täglichen Verwendung des Geräts sehr schmut- zig. Reinigen Sie diesen nach circa 150 Verwendungsstunden. •... -
Page 21: Spezielle Entsorgungshinweise Für Verbraucher In Deutschland
SPEZIELLE ENTSORGUNGSHINWEISE FÜR VERBRAUCHER IN DEUTSCHLAND Entsorgen Sie Ihre Altgeräte fachgerecht. Dadurch wird gewährleistet, dass die Altgeräte umweltgerecht verwertet und negative Auswirkungen auf die Umwelt und menschliche Gesundheit vermieden werden. Bei der Entsorgung sind folgende Regeln zu beachten: • Jeder Verbraucher ist gesetzlich verpflichtet, Elektro- und Elektronikaltgeräte (Altgeräte) sowie Batterien und Akkus getrennt vom Hausmüll zu entsorgen. - Page 22 • Bei einem Vertrieb unter Verwendung von Fernkommunikationsmitteln ist die unentgeltliche Abholung am Ort der Abgabe auf Elektro- und Elektronikgeräte der Kategorien 1, 2 und 4 gemäß § 2 Abs. 1 ElektroG, nämlich „Wärmeüberträger“, „Bildschirmgeräte“ (Oberfläche von mehr als 100 cm²) oder „Großgeräte“ (letztere mit mindestens einer äußeren Abmessung über 50 Zentimeter) beschränkt.
-
Page 23: Hinweise Zur Entsorgung
HINWEISE ZUR ENTSORGUNG Wenn es in Ihrem Land eine gesetzliche Regelung zur Entsorgung von elektrischen und elektronischen Geräten gibt, weist dieses Symbol auf dem Produkt oder auf der Verpackung darauf hin, dass dieses Produkt nicht im Hausmüll entsorgt werden darf. Stattdessen muss es zu einer Sammelstelle für das Recycling von elektrischen und elektronischen Geräten gebracht werden. -
Page 24: Technische Parameter
TECHNISCHE PARAMETER Modellkennung(en) 10035036 Angabe Symbol Wert Einheit Angabe Einheit Wärmeleistung Nur bei elektrischen Speicher-Einzelraumheiz- geräten: Art der Regelung der Wärmezufuhr Nennwärmeleistung Pnom Manuelle Regelung der Wärmezu- nein fuhr mit integriertem Thermostat Mindestwärmeleis- Pmin Manuelle Regelung der Wärmezufuhr mit Rück- nein tung (Richtwert) meldung der Raum- und/oder Außentemperatur... -
Page 25: Ipx4
Dear Customer, Congratulations on purchasing this equipment. Please read this manual carefully and take care of the following hints to avoid damages. Any failure caused by ignoring the items and cautions mentioned in the instruction manual are not covered by our warranty and any liability. Scan the QR code to get access to the latest user manual and other information about the product. -
Page 26: Safety Instructions
SAFETY INSTRUCTIONS • Read all instructions before using this unit. • Do not leave this unit unattended when in use. • This heater will get hot when in use. Do not touch hot surfaces. CAUTION Risk of burns! Some parts of this product can become very hot and cause burns. - Page 27 • This heater can be used by children aged from 8 years and above and persons with reduced physical, sensory or mental capabilities or lack of experience and knowledge if they have been given supervision or instruction concerning use of the heater in a safe way and understand the hazards involved.
- Page 28 • Do not use this heater in the immediate surroundings of a bath, shower or swimming pool. • Do not touch the plug with wet or damp hands. • Do not run the power cable under carpeting. Do not cover the power cable with rugs, runner, or similar coverings.
- Page 29 • This heater is intended for domestic use only and should not be used commercially for contract purposes. Any alternative use, not recommended by the manufacturer, may result in fire, electric shock, or injury to persons. • Means for disconnection having a contact separation in all poles must be incorporated in the fixed wiring in accordance with the wiring rules.
-
Page 30: Installation
INSTALLATION Installation Notes WARNING Risk of injury! In order to avoid a hazard for very young children, this heater should be installed so that the lowest heated rail is at least 600 mm above the fl oor.. • This heater must be installed by a qualifi ed person, that is, a qualifi ed electrician. •... - Page 31 3. Please insert one peg per hole into the wall and push them in with a hammer until the pegs no longer stick out from the wall. 4. Fix the wall bracket to the two upper holes using two ST4X35 screws.
- Page 32 5. Fasten the two Z-brackets to the back of the heater with two M4X8 screws. 6. Insert the smaller towel rack into the provided brackets and screw it tight with four M4X16screws. Follow the same way to fix the larger towel rack with four M4X16 screws.
- Page 33 Two person are required for the following assembly steps Place the appliance on the wall bracket and fasten it on the left and right side with two M4X10 screws to the wall bracket. 8. Fix the Z-brackets to the wall with two ST4X35 screws. The screws should fit into the two previously drilled lower holes.
- Page 34 9. Wipe the surface of the appliance with a soft cloth. The appliance is ready for operation.
-
Page 35: Appliance Overview
APPLIANCE OVERVIEW Towel rack up and down sliding Towel rack Display Mirror glass Touch panel buttons Control... -
Page 36: Operation
OPERATION Control panel 1. Panel heating 2. PTC heating 3. ON/ STANDBY 4. PTC power setting 5. Panel Heating/Window open detection 6. Timer setting Anti-frost 8. Window open detection 9. Program setting 10. Mode Setting 1 1. Value Increase 12. Value Decrease... - Page 37 Plug in supply of 220-240V~ 50Hz, push the ON/OFF (0/I) button located at the bottom of the heater to switch it on. Buzzer will have a short “D” sound. Display will light up for 10s. Touch once to turn on heating. Button light will go out in 10s when no operation is conducted.
- Page 38 1. PTC heating (1800W): Touch button to turn on the appliance. The icon light up, PTC heating is working at high power 1800W. Touch once to switch it low power 1 100W, only one icon lights up. lights up. 2. Panel Heating (200W): Touch once to start panel heating.
- Page 39 Working mode Week day mode Anti-frost Comfort Anti-frost Comfort Anti-frost Comfort Anti-frost 00:00- 24:00 00:00- 06:30- 08:30- 17:00- 22:30- 06:30 08:30 17:00 22:30 24:00 00:00- 07:30- 10:00- 12:00- 14:00- 17:00- 22:30- 07:30 10:00 12:00 14:00 17:00 22:30 24:00 00:00- 06:00- 17:00- 06:00 17:00...
- Page 40 Note: each step must be operated within 2 min, or it will exit setting and screen will recover to initial display. Anti-frost: appliance keep room temperature at default 5 °C to prevent frost. Comfort: comfortable level achieved by setting power and temperature upon need. (Reference to step 2&3) 24 Hour Timer –...
-
Page 41: Cleaning And Maintenance
CLEANING AND MAINTENANCE The filter will become very dirty after day after day usage. Please clean the filter after around 150 hour usage. Steps to remove and assemble filter Use screw driver to unscrew 2PCS screws ST3X10 from filter, then remove the left and right filters. -
Page 42: Disposal Considerations
DISPOSAL CONSIDERATIONS If there is a legal regulation for the disposal of electrical and electronic devices in your country, this symbol on the product or on the packaging indicates that this product must not be disposed of with household waste. Instead, it must be taken to a collection point for the recycling of electrical and electronic equipment. -
Page 43: Technical Parameters
TECHNICAL PARAMETERS Model identifier(s): 10035036 Item Symbol Value Unit Item Unit Heat output Type of heat input, for electric stor- age local space heaters only Nominal heat output manual heat charge control, with integrated thermostat Minimum heat out- manual heat charge control with room put (indicative) and/or outdoor temperature feedback Maximum continu-... -
Page 45: Ipx4
Chère cliente, cher client, Toutes nos félicitations pour l’acquisition de ce nouvel appareil. Veuillez lire attentivement et respecter les instructions de ce mode d’emploi afin d’éviter d’éventuels dommages. Nous ne saurions être tenus pour responsables des dommages dus au non-respect des consignes et à la mauvaise utilisation de l’appareil. -
Page 46: Consignes De Sécurité
CONSIGNES DE SÉCURITÉ • Lisez toutes les instructions avant d'utiliser cet appareil. • Ne laissez pas l'appareil sans surveillance lorsqu'il est en marche. • Ce radiateur devient très chaud. Ne touchez pas les surfaces chaudes. ATTENTION Risque de brûlure ! certaines parties de ce produit peuvent devenir très chaudes et causer des brûlures. - Page 47 • Tenez les enfants et les animaux domestiques à distance. • Les enfants à partir de 8 ans et les personnes souffrant de handicaps mentaux, sensoriels et physiques ne peuvent utiliser l'appareil que s'ils ont été parfaitement familiarisés avec les fonctions et les précautions de sécurité...
- Page 48 • Si le cordon d'alimentation est endommagé, il doit être remplacé par le fabricant, son service après-vente ou une personne de qualification similaire afin d'éviter tout danger. Ne touchez pas l'élément chauffant à mains nues. En cas de contact accidentel, retirez les empreintes digitales avec un chiffon doux, sinon elles brûleront dans l'élément et provoqueront une panne de chauffage prématurée.
- Page 49 • Si possible, évitez d'utiliser une rallonge car elle peut surchauffer et provoquer un incendie. Cependant, si vous devez utiliser une rallonge, assurez-vous qu'elle est adaptée à une utilisation en extérieur et, de préférence, dispose d'un disjoncteur ou est branchée. •...
-
Page 50: Installation
INSTALLATION Remarques MISE EN GARDE Risque de blessure ! Pour éviter tout danger avec les très jeunes enfants, ce radiateur doit être installé de manière à ce que l'élément chauffant le plus bas soit à au moins 600 mm au-dessus du sol. •... - Page 51 3. Insérez une cheville dans chaque trou et frappez-la avec un marteau jusqu‘à ce que la cheville affleure simplement. 4. Fixez le support mural avec deux vis ST4X35 dans les trous supérieurs.
- Page 52 5. Fixez les deux supports en Z à l‘arrière du radiateur avec deux vis M4x8. 6. Faites glisser le plus petit porte-serviettes dans les supports fournis et vissez-les fermement avec quatre vis M4x16. Fixez le plus grand porte-serviettes de la même manière avec quatre vis M4x16 (sautez cette étape si vous n‘avez pas besoin de porte-serviettes).
- Page 53 Deux personnes sont nécessaires pour l‘étape d‘installation suivante : accrochez l‘appareil sur le support mural et fixez-le sur le côté droit et gauche avec deux vis M4x10 de chaque côté. 8. Fixez les supports en Z au mur avec deux vis ST4x35. Les vis doivent s‘insérer dans les trous inférieurs préalablement percés.
- Page 54 9. Essuyez la surface de l‘appareil avec un chiffon doux. L‘appareil est prêt à l‘emploi.
-
Page 55: Aperçu De L'appareil
APERÇU DE L‘APPAREIL Porte-serviettes et curseur vertical Porte serviette Display Panneau miroir Boîtier de commande tactile Boîte contrôle... -
Page 56: Utilisation
UTILISATION Panneau de commande 1. Voyant : chauffage en marche 2. Voyant: niveau de chauffage PTC 3. Touche : marche / veille 4. Touche: niveau de chauffage PTC 5. Touche: chauffage en marche /détection de fenêtre ouverte 6. Touche: réglage la minuterie Voyant: fonction antigel 8. - Page 57 Pour l‘allumer, branchez d‘abord l‘appareil sur une prise 220-240 V ~ 50-60 Hz. Appuyez ensuite sur l‘interrupteur marche / arrêt (0 / I) sur le côté gauche de l‘appareil. Vous entendez un bref bip. L‘écran et les touches s‘allument pendant 10 secondes.
- Page 58 1. PTC haute puissance de chauffage (1800 W) : Pour mettre l‘appareil en marche, appuyez sur la touche Les symboles s‘allument. L‘appareil fonctionne maintenant avec une puissance de chauffage élevée. Appuyez une fois sur la touche pour réduire la puissance à 1 100 W. Un seul symbole pour réduire la puissance à...
- Page 59 Mode Jour de la Mode semaine Antigel Confort Antigel Confort Antigel Confort Antigel 00:00- 24:00 00:00- 06:30- 08:30- 17:00- 22:30- 06:30 08:30 17:00 22:30 24:00 00:00- 07:30- 10:00- 12:00- 14:00- 17:00- 22:30- 07:30 10:00 12:00 14:00 17:00 22:30 24:00 00:00- 06:00- 17:00- 06:00...
- Page 60 au lieu de ou pour activer la Exemple 2 : Appuyez directement sur la touche fonction antigel pour le jour correspondant. Remarque : Chaque étape doit être effectuée dans les deux minutes. Sinon, l‘appareil sort du mode de réglage et revient à l‘écran initial. Fonction antigel : l‘appareil maintient automatiquement la température ambiante au- dessus de 5 °C pour éviter le gel.
- Page 61 Réinitialisation aux paramètres d‘usine Appuyez brièvement sur les touches MODE et en même temps pour réinitialiser l‘appareil aux paramètres d‘usine.
-
Page 62: Nettoyage Et Entretien
NETTOYAGE ET ENTRETIEN Nettoyage des filtres • Les filtres de l‘appareil se salissent pendant l‘utilisation quotidienne. Nettoyez-les après environ 150 heures d‘utilisation. • Utilisez un tournevis pour desserrer les deux vis ST3x10 du filtre. Retirez ensuite les filtres gauche et droit pour le nettoyage. Remettez les filtres en place selon la ligne de référence (voir figure ci-dessous). -
Page 63: Conseils Pour Le Recyclage
CONSEILS POUR LE RECYCLAGE S‘il existe une réglementation pour l‘élimination ou le recyclage des appareils électriques et électroniques dans votre pays, ce symbole sur le produit ou sur l‘emballage indique que cet appareil ne doit pas être jeté avec les ordures ménagères. -
Page 64: Fiche De Données Produit
FICHE DE DONNÉES PRODUIT Référence (s) du produit 10035036 Donnée Symbole Valeur Unité Donnée Unité Puissance calorifique Uniquement pour les radiateurs électriques à accumulation : Type de régulation de l'apport de chaleur Puissance calorifique Pnom Régulation manuelle de l'apport de nominale chaleur avec thermostat intégré... -
Page 65: Ipx4
Estimado cliente, Le felicitamos por la adquisición de este producto. Lea atentamente las siguientes instrucciones y sígalas para evitar posibles daños. No asumimos ninguna responsabilidad por los daños causados por el incumplimiento de las instrucciones y el uso inadecuado. Escanee el siguiente código QR para obtener acceso a la última guía del usuario y más información sobre el producto. -
Page 66: Instrucciones De Seguridad
INSTRUCCIONES DE SEGURIDAD • Lea estas instrucciones cuidadosamente. • No deje el aparato desatendido cuando esté en uso. • Este calentador se calienta durante el uso. No toque las superfi cies calientes. ATENCIÓN ¡Riesgo de quemaduras! Algunas partes de este producto pueden calentarse mucho y causar que-maduras. - Page 67 • Mantenga a los niños y a las mascotas lejos del aparato. • Niños a partir de 8 años, personas con discapacidad mental, sensorial y física sólo podrán utili-zar el dispositivo si han sido familiarizados previamente con las funciones y las precauciones de seguridad por un supervisor responsable de ellas y comprenden los riesgos que conlleva.
- Page 68 • Si el cable de alimentación está dañado, debe ser sustituido por el fabricante, su agente de servicio o por perso-nas cualificadas de forma similar para evitar un peligro. No manipule el elemento calefactor con las ma-nos desnudas. Si se toca accidentalmente, elimine las huellas dactilares con un paño suave, de lo contra-rio se quemarán en el elemento y causarán una falla prematura del...
- Page 69 • De ser posible, evite usar un alargador, ya que puede sobrecalentarse y provocar un incendio. Sin embargo, si debe utilizar un alargador, asegúrese de que sea adecuado para su uso en el exterior y preferiblemente equipado o conectado con un disyuntor.
-
Page 70: Instalación
INSTALACIÓN Notas ADVERTENCIA ¡Riesgo de lesiones! Para evitar un peligro para los niños muy pequeños, este calentador debe ser instalado de manera que el elemento calefactor más bajo esté al menos a 600 mm del suelo. • Este calentador debe ser instalado por una persona cualifi cada, es decir, un electricista cualifi cado. - Page 71 3. Por favor, ponga una clavija por agujero en la pared y fíjela con un martillo hasta que las clavijas no sobre-salgan de la pared. 4. Fije el soporte de la pared con dos tornillos ST4X35 en los agujeros superiores.
- Page 72 5. Faites glisser le plus petit porte-serviettes dans les supports fournis et vissez-les fermement avec quatre vis M4x16. 6. Deslice el toallero más pequeño en los soportes incluidos y asegúrelo con cuatro tornillos M4x16. Fije el toallero más grande de la misma manera con cuatro tornillos M4x16 (salte este paso si no necesita el toallero).
- Page 73 Se necesitan dos personas para el siguiente paso de instalación: Cuelgue la unidad en el soporte de la pared y fíjela a la derecha y a la izquierda con dos tornillos M4x10 cada uno. 8. Fije los soportes Z a la pared con dos tornillos ST4x35. Los tornillos deben encajar en los agujeros inferio-res taladrados anteriormente.
- Page 74 9. Limpie la superficie del dispositivo con un paño suave. El dispositivo está listo para ser utilizado.
-
Page 75: Descripción Del Producto
DESCRIPCIÓN DEL PRODUCTO Toallero y deslizador vertical Toallero Pantalla Panel de vidrio Panel control táctil Panel control... -
Page 76: Funcionamiento
FUNCIONAMIENTO Funcionamiento 1. Indicador: Modo de calefacción 2. Indicador: nivel de calentamiento del PTC 3. Tecla: On/ Standby 4. Tecla: Nivel de calentamiento del PTC 5. Tecla: Modo de calefacción/detector de ventana abierta 6. Tecla: Ajuste del temporizador Indicador: Función antiescarcha 8. - Page 77 Para encenderlo, primero inserte el enchufe del aparato en una toma de 220 - 240 V~ 50-60 Hz. Luego presione el interruptor de encendido y apagado (0/I) en el lado izquierdo del dispositivo. Ahora se puede escuchar un corto pitido. La pantalla y los botones se iluminarán durante 10 segundos.
- Page 78 1. PTC de alta potencia calorífi ca (1800 W): Toque el botón para encender el aparato. Los símbolos se encienden. El aparato funcionará ahora con una alta potencia calorífi ca. Presione el botón una vez para reducir la potencia a 1 100 W.
- Page 79 Modo de funcionamiento Día de la Modo Antie- Antie- Antie- Antie- semana Comfort Comfort Comfort scarcha scarcha scarcha scarcha 00:00- 24:00 00:00- 06:30- 08:30- 17:00- 22:30- 06:30 08:30 17:00 22:30 24:00 00:00- 07:30- 10:00- 12:00- 14:00- 17:00- 22:30- 07:30 10:00 12:00 14:00 17:00...
- Page 80 en lugar de o , para dejar ese día en la Ejemplo 2 - Toque directamente función anti-escarcha. Nota: cada paso debe ser seleccionado en menos de 2 min. Si no se ajusta y la pantalla se recuperará a la visualización inicial. Antiescarcha: el aparato mantiene la temperatura ambiente en los 5 °C predeterminados para evitar las heladas.
- Page 81 Reajuste de la unidad a los ajustes de fábrica Toque brevemente los botones MODE y dos veces al mismo tiempo. A continuación, el dispositivo se restablece a los ajustes de fábrica.
-
Page 82: Limpieza Y Mantenimiento
LIMPIEZA Y MANTENIMIENTO Limpiar el filtro • El filtro del aparato se ensucia mucho durante el uso diario del mismo. Límpielo después de aproximadamente 150 horas de uso. • Use un destornillador para aflojar los dos tornillos ST3x10 del filtro. Entonces retire los filtros izquierdo y derecho para limpiarlos. -
Page 83: Indicaciones Sobre La Retirada Del Aparato
INDICACIONES SOBRE LA RETIRADA DEL APARATO Si en su país existe una disposición legal relativa a la eliminación de aparatos eléctricos y electrónicos, este símbolo estampado en el producto o en el embalaje advierte que no debe eliminarse como residuo doméstico. En lugar de ello, debe depositarse en un punto de recogida de reciclaje de aparatos eléctricos y electrónicos. -
Page 84: Hoja De Datos Del Producto
HOJA DE DATOS DEL PRODUCTO Denominación del modelo 10035036 Dato Símbolo Valor Unidad Dato Unidad Potencia térmica Solo con disposítivos de acumulación de calor eléctricos para abastecimiento local: Tipo de regulación del abastecimiento de calor Potencia térmica nominal Pnom Regulación manual del abastecimiento de calor con termostato integrado: Potencia térmica mínima Pmin... - Page 85 Gentile cliente, La ringraziamo per aver acquistato il dispositivo. La preghiamo di leggere attentamente le seguenti istruzioni per l’uso e di seguirle per evitare possibili danni. Non ci assumiamo alcuna responsabilità per danni scaturiti da una mancata osservazione delle avvertenze di sicurezza e da un uso improprio del dispositivo.
-
Page 86: Avvertenze Di Sicurezza
AVVERTENZE DI SICUREZZA • Leggere tutte le istruzioni prima di utilizzare il dispositivo. • Non lasciare il dispositivo privo di controllo mentre è in funzione. • Il dispositivo diventa bollente durante l’uso. Non toccare le superfi ci bollenti. ATTENZIONE Pericolo di ustione! Alcuni componenti del dispositivo possono diventare estremamente bollenti e causare ustioni. - Page 87 • Tenere bambini e animali domestici lontano dal dispositivo. • Bambini a partire da 8 anni e persone con limitate capacità fisiche e psichiche possono utilizzare il dispositivo solo se sono stati istruiti in modo esaustivo da una persona responsabile del loro controllo sulle funzioni e sulle procedure di sicurezza.
- Page 88 • Se il cavo di alimentazione è danneggiato, farlo sostituire dal produttore, dal servizio di assistenza ai clienti o da un tecnico specializzato, in modo da evitare pericoli. Non toccare l’elemento riscaldante a mani nude. Se viene toccato involontariamente, rimuovere subito le impronte delle dita con un panno morbido, altrimenti si imprimono sull’elemento e possono causare un precoce malfunzionamento della stufa.
- Page 89 • Se possibile, evitare l’uso di cavi di prolunga, dato che possono surriscaldarsi e causare incendi. Se è però necessario l’uso di una prolunga, assicurarsi che sia adatta all’uso all’aperto e, possibilmente, che sia dotata di un interruttore di sicurezza. •...
-
Page 90: Installazione
INSTALLAZIONE Note AVVERTENZA Pericolo di lesione! Per evitare pericoli per bambini molto piccoli, la stufa deve essere installata in modo che l’elemento riscaldante si trovi ad almeno 600 mm sopra al pavimento. • Questa stufa deve essere installata da una persona qualifi cata, cioè da un elettri- cista qualifi cato. - Page 91 3. Inserire un tassello in ogni foro e inserirlo nella parete usando un martello, fino a quando non sporge più dal foro. 4. Fissare il supporto a parete con due viti ST4x35 nei fori superiori.
- Page 92 5. Fissare i due supporti a Z con due viti M4x8 sul retro del dispositivo. 6. Inserire lo scaldasalviette piccolo nei ganci inclusi in consegna e fissarlo con quattro viti M4x16. Fissare allo stesso modo lo scaldasalviette grande con quattro viti M4x16 (saltare questo passaggio, se non sono necessari gli scaldasalviette.
- Page 93 Per il prossimo passaggio è necessario l’aiuto di una seconda persona: agganciare la stufa al supporto a parete e fissarla sui lati destro e sinistro con due viti M4x10 per lato. 8. Fissare i supporti a Z alla parete con due viti ST4x35. Le viti vanno inserite nei due fori inferiori realizzati in precedenza.
- Page 94 9. Pulire la superficie del dispositivo con un panno morbido. Il dispositivo è ora pronto all’uso.
-
Page 95: Descrizione Del Prodotto
DESCRIZIONE DEL PRODOTTO Scaldasalviette e cursore verticale Scaldasalviette Display Pannello Tasti specchiato touch Panello controllo... -
Page 96: Utilizzo
UTILIZZO Pannello di controllo 1. Indicazione: funzione riscaldante 2. Indicazione: livello riscaldante PTC 3. Tasto: on/off 4. Tasto: livello riscaldante PTC 5. Tasto: funzione riscaldante/rilevamento finestra aperta 6. Tasto: impostazione timer Indicazione: funzione antigelo 8. Indicazione: rilevamento finestra aperta 9. Tasto: selezione programma 10. - Page 97 Per accendere il dispositivo, inserire la spina in una presa elettrica da 220 – 240 V~ 50 Hz. Premere dunque l’interruttore on/off (O/I) sul lato inferiore del dispositivo. Viene emesso un breve segnale acustico e il display si illumina per 10 secondi. Premere una volta il tasto per attivare la funzione riscaldante.
- Page 98 1. Potenza riscaldante PTC elevata (1800 W): toccare il tasto per accendere il dispositivo. Il simbolo si illumina. Il dispositivo funziona con la potenza elevata. Premere una volta per abbassare la potenza a 1 100 W. Ora rimane illuminato solo un simbolo 2.
- Page 99 Modalità di funzionamento Giorni della Modalità Antigelo Comfort Antigelo Comfort Antigelo Comfort Antigelo settimana 00:00- 24:00 00:00- 06:30- 08:30- 17:00- 22:30- 06:30 08:30 17:00 22:30 24:00 00:00- 07:30- 10:00- 12:00- 14:00- 17:00- 22:30- 07:30 10:00 12:00 14:00 17:00 22:30 24:00 00:00- 06:00- 17:00-...
- Page 100 Esempio 2: toccare direttamente invece di premere , per attivare la funzione antigelo per il giorno in questione. Nota: ogni passaggio deve essere completato entro 2 minuti, altrimenti il dispositivo abbandona la modalità di impostazione e torna alla schermata iniziale. Funzione antigelo: il dispositivo mantiene automaticamente la temperatura sopra i 5 °C per evitare la formazione di gelo.
-
Page 101: Pulizia E Manutenzione
PULIZIA E MANUTENZIONE Pulire i filtri • In caso di utilizzo giornaliero, il filtro diventa molto sporco e deve essere pulito dopo circa 150 ore di operatività. • Utilizzare un cacciavite per rimuovere le viti ST3x10 dal filtro. Togliere i filtri a destra e sinistra per pulirli. -
Page 102: Avviso Di Smaltimento
AVVISO DI SMALTIMENTO Se nel proprio paese si applicano le regolamentazioni inerenti lo smaltimento di dispositivi elettrici ed elettronici, questo simbolo sul prodotto o sulla confezione segnala che questi prodotti non possono essere smaltiti con i rifiuti normali e devono essere portati a un punto di raccolta di dispositivi elettrici ed elettronici. -
Page 103: Scheda Informativa Del Prodotto
SCHEDA INFORMATIVA DEL PRODOTTO Identificazione del modello (i) 10035036 Indicazione Simbolo Valore Unità Indicazione Unità Potenza termica Solo per gli apparecchi per il riscaldamento d'ambiente locale elettrici ad accumulo: Tipo di controllo dell´apporto termico Potenza termica nominale Pnom Controllo manuale del carico termico con termostato integrato Potenza termica minima Pmin...
Need help?
Do you have a question about the HOT SPOT CRYSTAL FLOW and is the answer not in the manual?
Questions and answers