Advertisement
Quick Links
Advertisement

Related Manuals for QEO GeoDist 100


Summary of Contents for QEO GeoDist 100
- Page 1 GeoDist ® USER MANUAL www.geo-fennel.com...
-
Page 2: Table Of Contents
Dear Customer, Thank you for your confidence in us, having purchased a geo-Fennel instrument. For the optimum performance of the instrument, please read this ma- nual carefully and keep it in a convenient place for future reference. This manual contains important safety information that should be read and understood before use. -
Page 3: Supplied With
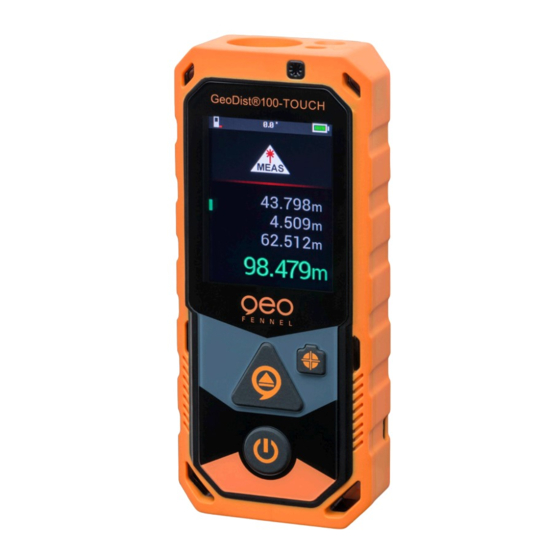
EN E N SUPPLIED WITH · Laser distance meter GeoDist ® · NiMH rechargeable batteries · USB charging cable · Holster · Hand strip · User manual Technical data Measuring range 0,2 - 100 m* Measuring accuracy ±2 mm ** Tilt measurement accuracy ±... - Page 4 FEATURES P . 30 · Levelling support in the display P . 31 · Camera function P . 32 · Measuring reference · Addition / subtraction · Single measurement · Contiuous measurement P . 33 · Area calculation · Volume calculation P .
-
Page 5: Power Supply
POWER SUPPLY INSERT 3 X AAA NIMH BATTERIES Ensure correct polarity when inserting the batteries. CHARGE THE BATTERIES Open the cover of the USB plug (bottom of the instrument) and charge the batteries via the USB connection. For this use a standard USB charger, i. -
Page 6: Operation
OPERATION DISPLAY INDICATION Power on the unit with -> the left display indication (start screen) will appear TOUCH SCREEN The instrument is equipped with a touch screen. Coming from the start screen: · slide right = selection of the measuring modes (pict. 1) ·... - Page 7 MENU 1. Bluetooth function grey = off ® A = automatic transfer M = manual transfer 2. Measuring unit = m / ft / in / ft+in ( , ,, 3. Measuring reference front, tripod, rear 4. Digital vial grey = off 5.
- Page 8 DISPLAY INDICATION IN MEASURING MODE Angle display Measuring Battery status reference indication Bluetooth ® Measuring Digital mode level indication display Value measured Measuring mode 1. Value measured 2. Value measured 3. Value measured Volume HORIZONTAL LEVELLING - DISPLAY INDICATION In order to increase the measuring accuracy in horizontal direction the instrument offers a levelling support in the display: Numerical slope indication: Preferably keep the instrument at 0°.
- Page 9 GENERAL NOTES · After 3 minutes without operation the instruments powers off auto- matically. · The instrument automatically saves the last 1.000 measured values. · The integrated tilt sensor 360° is always active. · In all measuring modes (except single and continuous measurement) the red line shows which parameter will be measured next.
- Page 10 MEASURING REFERENCE Press to select the requested measuring reference. FRONT TRIPOD REAR ADDITION / SUBTRACTION In the modes distance measurement, area and volume calculation slide left and select + or - to execute the requested task. SINGLE MEASUREMENT Power on the unit - measuring mode: single measurement For taking measurements press CONTINUOUS MEASUREMENT Keep...
- Page 11 Navigation within the following measuring modes Select the required menu item and confirm by a short press. = repeat the mode = leave the mode AREA CALCULATION Select and press Press for the first distance Press for the second distance Display indication line 3: area Press for a new area calculation, press the OFF button to...
- Page 12 PYTHAGORAS MEASUREMENTS IMPORTANT - it is essential to observe the following · When measuring the horizontal distance (2nd dimension), the measurement must be taken at a 90° angle to the measuring sur- face. To do this, use the inclination indicator (0°). ·...
- Page 13 PYTHAGORAS (3-POINT / PARTIAL HEIGHT) Select and press Press for the inclined distance top Press for the inclined distance bottom Press for the horizontal distance Display indication line 4: partial height INDIRECT MEASUREMENTS VIA INCLINATION WITH HIGH ACCURACY Where direct measurements to the target are not possible, e.g. on glass facades without measurement reflection or when the measurement object is obscured: Measure partial distances, missing distances are calculated by the...
- Page 14 INDIRECT MEASUREMENT 1 Select and press Press Display indication line 1: angle Display indication line 2: inclined distance top Display indication line 3: height Display indication line 4: horizontal distance INDIRECT MEASUREMENT 2 Select and press Press for the inclined distance top (top point) Press for the inclined distance botton (bottom point) Display indication line 1: angle...
- Page 15 MEASUREMENT POINT-TO-POINT Select and press Hold the unit steady and imperatively wait until the self-calibration is completed Press for the first distance Press for the second distance Display indication line 1: angle Display indication line 2: distance to the first measuring point Display indication line 3: distance to the second measuring point Display indication line 4: distance between both measuring points...
- Page 16 TRAPEZOID MEASUREMENT 2 Select and press Press for the first distance Press for the second distance Display indication line 1: angle diagonal-horizontal Display indication line 2: altitude Display indication line 3: length of the hypotenuse Display indication line 4: length of the slope, i.e. slope of the roof TRIANGLE AREA CALCULATION Select and press Press...
- Page 17 CYLINDRICAL VOLUME Select and press Press for the diametre Press for the height Display indication line 1: diametre Display indication line 2: height Display indication line 3: cylinder area Display indication line 4: cylinder volume STAKE OUT FUNCTION Select and press ·...
- Page 18 OFFSET FUNCTION Select and press · switch the digits with the arrow buttons · define the requested offset with + / - · confirm with The activation of the offset function will be displayed permanently by this symbol ATTENTION: The offset function is permanently active, even after powering off/on of the unit.
- Page 19 DATA EXPORT VIA USB Conncect the GeoDist 100 to a PC / laptop by means of the USB cable. ® Search for the device within the explorer and click. The excel file shown lists all measured values recorded. GeoDist Connect App (iOS and Android) ®...
- Page 20 TROUBLE SHOOTING Code Cause Corrective action Calculation error Repeat the measurement Excessive current Contact your dealer Battery weak Charge the battery Signal too weak or Change the target surface measuring time too long Signal too strong Change the target surface Out of measuring range Select the measuring distance within the range...
-
Page 21: Safety Notese
SAFETY NOTES INTENDED USE OF INSTRUMENT The instrument emits a visible laser beam in order to carry out the following measuring tasks (depending on the instrument): distance measurements. SPECIFIC REASONS FOR ERRONEOUS MEASURING RESULTS Measurements through glass or plastic windows; dirty laser emitting windows;... - Page 22 EXCEPTIONS FROM RESPONSIBILITY The user of this product is expected to follow the instructions given in the user manual. Although all instruments left our warehouse in perfect condition and adjustment the user is expected to carry out periodic checks of the product’s accuracy and general performance. The manufacturer, or its representatives, assumes no responsibility of results of a faulty or intentional usage or misuse including any direct, indirect, consequential damage, and loss of profits.
- Page 23 SAFETY INSTRUCTIONS · Follow up the instructions given in the user manual. · Do not stare into the beam. The laser beam can lead to eye injury. A di- rect look into the beam (even from greater distance) can cause damage to your eyes.
- Page 24 geo-FENNEL GmbH Technische Änderungen vorbehalten. Kupferstraße 6 All instruments subject to technical changes. D-34225 Baunatal Sous réserve de modifications techniques. Tel. +49 561 / 49 21 45 +49 561 / 49 72 34 info@geo-fennel.de www.geo-fennel.de 03/2021 Precision by tradition.
Need help?
Do you have a question about the GeoDist 100 and is the answer not in the manual?
Questions and answers