Table of Contents
Advertisement
Quick Links
Special (2–tier)
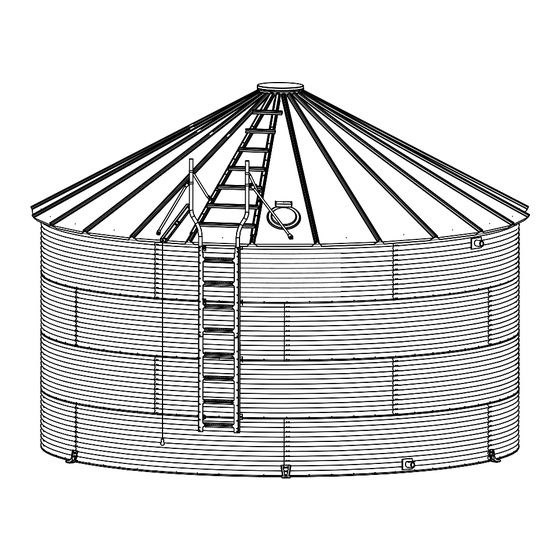
Water Tank
INSTALLATION AND STORAGE INSTRUCTIONS
Installation and Storage Instructions
*This image is representative only
Read this manual before using product. Failure to
follow instructions and safety precautions can
result in serious injury, death, or property
damage. Keep manual for future reference.
WaterTank
READ THESE INSTRUCTIONS CAREFULLY AND COMPLETELY
BEFORE BEGINNING FOUNDATION OR ASSEMBLY
EFFECTIVE DATE: September, 2015
Part Number: 199199
Revision: 9
Part Number: 199800 R3
Revised: November 2020
Original Instructions
Advertisement
Table of Contents

Subscribe to Our Youtube Channel
Related Manuals for AGI Westeel

Summary of Contents for AGI Westeel
- Page 1 Special (2–tier) Part Number: 199199 Revision: 9 WaterTank Water Tank INSTALLATION AND STORAGE INSTRUCTIONS Installation and Storage Instructions *This image is representative only READ THESE INSTRUCTIONS CAREFULLY AND COMPLETELY BEFORE BEGINNING FOUNDATION OR ASSEMBLY EFFECTIVE DATE: September, 2015 Read this manual before using product. Failure to Part Number: 199800 R3 follow instructions and safety precautions can Revised: November 2020...
- Page 2 New in this Manual The following changes have been made in this revision of the manual: Description Section Falling Hazard decal 8110-00136 has been replaced Figure 1 on page 7 by new decal 8110-00228.
-
Page 3: Table Of Contents
5.13 Water Tank Sign Installation Detail..................36 5.14 Tank Jack ..........................37 6. Appendix ............................... 38 6.1 Roof Parts Box Identification ....................38 6.2 Hardware Usage ........................39 6.3 Recommended Bolt Assembly ....................41 7. Limited Warranty: Westeel Water Tank Containment Systems ............42 199800 R3... -
Page 4: Introduction
Before assembling, please read this manual. Familiarize yourself with the process and the necessary precautions for efficient and safe assembly of this Westeel Special (2–tier). Everyone present at the assembly site is required to be familiar with all safety precautions. -
Page 5: Safety
• Follow a health and safety program for your worksite. Contact your local occupational health and safety organization for information. • Contact your local representative or Westeel if you need assistance or additional information. • Always follow applicable local codes and regulations. -
Page 6: Personal Protective Equipment
2. SAFETY SPECIAL (2–TIER) – WATER TANK 2.3. Personal Protective Equipment The following Personal Protective Equipment (PPE) should be worn when installing the equipment. Safety Glasses • Wear safety glasses at all times to protect eyes from debris. Coveralls • Wear coveralls to protect skin. Hard Hat •... -
Page 7: Safety Decal Locations And Details
2. SAFETY SPECIAL (2–TIER) – WATER TANK 2.6. Safety Decal Locations and Details Replicas of the safety decals that are attached to the water tank and their messages are shown in the figure(s) that follow. Safe operation and use of the water tank requires that you familiarize yourself with the various safety decals and the areas or particular functions that the decals apply to, as well as the safety precautions that must be taken to avoid serious injury, death, or damage. - Page 8 2. SAFETY SPECIAL (2–TIER) – WATER TANK WARNING WARNING SAFETY INSTRUCTIONS ENTRAPMENT HAZARD • Read operator’s manual and all safety decals Never enter the bin when loading or before assembling, using, or servicing bin. unloading grain. • Close/latch all access doors when not in use. If you must enter the bin: •...
- Page 9 2. SAFETY SPECIAL (2–TIER) – WATER TANK WARNING NOTICE When equipped with aeration system, to prevent roof and/or bin damage: • Use a minimum 1 square foot (0.1m ) opening for each 1000ft /min (30m /min) of air. • Ensure all roof vents are open and unobstructed. FALLING HAZARD •...
-
Page 10: Before You Begin
Local safety authorities should be contacted as standards vary between jurisdictions. 3.3. Methods of Installation Recommendations for installing Westeel Water Tanks should be closely followed to achieve the full strength of the tank, and to achieve adequate weather sealing. Warranty is void if the recommendations are not followed including but not limited to: 1. -
Page 11: Critical Assembly Requirements
1. Comply with all local code and jurisdictional requirements applicable to your water tank installation. 2. Design and build foundations with the necessary strength for the loads they must support, and for local soil conditions. Westeel foundation guidelines are based on specific stated conditions and may not be applicable to local conditions. -
Page 12: Important Notes
Due to safety eather conditions, allowing moisture to contact concerns with installation and use, Westeel does not recommend the use of oil on other parts such as roof separated until assembly. Brace goods sheets and safety ladders. - Page 13 3. BEFORE YOU BEGIN SPECIAL (2–TIER) – WATER TANK location is out of reach. It is advisable to construct a diagram of accessories and their relative location before construction so as not to forget these details during construction. Some things to consider: •...
-
Page 14: Preparation
4. PREPARATION SPECIAL (2–TIER) – WATER TANK 4. Preparation 4.1. Check Shipment Unload the parts at the assembly site and compare the packing slip to the shipment. Ensure that all items have arrived and that none are damaged. Report damaged parts or shortages immediately to your dealer. Your dealer will order replacement parts immediately to ensure that assembly will not be held up by missing parts. -
Page 15: Assembly
5. ASSEMBLY SPECIAL (2–TIER) – WATER TANK 5. Assembly Before continuing, ensure you have completely read and understood this manual’s Safety section, in addition to the safety information in the section(s) below. 5.1. Assembly Safety • Do not take chances with safety. The components can be large, heavy, and hard to handle. Always use the proper tools, rated lifting equipment, and lifting points for the job. -
Page 16: Top Tier Installation
2. Plan the assembly: a. Determine the desired tank orientation. b. Determine the locations of tank features and accessories (Westeel logo, unloading devices, outside ladder, spiral stairs). These considerations affect the location of the inspection hatch roof panel and the placement of the roof ladder or roof stairs. - Page 17 Do not align the top ring angle joints with wall sheet joints. Figure 3. Installing the Top Ring Angle 7. Install flat or low profile roof as per the roof manual (WESTEEL or third party). Important The water tank must have a roof installed for wind rating.
-
Page 18: Water Tank Wall Sheet Matrix
5. ASSEMBLY SPECIAL (2–TIER) – WATER TANK 5.3. Water Tank Wall Sheet Matrix Table 2. Wall Sheet Part Number Table Specification Wall Sheet Stencil Sheet Hole Length Thickness Label Weight Pattern (overall) Gauge Flat Finished Flat Finished nom (min) Colour (hole-to-hole) 194679 199200... -
Page 19: Wall Sheet Assembly Detail
the prepared foundation to scribe a circle is required (see chart below for calculated radii. These radii 3/4" smaller than the wall sheet radius at the bottom, so that the scribed circle can be seen during embly). A perfectly placed ring of sheets should be 3/4" on the outside of this line all the way around. 5. -
Page 20: Assembling Wall Sheets On Small Diameter Tanks
5. ASSEMBLY SPECIAL (2–TIER) – WATER TANK 5.6. Assembling Wall Sheets on Small Diameter Tanks ASSEMBLING WALL SHEETS ON SMALL DIAMETER TANKS The assembly of small diameter tanks is very sensitive to bolt hole locations on mating sheets. Very slight differences in diameter due to gauge thickness, or the spacing between mating sheets quickly becomes evident eter tanks is very sensitive to bolt hole locations on mating sheets. - Page 21 evated wall sheets. old the wall sheets relative to each other by inserting tapered punches through the the lower sheet and the mating vertical seam hole on the upper sheet. (Figure 1) 5. ASSEMBLY SPECIAL (2–TIER) – WATER TANK te the punch to align and ream the holes in the three mating sheets. (Figure 2) At punch should be inserted into an adjacent hole in order to assist in maintaining Figure 6.
-
Page 22: Prior To Installing Liner And/Or Lifting The Tank For The First Time
5. ASSEMBLY SPECIAL (2–TIER) – WATER TANK 11. Leave the last vertical seam hole on either end of the wall sheet being installed and repeat the procedure on each of the following wall sheets. Note When it comes time to make the connection on the vertical seams of the lower tier, it should still be possible to first insert a punch to align the three mating sheets. - Page 23 5. Install the "water level" or any other options or accessories that are components of the roof or installed on the first tier wall sheet. 6. Liner and textile should be moved on to the pad (center of tank) prior to install of the walls. 5.
-
Page 24: Tank Liner Installation
5. ASSEMBLY SPECIAL (2–TIER) – WATER TANK 5.8. Tank Liner Installation TANK LINER INSTALLATION Figure 9. Tank Liner and Top Ring Detail TOP RING ANGLE CLAMP 1st NUT FROM TOP-RING-ANGLE INSTALLATION GEOTEC FABRIC BOLT & NUT TANK LINER WITH LOOP OVER ROPE TANK LINER AT TOP... - Page 25 5. ASSEMBLY SPECIAL (2–TIER) – WATER TANK 10. Snug up the nut to secure in place but do not completely tighten. 11. Proceed installing the liner around the tank by inserting under the clamps and finger tightening the nuts. Do not pull the liner tight between the liner clamps. Leave a slight and consistent excess in between. 12.
-
Page 26: Tank Anchoring
Attachment to a pad or to the ground is by customer supplied hardware. Anchoring must be sufficient to secure tanks against the environmental loading conditions which are available from WESTEEL for different geographical locations. Anchor brackets may need to be installed at locations other than vertical wall seams depending on tank diameter and punched hole pattern of the bottom tier wall patterns. - Page 27 Attachment to a pad or to the ground is by customer supplied hardware. Anchoring must be sufficient to secure tanks against the environmental loading conditions which are available from WESTEEL for different 1. Place the anchor against the wall sheet at the desired location and mark hole locations.
-
Page 28: Options
WaterTank 5. ASSEMBLY SPECIAL (2–TIER) – WATER TANK SPECTION HATCH COLLAR INSTRUCTIONS 5.10. Options 24” Diameter Inspection Hatch Assembly This option is a collar and lid assembly that can be installed on a flat or low profile roof sheet. It comes with its own instructional manual. -
Page 29: Fitting Plate Installation
This is an option that will be supplied as requested. It comes in sizes 2", 4", 6", 8", 10" and 12". A hole must be cut in the tank wall and bolt holes drilled by installer. 5. ASSEMBLY SPECIAL (2–TIER) – WATER TANK Figure 15. - Page 30 Having a spotter on the inside is advised. the liner/textile bag for 4. Add two layers of Westeel butyl tape around the entire perimeter of plate, on the side that will be facing discharge plate nipple PIERCE LINER AND TEXTILE BAG, outward.
- Page 31 TIGHTEN SECURE AND EVENLY WI layers of Westeel butyl tape to the side that will be facing outward. Be careful he outside of the tank. DRILL OR IMPACT GU to consider that the corrugation of the...
-
Page 32: Wall Sheet Layouts
5. ASSEMBLY SPECIAL (2–TIER) – WATER TANK 5.12. Wall Sheet Layouts Figure 21. Model 0601 WTR to 0606 WTR Figure 22. Model 0901 WTR to 0906 WTR Figure 23. Model 1201 WTR to 1206 WTR 199800 R3... - Page 33 5. ASSEMBLY SPECIAL (2–TIER) – WATER TANK Figure 24. Model 1501 WTR to 1506 WTR Figure 25. Model 1507 WTR to 1804 WTR Figure 26. Model 2101 WTR to 2106 WTR Figure 27. Model 2107 WTR to 2404 WTR 199800 R3...
- Page 34 5. ASSEMBLY SPECIAL (2–TIER) – WATER TANK Figure 28. Model 2701 WTR to 2706 WTR Figure 29. Model 3001 WTR to 3006 WTR Figure 30. Model 3301 WTR to 3306 WTR Figure 31. Model 3601 WTR to 3606 WTR 199800 R3...
- Page 35 5. ASSEMBLY SPECIAL (2–TIER) – WATER TANK Figure 32. Model 3901 WTR to 3906 WTR Figure 33. Model 4201 WTR to 4206 WTR Figure 34. Model 4501 WTR to 4506 WTR Figure 35. Model 4801 WTR to 4806 WTR 199800 R3...
-
Page 36: Water Tank Sign Installation Detail
5. ASSEMBLY SPECIAL (2–TIER) – WATER TANK 5.13. Water Tank Sign Installation Detail 1. Locate the sign in a high visibility area. NAMEPLATE SIGN INSTALLATION DETAIL 2. Wipe wall panel to remove oil. 3. Mark holes on the panel on the ‘peaks’. 1. -
Page 37: Tank Jack
5. Use a minimum of four 3/8” x 1¼” bolts (Grade 8) (not supplied) to fasten lug, if one jack per wall sheet is internal jacking system. used (not available from Westeel) We recommend: 1. Ensure jacks are sized for the job. Do not exceed rated capacity. -
Page 38: Appendix
6. APPENDIX SPECIAL (2–TIER) – WATER TANK 6. Appendix 6.1. Roof Parts Box Identification 195149 – Peak Ring Bulb Gasket (105") 195150 – Peak Ring Bulb Gasket 212230 – Bird Stop (168") 212231 – Foam Roof Rib Closure 195030 – Foam Closure for Peak 235882 –... -
Page 39: Hardware Usage
IMPORTANT! 6. APPENDIX SPECIAL (2–TIER) – WATER TANK Use 5/16” x 1¼” bolts provided in the bin parts boxes for the top ring angle to wall sheet connection. Use 3/8” hardware at all other wall sheet connections as shown below. There may be a shortage of 3/8” bolts 6.2. - Page 40 6. APPENDIX SPECIAL (2–TIER) – WATER TANK Table 6. Tank Hardware 3/8" x 1" 7/16" x 1-1/2" 7/16" x 1-3/4" 3/8" 7/16" Flanged Hex Flanged Hex BOLT Round Head Hex Nut Hex Nut LENGTH Bolt c/w Slot Bolt (Washer) Bolt (Washer) 235960 (700) 235960 (700) 232855 (400)
-
Page 41: Recommended Bolt Assembly
ALWAYS TIGHTEN THE NUT, NOT THE BOLT. Avoid bin assembly at temperatures below -10°C (14°F) if possible. Erection in low temperatures does not ensure strong, well sealed connections. Do not substitute bolts in place of those supplied by Westeel. 199800 R3... -
Page 42: Limited Warranty: Westeel Water Tank Containment Systems
2. improper storage of the goods both prior to and after purchase; 3. damage caused by, or in the course of, installation or assembly; 4. any use of the goods which is not an intended use as specified in Westeel's published product literature, or otherwise specified by Westeel in writing;... - Page 43 11. Any use or installation inconsistent with Westeel’s Standard Disclaimers. Limitations as to Manufacturer The warranty does not cover products sold by Westeel that are not manufactured by Westeel. In those circumstances, the purchaser is referred to the manufacturer of those products.
- Page 44 P.O. Box 792 Winnipeg, Manitoba, R3C 2N5 Canada Phone: 1-888-937-8335 Website: www.aggrowth.com Email: customerservice.winnipeg@westeel.com ©Ag Growth International Inc. 2020 Printed in Canada If you have any comments or questions on this manual, or find an error, email us at comments@aggrowth.com.
Need help?
Do you have a question about the Westeel and is the answer not in the manual?
Questions and answers