Table of Contents
Advertisement
Quick Links
Advertisement
Table of Contents

Related Manuals for Uniden EXR 2460


Summary of Contents for Uniden EXR 2460
- Page 1 All manuals and user guides at all-guides.com...
-
Page 2: Table Of Contents
All manuals and user guides at all-guides.com C O N T E N T S Introduction........... 1 •... -
Page 3: Introduction
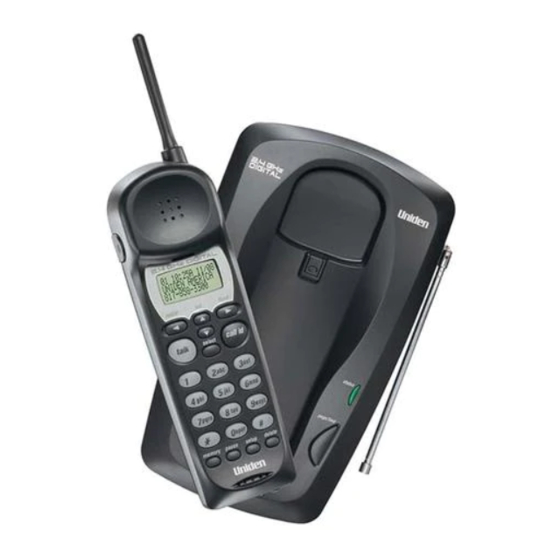
All manuals and user guides at all-guides.com oduction WELCOME Congratulations on your purchase of the Uniden EXR2460 cordless telephone. This phone is designed for reliability, long life, and outstanding performance utilizing the latest in 2.4 GHz Spread Spectrum technology. FEATURES •... -
Page 4: Included In Your Package
NOTE If any of these items are missing or damaged, Beltclip Rechargeable Battery Short Telephone Cord contact the Uniden Parts (BT-2499) Department at (800)554-3988. Hours are from 8:00 a.m. to 5:00 p.m. Central Time, Monday through Friday. We can also be reached on the web at www.uniden.com. -
Page 5: Installing And Adjusting Your Phone
3) Plug the AC adapter into a standard 120 V AC wall outlet. Use only the Uniden AC adapter supplied with this phone and DO NOT use an outlet controlled by a wall switch. 4) Charge the battery (refer to “Charging the Battery Pack,” page 11). -
Page 6: Wall Installation
All manuals and user guides at all-guides.com 7) Attach the desktop stand to the base. HINT Before using your phone, fully charge the Nickel- Cadmium battery pack 8) Set the base on a desk or tabletop and for 12-15 hours. place the handset into the base. - Page 7 All manuals and user guides at all-guides.com 3) Plug the AC adapter cord into the 10 V DC input jack on the back of the base. 4) Put the AC adapter cord inside the molded wiring channel, then wrap it around the strain relief notch.
- Page 8 All manuals and user guides at all-guides.com 7) On the base unit, pull the handset retainer out of the slot and rotate it clockwise 180°. If the handset beltclip is attached, you cannot charge the handset with the display showing when the phone is mounted on the 8) Flip the retainer from front to back, wall (See page 14).
- Page 9 All manuals and user guides at all-guides.com Direct wall mounting If you don't have a standard wall plate, you can mount your phone directly to the wall. Before doing this, consider the following: • Select a location away from electrical cables, pipes, or other items behind the mounting location.
- Page 10 All manuals and user guides at all-guides.com 3) Rotate the mounting adapter 180° and snap it into place at the bottom of the base. 4) Plug the AC adapter cord into the 10 V DC input jack on the back of the base.
- Page 11 All manuals and user guides at all-guides.com 7) Line up the mounting slots on the base with the mounting screws on the wall, then push in and down until the phone is firmly seated. 8) On the base unit, pull the handset retainer out of the slot and rotate it clockwise 180°.
-
Page 12: Installing The Handset Battery Pack
2) Install the nickel-cadmium battery with the label facing down. Use only Uniden battery model (BT2499) supplied with your phone. 3) Slide the battery cover on until it snaps into place. -
Page 13: Charging The Battery Pack
You can NOTE obtain an extra battery pack from your authorized Uniden dealer. Please visit your 1) Position the battery pack so the inner side with contacts is facing up. -
Page 14: Cleaning The Battery Contacts
All manuals and user guides at all-guides.com Low battery indicator When the battery pack is very low and needs to be charged, the phone is Low Battery programmed to eliminate functions in order to save power. If the phone is not in use, flashes. -
Page 15: Adjusting The Handset Volume Controls
All manuals and user guides at all-guides.com ADJUSTING THE HANDSET VOLUME CONTROLS Handset ringer volume When the phone is in standby mode, pressing the key on the handset selects the handset ringer volume. There are two ringer volume settings; high and low. To select the high volume setting, press . -
Page 16: Installing The Beltclip
All manuals and user guides at all-guides.com INSTALLING THE BELTCLIP To attach the beltclip 1) Remove the slot cover. If you have wall mounted the base, you must remove the beltclip to charge the handset with display showing. 2) Insert the beltclip into the empty slot and press down until it clicks. -
Page 17: Headset Installation
All manuals and user guides at all-guides.com HEADSET INSTALLATION Your phone may be used with an optional headset, the Uniden HS910. To use this feature, simply insert the headset plug into the headset jack. Your headset is ready for hands-free conversations. -
Page 18: Using Your New Phone
All manuals and user guides at all-guides.com Using Your New Phone MAKING AND RECEIVING CALLS Handset On Base Handset Off Base 1) Pick up the handset. 1) Press any key. To answer 2) If not in Autotalk Mode, 2) If not in Autotalk Mode, a call press press... -
Page 19: Storing A Phone Number In Memory
All manuals and user guides at all-guides.com STORING A PHONE NUMBER IN MEMORY 1) Remove the handset from the base. NOTE 2) Press and hold until the memory Memory Store confirmation tone sounds. The following Whenever you are using a 1>... -
Page 20: Editing A Phone Number In Memory
1> SMITH JOHN shows the Memory Store screen and any standby. You may also press 2 UNIDEN saved numbers. memory to exit a memory menu at any time. 3) Use the : and ; keys or number keypad to select the memory location you would like to edit. -
Page 21: Erasing A Number From Memory
Memory Store confirmation tone sounds. The handset 1> SMITH JOHN shows the Memory Store screen with any 2 UNIDEN saved numbers displayed. 3) Use the : and ; keys or number keypad to select the memory NOTE location you would like to delete. The < and > keys toggle between the names display and the numbers display. -
Page 22: Using Memory Dialing
2 Uniden 3 Grandma 2) Use the : and ; keys or the number 1 SMITH JOHN keypad to select the memory location 2 > Uniden you would like to dial. 3 Grandma 3) Press and the number is dialed. -
Page 23: Using Caller Id
All manuals and user guides at all-guides.com USING CALLER ID You must subscribe to Caller ID from your phone company in order to use this feature. Setting up Caller ID options There are three Caller ID setup options available; they are Autotalk, CIDCW, and Area Code. - Page 24 All manuals and user guides at all-guides.com Screening your calls Caller ID allows you to review caller 12/21 12:30PM 01 information before you answer your John Smith phone. After the first ring, the display 817-555-1212 shows the date, time, call count, name, and phone number of the caller.
- Page 25 : and ; keys to select a blank 1> Smith John memory location where you would like to 2 UNIDEN store the number. (If you want to replace an existing number with the Caller ID number, skip to step 5.) 4) Press .
- Page 26 All manuals and user guides at all-guides.com Deleting a Caller ID message To delete a single Caller ID message, follow the steps below. 1) Press , and the Caller ID summary call id screen appears. The screen shows the New : 01 number of new messages and Total : 02 total messages.
-
Page 27: Using Redial
All manuals and user guides at all-guides.com 4) A confirmation tone sounds, and the following screen appears. Total:00 5) Press to return to standby. call id USING REDIAL key redials the last number redial dialed. The redialed number can be up to 32 digits long. -
Page 28: Using The Page Feature
All manuals and user guides at all-guides.com USING THE PAGE FEATURE To locate the handset (while it’s off the base), press page the base. To beep the handset for 5 seconds, press on the base, Paging page and the handset displays paging. To beep the handset for 60 seconds, press and hold page... -
Page 29: Troubleshooting
Troubleshooting QUICK REFERENCE CHART If your phone is not performing to your expectations, please try these simple steps before calling Uniden customer service. If you are still unable to resolve the problem, call customer service at (800) 297-1023. PROBLEM SUGGESTION The charge light won’t come... - Page 30 All manuals and user guides at all-guides.com PROBLEM SUGGESTION The handset doesn’t ring or • The Nickel-Cadmium battery pack receive a page. may be weak. Charge the battery on the base unit for 12-15 hours. • The handset may be too far away from the base unit.
-
Page 31: Specifications
All manuals and user guides at all-guides.com Specifications GENER AL The EXR2460 complies with FCC Parts 15 and 68. Frequency control: PLL Modulation: Direct Sequence Spread Spectrum; DBPSK Operating temperature: 0° to 50° C (+32° F to +122° F) BASE Frequency: 2400 to 2483.5 MHz (20 channels) Power requirements: 10 V 500 mA (from AC adapter) Size: 5-1/2 in. - Page 32 All manuals and user guides at all-guides.com...
- Page 33 All manuals and user guides at all-guides.com 4,511,761 4,523,058 4,595,795 4,797,916 5,381,460 5,426,690 5,434,905 5,491,745 5,533,010 5,574,727 5,650,790 5,660,269 5,661,780 5,663,981 5,671,248 5,717,312 5,754,407 5,768,345 5,787,356 5,838,721 June1999...
Need help?
Do you have a question about the EXR 2460 and is the answer not in the manual?
Questions and answers