
Related Manuals for Red Bull Racing RB-RTEN10


Summary of Contents for Red Bull Racing RB-RTEN10
- Page 1 USER MANUAL FOR E-SCOOTER RB-RTEN10 Red Bull® Marks and the Red Bull Racing Logo are licensed by Red Bull GmbH/Austria...
-
Page 2: Pl Instrukcja Obsługi
Page 3-29 USER MANUAL Page 31-59 INSTRUKCJA OBSŁUGI... - Page 3 RB-RTEN10 E-SCOOTER WARNING FOR ELECTRIC KICKSCOOTER ead and follow all the instruction in the user manual before using the e-scooter. ollisions, falls, and loss of control can damage people and objects around you. wners of the e-scooter must check and obey any local laws applicable to e-scooter usage concerning helmet use, speed limits, and accessible areas.
- Page 4 appliance in a safe way and understand the hazards involved. l eaning and user maintenance shall not be made by children without supervision. o not recharge non-rechargeable batteries. he battery is to be disposed of safely. Introduction For your better use experience, please read this product manual carefully. Keep this user manual for future references. In order to avoid damage, carefully read and follow the instructions of this user manual.
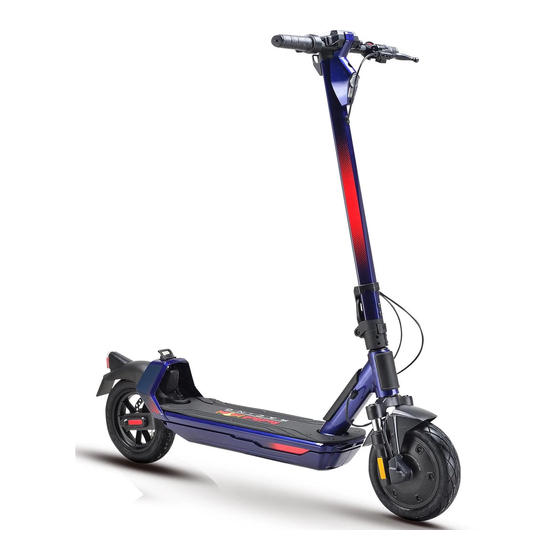
- Page 5 The product...
- Page 6 Assembling The kickscooter is folded inside its box. Hand pull the handlebar from the rear wheel. Upward the handlebar. Close the lever on the handlebar. For the very first use, please assemble the vertical handlebar. Use the hexagon wrench to tighten the 4 screws on the handlebar.
- Page 7 Install the handlebar on the standpipe. When the installation is done, please test the power switch of the display. If the display turns-on, the installation is well done. You can use the easel to keep the kickscooter standing alone.
-
Page 8: Folding Steps
Folding steps Make sure the electric scooter is powered off. Hold the standpipe by hand, rotate the folding wrench and align the front hook and the rear hook. Fold the handlebar. Hook the handlebar to the rear wheel. The folding procedure is now completed. The product can be easily carried. -
Page 9: Led Display
LED Display The LED display is on top of the handlebar, in front of the user. Press the power button to turn on the e-scooter. Press the button one time to switch from Pedestrian mode to ECO to D to S+ mode. Quickly press the power button 5 times to switch from MPH to KM/H and vice versa. -
Page 10: Battery Capacity
Current speed (1) The speed is showed in Km/h. It will change along with the current speed. Battery capacity (2) The battery capacity of the e-scooter is displayed by bars, from 100% (full battery) to 0% (empty battery). The display will light on all bars when the battery is full and one bar only for very low battery. During use the power of the battery gradually decreases. -
Page 11: Error Status
Error status When one of these error codes appear on the display, kindly contact your retailer or after-sale-service for immediate assistance. Remarks: When the above error occurs, the rear tail lamp will flash at 10Hz high frequency. The motor will not operate; therefore, the motor cannot be seen as damage when it does not operate when error occurs. - Page 12 Due to program setting, it might trigger the fault at the first use, but it would not happen next time. If it happens during normal use, the MOSFET up bridge-arm fault. controller MOS tube may be damaged, please replace controller. If it happens during normal use, the controller MOS tube may be damaged, please replace MOSFET down bridge-arm fault.
- Page 13 Headlight switch malfunction. This error is not valid for the current model. It is usually due to bad contact for main cable Communication failure. or connector clips and open circuit. After-sales service is required. Start-switch failure. This error is not valid for the current model. Instructions for use Before riding the electric kickscooter for the first time, the battery must be fully charged.
- Page 14 Release the acceleration lever to slow-down. Pull the brake lever on the left handle: the electric kickscooter will brake. Stop the electric kickscooter and remove the feet, one by one. Turn off the display. Use the easel to keep the electric kickscooter standing alone, when not in use. Distance The maximum range of the scooter is 35-40 km approx.
-
Page 15: Instructions For Charging
Battery The battery charge (and therefore the maximum distance) is affected by some factors like: 1. Ground (when ground is not flat, the discharge is increased). 2. Weight of the user. 3. Ambient temperature. 4. Drive style and speed will affect the life of the battery charge: a constant and moderate speed, positively affect the charge of the battery;... - Page 16 2. First connect the cable of the battery charger to the e-scooter. Then, connect the cable of the battery charger to the mains. 3. The indicator light on the charger will be red: this grants that the charge is proceeding. Charging should be in a safe, dry, and clean environment.
- Page 17 Keep the product and the battery at the recommended temperature to keep the highest efficiency of the e-scooter and of the battery. If used in an extreme cold or hot environment, the charging time sill be lengthened too. Working temperature: 0°C ̴...
-
Page 18: Transport Of The Battery
CAUTIONS Do not use the e-scooter if the battery is low. Do not use the e-scooter in case of burning smell. Do not use the e-scooter if anything leaks out from the battery. Do not touch anything leaking out from the battery. Do not let children or animals touch the battery. - Page 19 Adult supervision is required for minors of 18. The e-scooter is for personal entertainment only. It is prohibited to use it as public transportation (check your local laws). It is forbidden to use the e-scooter on vehicle roads (check your local laws). 10.
- Page 20 DO NOT ride during rainy / wet weather. Ride at a controlled and slow speed while you ride through uneven surfaces. Slightly bend your knees to absorb the bumpy impacts. DO NOT ride in traffic lanes or residential areas where Always steer clear of obstacles.
- Page 21 Look out for doors, elevators, and other overhead obstacles. DO NOT ride with any adult or child. DO NOT step on the rear mudguard. DO NOT take the hands off from the handlebars while riding.
- Page 22 DO NOT try to ride up or down stairs, or jump DO NOT accelerate when you go downhill. over the obstacles. DO NOT press the accelerator when you are walking DO NOT hang bags or other heavy accessories on alongside the scooter.
- Page 23 Always keep both feet on the deck. DO NOT turn the handlebar violently during high-speed riding. DO NOT ride into a puddle that is deeper than 2 cm. DO NOT touch the disc brake.
- Page 24 Maintenance of the electric kickscooter The e-scooter requires routine cleaning and maintenance. First, make sure the charging cable is not connected. Fasten the rubber cover of the charging port on the deck. Second, the e-scooter must be powered off. Now you can wipe the case of the e-scooter with a soft damp cloth. Do not use alcohol, gasoline, kerosene or other corrosive, volatile chemical solvents for cleaning or the surface and the internal structure may be severely damaged.
-
Page 25: Adjust The Handlebar
Adjust the handlebar Staggering of steering rack: use a hex wrench, tighten the bolt near the folding mechanism. WARNING As with any mechanical component, a PLEV is subject to high stresses and wear. The various materials and components may react differently to wear or fatigue. If the expected service life for a component has been exceeded, it may break suddenly, therefore risking causing injuries to the user. - Page 26 WARNING When battery is completely empty (0% charge), a normal charge of 7-8 hours might not be sufficient. It is necessary to proceed with an 8-hour charge. Deflated wheel If the wheel deflates, connect a connecting pipe to a wheel nipple to pump it. Remove the pin cap first, then tighten a fitting. Now, start to pump the wheel.
- Page 27 the wheels, and the battery. WARNING Do not open the e-scooter for any reason. The user is responsible of any after-effect. Non-professionals shall not dismantle the battery pack without permission, or severe accidents may be caused due to electric shock or short circuit. WARNING When battery is completely empty (0% charge), a normal charge of 7-8 hours might not be sufficient.
-
Page 28: After-Sale Service
After-sale Service Please contact your Retailer for any technical problem. Warranty Carefully read all instructions before using the electric kickscooter. Do not use the electric kickscooter if use is forbidden. Do not use the kickscooter if this might cause danger for the user and people/things around. This product is warranted to be free from defects in materials, workmanship and functionality (aesthetic parts are excluded) for a period of 2 years starting from the date of purchase in case of receipt, for a period of 1 year starting from the date of purchase in case of invoice. -
Page 29: Declaration Of Conformity
Declaration Of Conformity We declare that the product described is in conformity with the required European Directives. Images inside this user manual are for illustrative purposes only. Our Company is not responsible for improper use of the product. Our Company reserves the right to modify the product and the content of this manual without prior notice. MADE IN CHINA IMPORTED AND DISTRIBUTED BY 4cv MOBILE SP.Z O.O. - Page 31 RB-RTEN10 HULAJNOGA ELEKTRYCZNA UWAGI I OSTRZEŻENIA Elektryczna hulajnoga może być używana przez dzieci powyżej dziesięciu lat, a także przez osoby z ograniczeniami ruchu lub innymi niedowładnościami lub osoby bez wiedzy i doświadczenia w poruszaniu się takimi pojazdami - tylko pod nadzorem doświadczonych użytkowników i po uprzednim przeszkoleniu.
-
Page 32: Przed Pierwszym Użyciem
przeznaczeniem, niezgodnie z instrukcją obsługi i zawartymi ostrzeżeniami. Bez względu na okoliczności jazdy, utrata kontroli nad hulajnogą, kolizje lub upadki mogą spowodować zagrożenia dla użytkownika i otoczenia. Producent, Importer i Dystrybutor nie odpowiadają za żadne skutki użycia produktu niezgodnie z przeznaczeniem lub niezgodnie z instrukcją, ostrzeżeniami i zaleceniami. - Page 33 ELEMENTY HULAJNOGI...
- Page 34 ROZKŁADANIE HULAJNOGI W pudełku hulajnoga jest złożona. Wyjmij ostrożnie urządzenie z pudła, postaw na twardym, stabilnym podłożu. Zwolnij klamrę umieszczoną na kierownicy z haczyka umieszczonego na błotniku tylnym. Podnieś pałąk kierownicy do pozycji pionowej. Zablokuj dźwignią jak na rysunku. Sprawdź, czy przycisk zabezpieczający zablokował dźwignię. Przed pierwszym użyciem –...
- Page 35 Gdy montaż jest zakończony, wypróbuj działanie włącznika. Naciśnij przycisk na kierownicy (patrz strona następna). Jeśli wyświetlacz zaświeci się – montaż jest poprawny. Możesz użyć nóżki dla podparcia hulajnogi. SKŁADANIE HULAJNOGI Zwolnij przycisk zabezpieczający i otwórz dźwignię zabezpieczającą. Połóż pałąk do tyłu. Zaczep klamrę...
- Page 36 Procedura składania jest teraz zakończona. Produkt jest łatwy do przenoszenia. WYŚWIETLACZ Wyświetlacz LED znajduje się na górze kierownicy, przed użytkownikiem. Naciśnij i przytrzymaj przycisk włącznika ON/OFF, aby włączyć/wyłączyć e-hulajnogę. Krótko naciśnij przycisk zasilania jeden raz, aby przełączyć się z biegu 1 (ECO) na bieg 2 (D).
- Page 37 Ponownie krótko naciśnij, aby przełączyć się z biegu 2 na bieg 3 (S+).. Szybko naciśnij przycisk zasilania dwa razy, aby włączyć/wyłączyć przednie światło LED. Szybko naciśnij przycisk zasilania 5 razy, aby przełączyć się z MPH na KM / H i odwrotnie. Naciśnij i przytrzymaj włącznik 5 sek aby wyłączyć...
- Page 38 akumulator. Licznik przebiegu (3) (4) Informacje ODO (całkowity przebieg) są widoczne, gdy urządzenie jest włączane. Wartość ta jest zapamiętywana i niekasowana. Informacje o podróży TRP (tzw. przebieg dzienny) są widoczne podczas normalnego użytkowania hulajnogi elektrycznej. Jest to przebieg aktualnej wycieczki od chwili włączenia hulajnogi i jest kasowany po wyłączeniu urządzenia. Wskaźnik oświetlenia (5) Ten symbol zaświeci się, gdy przednie światło zostanie włączone.
- Page 39 UWAGA: Gdy wystąpią poniższe błędy, tylna lampa będzie migać z wysoką częstotliwością 10 Hz. Silnik nie będzie działał. Nie jest to uszkodzenie silnika tylko zatrzymanie hulajnogi wskutek sygnalizowanego błędu. Dotyczy Status Znaczenie Opis Jeśli podjeżdżamy pod górę lub gwałtownie przyspieszamy z dużym obciążeniem, może Zabezpieczenie przeciążeniowe silnika włączyć...
- Page 40 Jeśli zdarzy się podczas normalnego Błąd kontrolera MOSFET użytkowania, oznacza uszkodzenie sterownika. Uszkodzenie wymaga interwencji serwisu Uszkodzony sterownik przypadku sterownika jest zwykle nadmierna temperatura, spowodowana ciągłą jazdą po zboczach lub przeciążeniem hulajnogi przez dłuższy czas. Początkowa ochrona Ochrona przed przegrzaniem ograniczy prąd wyjściowy i nie wygeneruje kodu błędu.
-
Page 41: Instrukcja Użycia
INSTRUKCJA UŻYCIA Postępuj zgodnie z instrukcjami zawartymi w niniejszej instrukcji obsługi, aby uniknąć problemów technicznych. Przed pierwszą jazdą na hulajnodze elektrycznej akumulator musi być w pełni naładowany. Staraj się ładować baterię po każdej jeździe, co może znacznie wydłużyć jej żywotność jak również zapewnić komfort i bezpieczeństwo użytkowania hulajnogi. - Page 42 ZASIĘG JAZDY Maksymalny przebieg elektrycznej hulajnogi przy pełnym naładowaniu i nowej baterii wynosi do 35-40 km. Należy zwrócić uwagę, że zasięg hulajnogi jest warunkowany wieloma czynnikami: stopniem rozładowania akumulatora, obniżeniem pojemności wskutek zużycia, warunkami drogowymi (płaska i równa nawierzchnia spowoduje większy zasięg niż wyboista i ze wzniesieniami), stylem jazdy, temperaturą...
-
Page 43: Ładowanie Baterii
Wagą kierowcy. Temperaturą otoczenia. Stylem jazdy i szybkością. Stała i umiarkowana prędkość wydłuża czas życia baterii; wysoka prędkość i jej dynamiczne zmiany zwiększają szybkość rozładowania akumulatora. Czasem użytkowania baterii (normalnym zużyciem eksploatacyjnym), częstotliwością ładowania-rozładowania. Długotrwałe nieużywanie hulajnogi i związane z nim nierozładowywanie baterii wskutek zwykłej eksploatacji zmniejsza pojemność... - Page 44 UWAGA 1. Nie podłączaj ładowarki do urządzenia zaraz po zakończeniu jazdy. Odczekaj godzinę, aż hulajnoga wystygnie, tj. osiągnie temperaturę otoczenia. 2. Ładuj baterię wyłącznie w bezpiecznym, suchym i czystym otoczeniu. 3. Jeśli bateria jest w pełni rozładowana (0% pojemności), normalne 7-8 godzinne ładowanie może być niewystarczające. Niezbędne jest ładowanie 8-godzinne.
-
Page 45: Ostrzeżenia I Uwagi
OSTRZEŻENIA I UWAGI Akumulator (bateria) zawiera substancje niebezpieczne. Nie wolno otwierać, demontować, niszczyć baterii. Nie wolno wbijać jakichkolwiek przedmiotów w baterię. Nie podłączaj ładowarki do hulajnogi na długi okres czasu (np. na noc) lub gdy nie będziesz mógł obserwować stanu naładowania przez długi okres czasu. - Page 46 PRZEWOŻENIE HULAJNOGI I BATERII Baterie litowe traktowane są jako materiały niebezpieczne. Proszę zapoznać się z lokalnie obowiązującym prawem w zakresie transportu baterii litowych i urządzeń z takimi bateriami. OGRANICZENIE PRĘDKOŚCI Maksymalna prędkość elektrycznej hulajnogi wynosi 20 km/h. Gdy użytkownik osiągnie prędkość maksymalną, hulajnoga będzie ją utrzymywać nawet przy dalszym naciskaniu manetki przyspieszenia.
-
Page 47: Bezpieczeństwo Użytkowania
BEZPIECZEŃSTWO UŻYTKOWANIA Przeczytaj uważnie instrukcję przed pierwszym użyciem elektrycznej hulajnogi. Zawsze stosuj kask, nakolanniki, ochraniacze łokci i nadgarstków. Hulajnoga jest przeznaczona do indywidualnej zabawy. Zabronione jest użycie jako środka transportu publicznego. Zabroniona jest jazda drogami publicznymi dla samochodów. Zabronione jest przewożenie rzeczy (obiektów w rękach, toreb, plecaków, itp.) w czasie zabawy na hulajnodze. Zwróć... - Page 48 NIE UŻYWAJ hulajnogi, gdy pogoda jest deszczowa lub wilgotna. Jedź z kontrolowaną i umiarkowaną prędkością na nierównych powierzchniach. Lekko ugnij kolana, aby amortyzować uderzenia w trudnym terenie. NIE WOLNO jeździć hulajnogą jezdni lub w obszarach Zawsze trzymaj się z dala od przeszkód. mieszkalnych, gdzie mogą...
- Page 49 Zwróć uwagę na drzwi i inne przeszkody na NIE WOLNO zabierać ze sobą innych osób (dzieci lub wysokości głowy. dorosłych). NIE wchodź na tylny błotnik. NIE zdejmuj rąk z kierownicy podczas jazdy.
- Page 50 NIE WOLNO wchodzić ani schodzić po schodach ani NIE przyspieszaj podczas zjazdu. przeskakiwać przeszkód na hulajnodze. NIE naciskaj przepustnicy gdy prowadzisz hulajnogę NIE WOLNO wieszać toreb lub innych ciężkich akcesoriów na kierownicy.
- Page 51 Zawsze trzymaj obie stopy na platformie. NIE skręcaj gwałtownie kierownicą podczas jazdy z dużą prędkością. NIE jedź przez kałuże. NIE dotykaj hamulca tarczowego.
-
Page 52: Regulacja Hamulca
PODSTAWOWE CZYNNOŚCI OBSŁUGI CODZIENNEJ Elektryczna hulajnoga wymaga rutynowego czyszczenia i konserwacji. Po pierwsze, upewnij się, że kabel ładowarki NIE jest podłączony. Po drugie, hulajnoga musi być wyłączona. Teraz można wytrzeć hulajnogę miękką ściereczką. Sprawdzaj okresowo dokręcenie wszystkich śrub i nakrętek. UWAGA Przed każym użyciem sprawdź... - Page 53 Regulacja drążka kierowniczego. Użyj klucza imbusowego, dokręć śrubę w pobliżu mechanizmu składania. Brak powietrza w oponie Jeśli z opony ujdzie powietrze, podłącz złączkę-przedłużkę (dostępna oddzielnie) łączącą do zaworu koła, aby je napompować. Najpierw zdejmij zaślepkę, a następnie dokręć złączkę. Teraz zacznij pompować koło.
-
Page 54: Specyfikacja Techniczna
OSTRZEŻENIE Jak każde urządzenie mechaniczne, hulajnoga i jej komponenty podlegają narażeniom mechanicznym i normalnemu zużyciu. Różne materiały i komponenty mogą różnie reagować na zużycie lub procesy zmęczenie. Pęknięcia, rysy i przebarwienia w obszarach narażonych na duże naprężenia wskazują, że komponent przekroczył swoją żywotność i należy go wymienić. -
Page 55: Serwis Techniczny
Moc silnika 350 W Zasięg maksymalny 35-40 km (uzależniony od masy kierowcy, warunków terenowych, prędkości jazdy, etc.) Kąt natarcia 10° Temperatura użytkowania 0-40°C Zasilanie AC 110V -240V (50 - 60HZ) Bateria 10400mAh Lithium rechargeable battery Moc baterii 380Wh Napięcie baterii Temp. - Page 56 POPRAWNA UTYLIZACJA PRODUKTU Zgodnie z Dyrektywą 2012/19/UE To oznaczenie umieszczone na produkcie, akcesoriach lub dokumentacji oznacza, że produktu i jego akcesoriów nie należy usuwać razem z innymi odpadami domowymi. Aby uniknąć szkodliwego wpływu na środowisko naturalne i zdrowie ludzi wskutek niekontrolowanego usuwania odpadów, prosimy oddzielić te przedmiotów od odpadów innego typu oraz o odpowiedzialny recykling w celu promowania ponownego użycia zasobów materialnych.
- Page 57 GWARANCJA 1) Dystrybutor niniejszego produktu gwarantuje prawidłowe działanie produktu w okresie 24 miesięcy od daty zakupu. Dla baterii okres gwarancji wynosi 6 miesięcy. Gwarancją objęte są jedynie produkty posiadające kartę gwarancyjną wraz z dowodem zakupu. Naprawy w okresie trwania gwarancji będą wykonywane bezpłatnie. Gdy naprawa będzie niemożliwa nastąpi wymiana produktu na nowy wolny od wad.
- Page 58 Nazwa sprzętu: ……………………………………………………………………… Model sprzętu: ……………………………………………………………………… Nr seryjny: …………………………………………………………………………….. Data sprzedaży: ……………………………………………………………………… Podpis: …………………………………………………………………………………… Pieczątka sklepu: …………………………………………………………………….
Need help?
Do you have a question about the RB-RTEN10 and is the answer not in the manual?
Questions and answers